I would use the simplest Intro. Suppose you are a mechanical engineer and you have plenty of knowledge of bike parts. But, instead of repairing and servicing yourself, you just give it to a service center to utilize your time. This is just a crude comparison. Let’s go in deep and technical.
Jump to Section
A Brief
Below, I explain the things that should be known before we dive deeper into the topic.
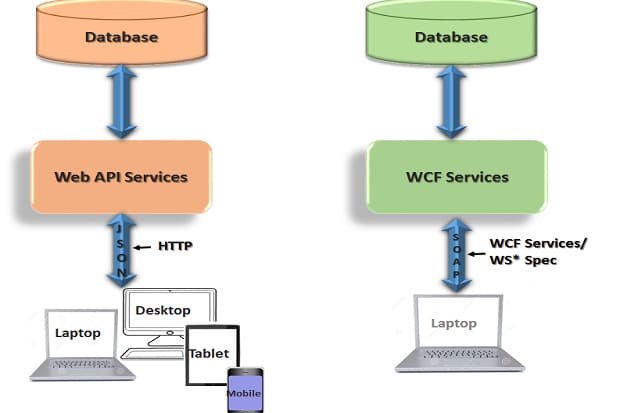
Web Service
- If we talk about web service, well, it is Completely Based on SOAP and returns data in XML form.
- It supports only HTTP protocol.
- This is not open source but can be consumed by any client that understands XML.
- It can be hosted only on IIS.
WCF (Windows Communication Foundation)
- Dependent on SOAP and returns data in XML form.
- WCF Follows many protocols like TCP, HTTP, HTTPS, Named Pipes, MSMQ.
- The main issue with WCF is its tedious and extensive configuration.
- WCF is not open source but can be consumed by any client that understands XML.
- It can be hosted within the application or on IIS or using window service.
WCF Rest
- Enable webHttpBindings to use WCF as WCF Rest service.
- [WebGet] and [WebInvoke] attributes are used for HTTP GET and POST verbs.
- For enabling other HTTP verbs, you will need to have some configuration in IIS to accept a request for that particular verb in .svc files.
- To pass the values through parameters using a WebGet establishes a configuration. There should be a specified UriTemplate.
- This support XML, JSON, and ATOM data format.
Web API
- The latest framework for creating HTTP services with ease and in a simple way.
- Web API is open source and a suggested platform for making REST-ful services using .NET.
- The stated uses the complete feature of HTTP (like URIs, request/response headers, caching, versioning, various content formats)
- Complete support of MVC features like routing, controller, action result, filter, model binder, dependency injection, unit testing so it makes it more simple and robust.
- This can be hosted within the application or on IIS.
- This is a lightweight architecture and good for devices that have limited bandwidth like smartphones.
- Responses are formatted by its MediaTypeFormatter into JSON, XML or you can add any format you want to as a MediaTypeFormatter.
What to Choose Between WCF and WEB API?
- Select WCF while creating a service to have a specific plan such as one-way messaging, message queues, duplex communication, etc.
- Then, select WCF when you want to build a service that uses fast transport channel (if available), like TCP, Named Pipes, or might be even UDP (in WCF 4.5), also support HTTP when all other transport channels are not available.
- Next, select Web API when you want to build a resource-oriented service over HTTP which can use the full feature of HTTP (as in URIs, request/response headers, caching, versioning, various content formats, etc).
- Lastly, select Web API when you want to expose your service to a broad range of clients including browsers, mobiles, iPhones, and tablets.
Example
I am giving you an example of CRUD in WCF.
Following things you will do:
- Step by step process of creating WCF service.
- Accessing WCF service.
- Use of Proxy class.
- How to get data from WCF.
- Step by step instructions to load grid view from SQL Server database using WCF service.
- Performing insert, edit, update and delete operation on grid view.
Using the Code
To insert data in the database using a WCF service, we will follow steps:
- Create a WCF service,
- Create a Web-based application.
Part 1: Create a WCF Service
Open Visual Studio 2010/2012.
1: Open Visual Studio -> Go to File menu -> New -> Project –> Select the new Empty Solution and give name WCFProject.

2: Then add a new Class Library Project and give it the name SaleClassLibrary.
3: Next, add a reference to System.ServiceModel and System.Runtime.Serialization into that project.
4: Then add a new Interface ISaleService.
using System;
using System.Collections.Generic;
using System.Linq;
using System.Runtime.Serialization;
using System.ServiceModel;
using System.ServiceModel.Web;
using System.Text;
using System.Collections.Generic;
using System.Runtime.Serialization;
using System.ServiceModel;
[ServiceContract]
interface ISaleService
{
[OperationContract]
bool InsertPurchaser(Purchaser obj);

[OperationContract]
List<Purchaser> GetAllPurchaser();

[OperationContract]
bool DeletePurchaser(int Cid);

[OperationContract]
bool UpdatePurchaser(Purchaser obj);
}

[DataContract]
public class Purchaser
{
[DataMember]
public int PurchaserID;
[DataMember]
public string PurchaserName;
[DataMember]
public string Address;
[DataMember]
public string EmailId;
}
5: And write the following code in the SaleService.cs file:
SaleService.cs page:
using System;
using System.Collections.Generic;
using System.Linq;
using System.Runtime.Serialization;
using System.ServiceModel;
using System.ServiceModel.Web;
using System.Text;
using System.Collections.Generic;
using System.Configuration;
using System.Data;
using System.Data.SqlClient;

public class SaleService : ISaleService
{
public bool InsertPurchaser(Purchaser obj)
{
cutomerList.Add(obj);
return true;
}

public List<Purchaser> GetAllPurchaser()
{
return cutomerList;
}

public bool DeletePurchaser(int Cid)
{
var item = cutomerList.First(x => x.PurchaserID == Cid);

cutomerList.Remove(item);
return true;
}

public bool UpdatePurchaser(Purchaser obj)
{
var list = cutomerList;
cutomerList.Where(p => p.PurchaserID ==
obj.PurchaserID).Update(p => p.PurchaserName = obj.PurchaserName);
return true;
}

public static List<Purchaser> purchaserList = new List<Purchaser>()
{
new Purchaser {PurchaserID = 1, PurchaserName="Sujeet",
Address="Pune", EmailId="[email protected]" },
new Purchaser {PurchaserID = 2, PurchaserName="Rahul",
Address="Pune", EmailId="[email protected]" },
new Purchaser {PurchaserID = 3, PurchaserName="Mayur",
Address="Pune", EmailId="[email protected]"}
};
}

public static class LinqUpdates
{
public static void Update<T>(this IEnumerable<T> source, Action<T> action)
{
foreach (var item in source)
action(item);
}
}
6: Build your Class library.
7: Add New Empty ASP.NET Project into that Solution, give the name SaleServiceHost.

8: Next, add a reference named ClassLibrary Project to that SaleServiceHost ASP.NET project.
9: Add a new item WCF Service in that SaleServiceHostASP.NET project and give the name SaleService.

10: Right-click on that SaleService.svc and select view Markup:

Change the Service Name from that markup:
<%@ ServiceHost Language="C#" Debug="true"

Service="SaleClassLibrary.SaleService"  %>
11: And build the solution and SaleServiceHost set as the startup project and SaleService.svc set as startup page.

In this way, your WCF service builds successfully.
Part 2: Create a Web-Based Application (Client)
Now, create your client application on your system:

<html xmlns="http://www.w3.org/1999/xhtml"> <head runat="server"> <title></title> </head> <body> <form id="form1" runat="server"> <h2> Welcome to Sale Service</h2><table class="style1"> <tr> <td style="text-align: right"> Enter name</td> <td> <asp:TextBox ID="TextBox1" runat="server"></asp:TextBox> </td> </tr> <tr> <td class="style2"> Address</td> <td> <asp:TextBox ID="TextBox2" runat="server"></asp:TextBox> </td> </tr> <tr> <td class="style2"> Email ID</td> <td> <asp:TextBox ID="TextBox3" runat="server"></asp:TextBox> </td> </tr> <tr> <td class="style2"> </td> <td> <asp:Button ID="Button1" runat="server" onclick="Button1_Click" Text="Save" /> </td> </tr> </table> <p> <asp:GridView ID="GridView1" runat="server" AllowPaging="True" DataKeyNames="PurchaserID,PurchaserName" AllowSorting="True" AutoGenerateDeleteButton="True" onrowdeleting="GridView1_RowDeleting"> </asp:GridView> </p> <p> <asp:Label ID="Label1" runat="server" Text="Label"></asp:Label> </form> </body> </html>
- Create a Website.
- Add Service Reference http://localhost:53544/SaleService.svc?wsdl to a Web Application.
- Select your Website.
- Right-click on it, add Service Reference, then enter your Service URL and click Go.
- Give the name for your service as SaleService -> OK.
- Then automatically a proxy will be created in your client system.
- Write the following code in your source code:
- Add your service reference at the top.
- Then create an object for Service Reference and use that object to call the methods from your service.
- Write the following code in your aspx.cs file.
using System;
using System.Collections.Generic;
using System.Linq;
using System.Web;
using System.Web.UI;
using System.Web.UI.WebControls;
using System.Collections.Generic;
using ServiceReference1;

public partial class _Default : System.Web.UI.Page
{
SaleService.SaleServiceClient proxy;
protected void Page_Load(object sender, EventArgs e)
{
if (!IsPostBack)
{
proxy = new SaleService.SaleServiceClient();
GridView1.DataSource = proxy.GetAllPurchaser();
GridView1.DataBind();
}
}

protected void Button1_Click(object sender, EventArgs e)
{
proxy = new SaleService.SaleServiceClient();
SaleService.Purchaser objcust =
new SaleService.Purchaser()
{
PurchaserID = 5,
PurchaserName = TextBox1.Text,
Address = TextBox2.Text,
EmailId = TextBox3.Text
};

proxy.InsertPurchaser(objcust);

GridView1.DataSource = proxy.GetAllPurchaser();
GridView1.DataBind();
Label1.Text = "Record Saved Successfully";
}

protected void GridView1_RowDeleting(object sender, GridViewDeleteEventArgs e)
{
int userid = Convert.ToInt32(GridView1.DataKeys
[e.RowIndex].Values["PurchaserID"].ToString());
proxy = new SaleService.SaleServiceClient();

bool check = proxy.DeletePurchaser(userid);
Label1.Text = "Record Deleted Successfully";
GridView1.DataSource = proxy.GetAllPurchaser();
GridView1.DataBind();
}
}
By utilizing this, you have effectively embedded information in the database and you have likewise demonstrated this in the grid view.

Happy Coding!!
I excel when it comes to making bespoke data dashboards and visualizations that users and clients absolutely love. Sharing about things I enjoy doing is my hobby, whether it's about a project, collaboration, feedback, or just simple how-to guides about visualization.
If you have something to ask or share, I'd love to hear from you!
- Business Intelligence Vs Data Analytics: What’s the Difference? - December 10, 2020
- Effective Ways Data Analytics Helps Improve Business Growth - July 28, 2020
- How the Automotive Industry is Benefitting From Web Scraping - July 23, 2020
Very Nice…… All the Best !!!