Hey guys, today we will be going to create a simple yet amazing camera application using one of the finest iOS libraries – the UIImagePickerController.
It will be going to help us in managing and controlling the functionality of our camera.
To help you understand the use of this library, we will create a dummy camera application which will work exactly the same as the normal camera feature provided by Apple in its all iOS devices.
This will consist of the main window in which, when the user clicks on the take a photo button, it will open the camera within the device to take a photo and later on will save it in your library to access it later.
Additionally, we will be going to add one more feature to select the image from the gallery and then show it into the UIImageView after the user makes a selection of the image.
So let’s jump directly into the development now!
Jump to Section
Step 1
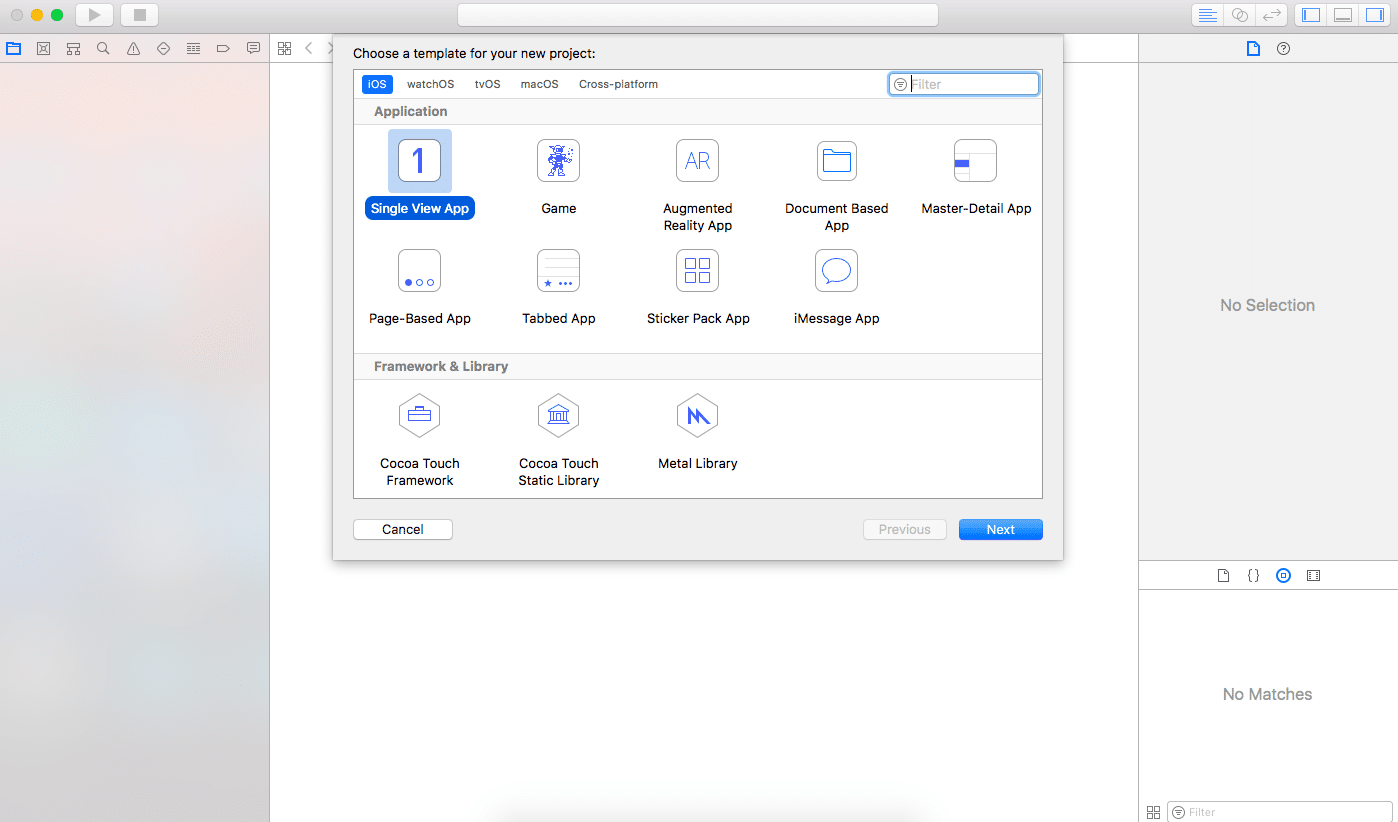
Select the template as a Single View Application.
Step 2
Name your application and hit next. In my case, I am going to name it as cameraapplication. You can choose your name according to your taste.
Step 3
Save your application to a particular location wherever you want.
Designing the User Interface
Below are the steps to design the user interface of the test application.
Step 1
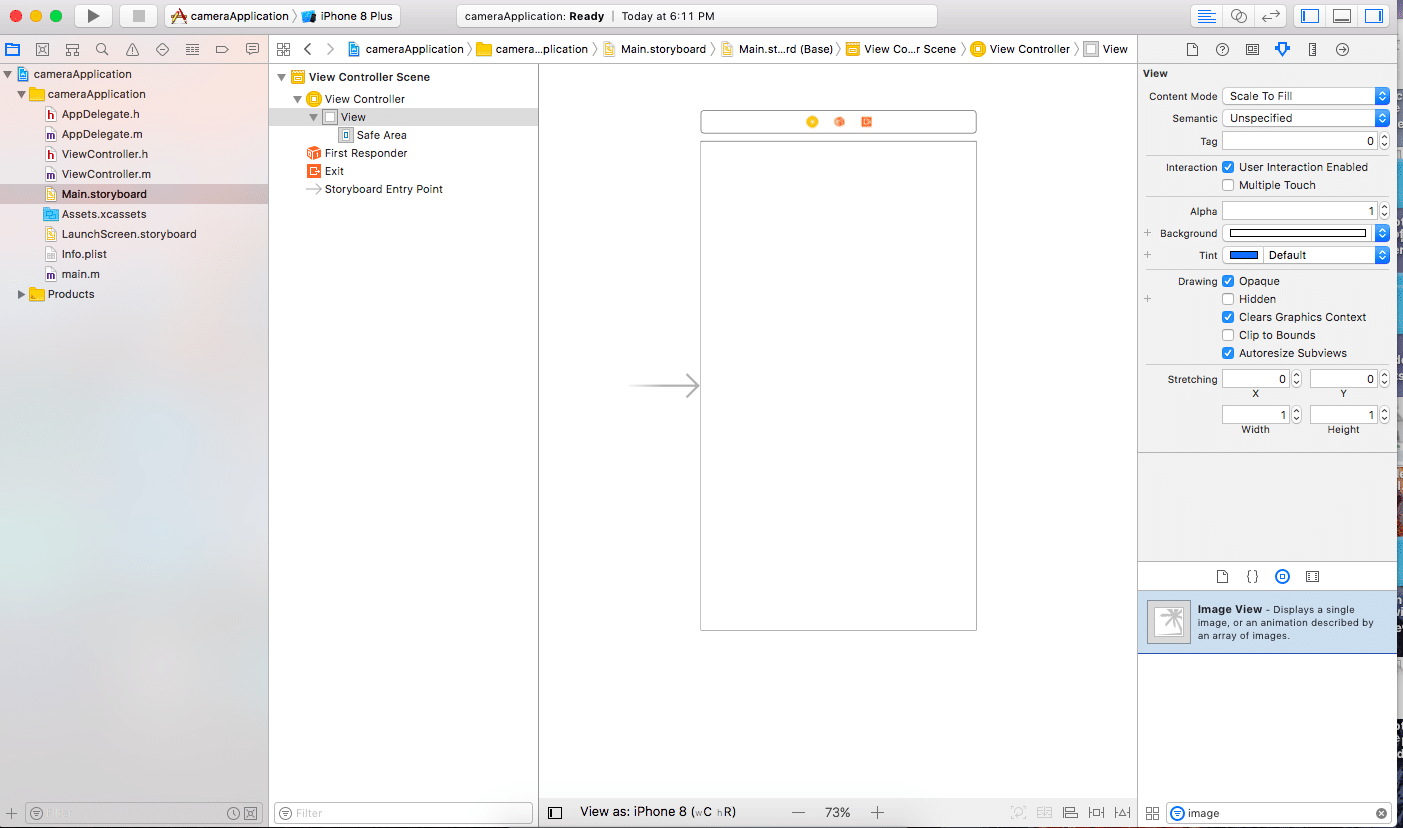
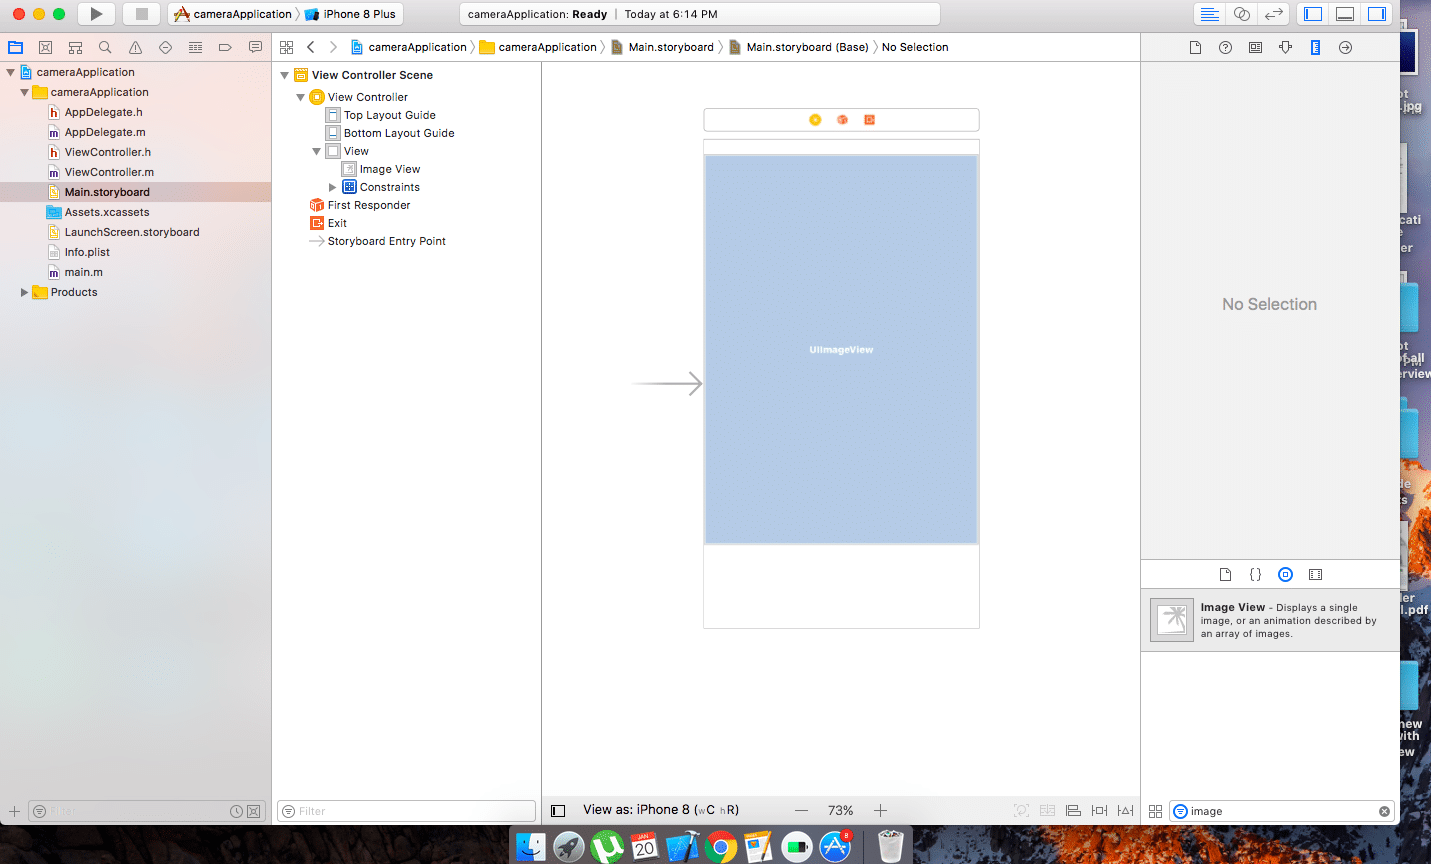
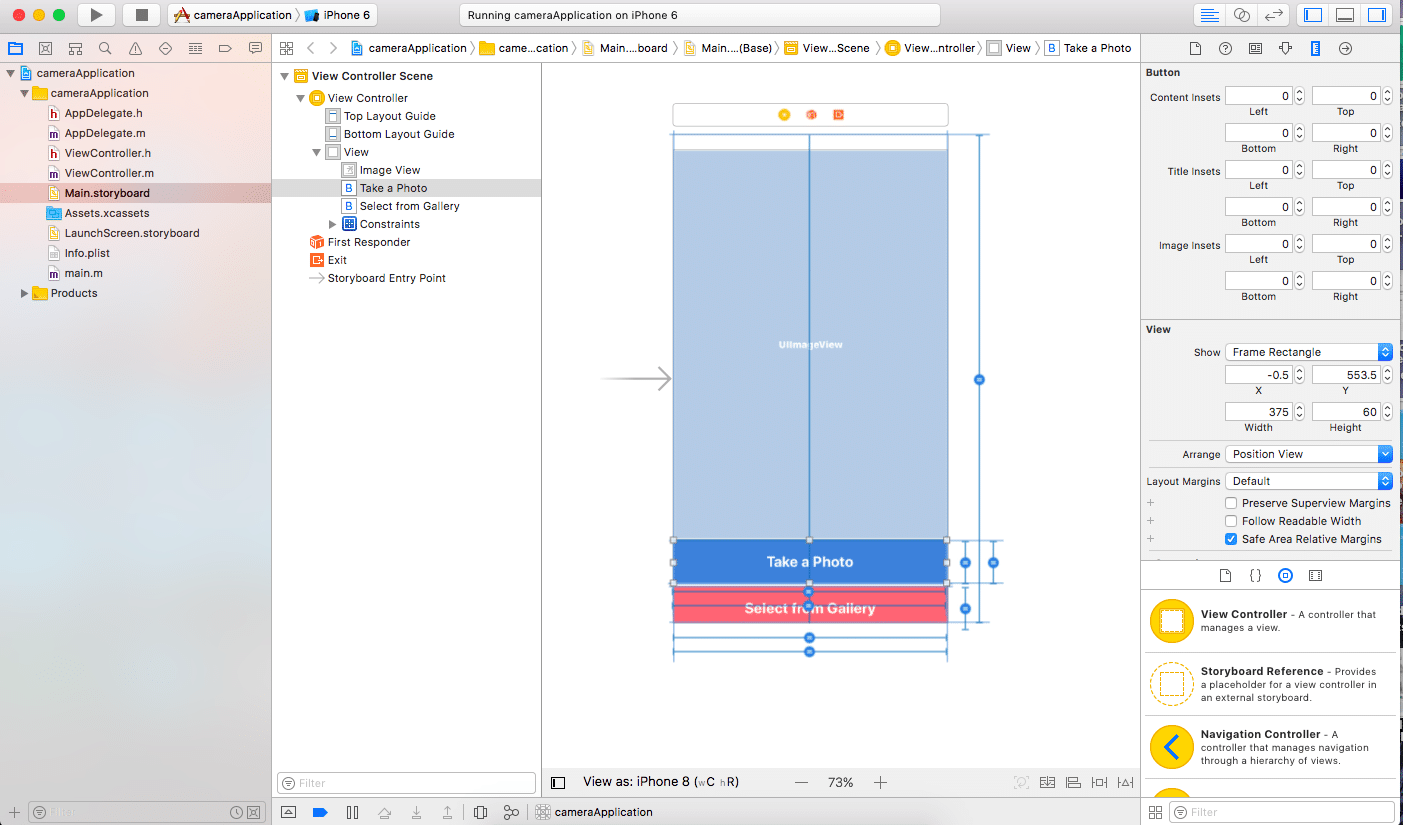
Go to Main.Storyboard and select the UIView and then select the UIImageView from the library on the right side. Now, drag and drop it into the view of the storyboard as shown in the image below.
Step 2
Here we need to add two buttons at the UIImageView so that we can use them further to add the functionality of taking the picture and selecting the picture from the gallery.
(Note: Always set the constraints first so that it will run on multiple devices and will become independent of the screen size.)
Step 2 A
Now drag and drop one button first and name it “Take a Picture”, so that we can use it to capture the image after turning on the camera.
Step 2 B
After you finish with the first button do the same step and this time name the second button as “Select from Gallery” as shown in the image below.
Step 3
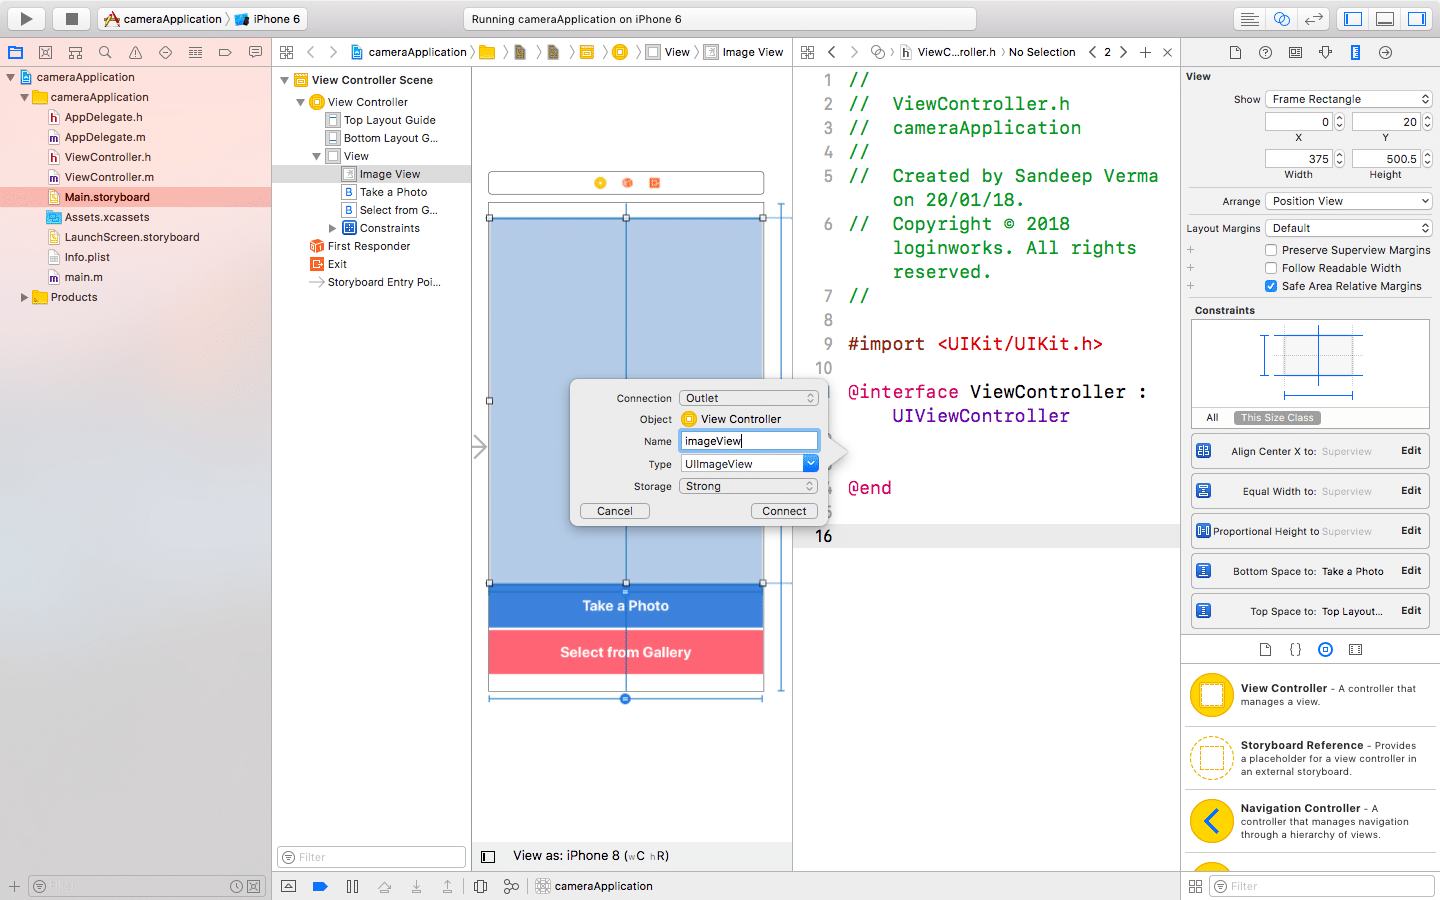
The next step is to create a connection with the button and view controller. To do this, drag and drop the image view into the view controller in the file first. Name it imageView and click connect as shown in the image below.
Step 4
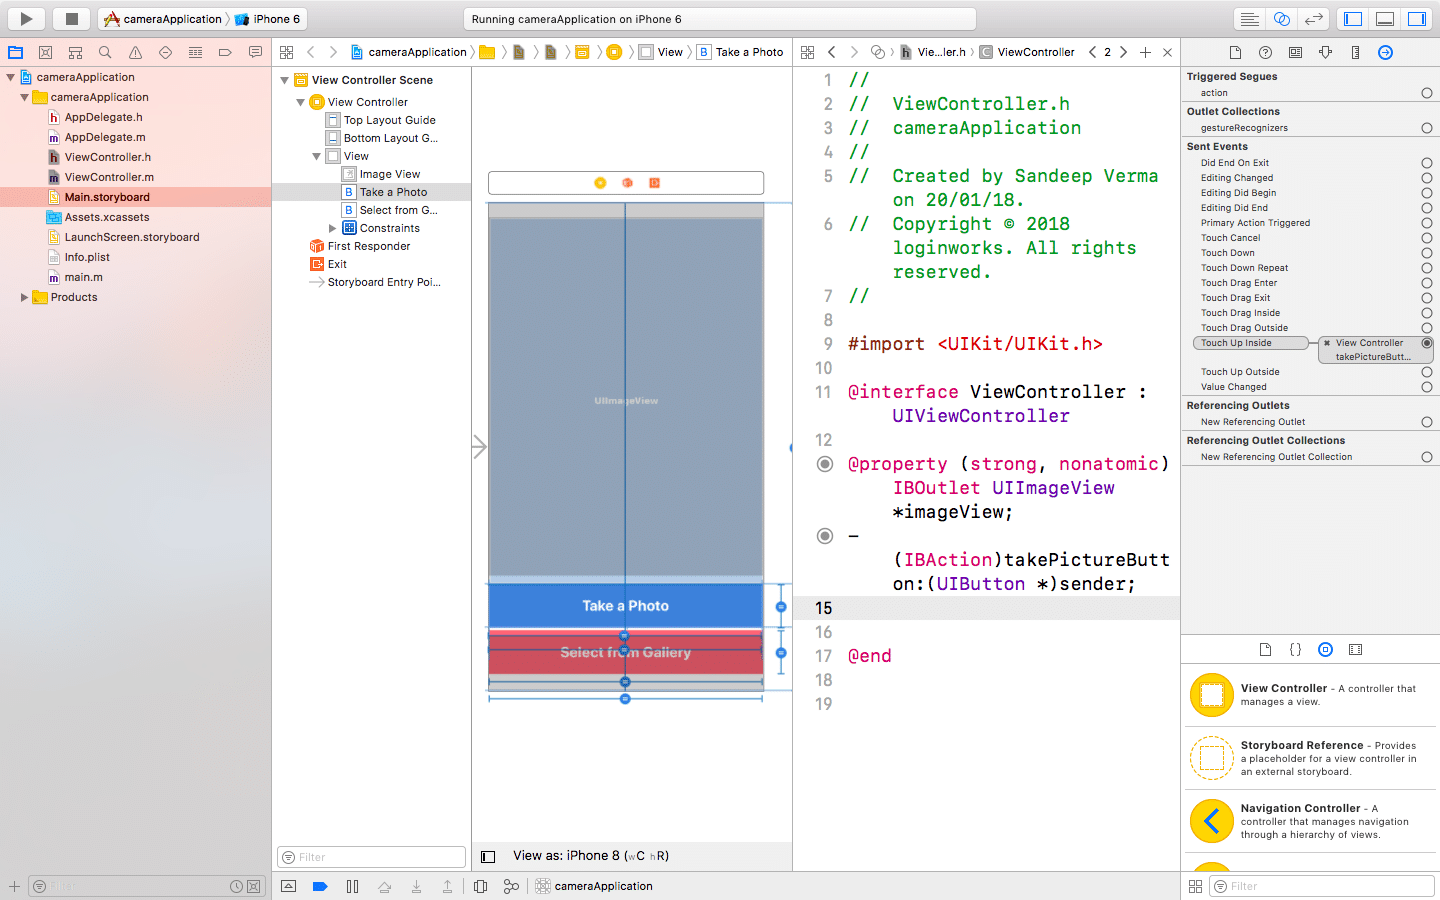
Do the same thing by selecting the buttons one at a time and drag n drop them into the view controller.
Please remember to select the action from the connection, because we want to use the button to perform a particular action.
Then name it as takePictureButton and click on connect as shown in the image below.
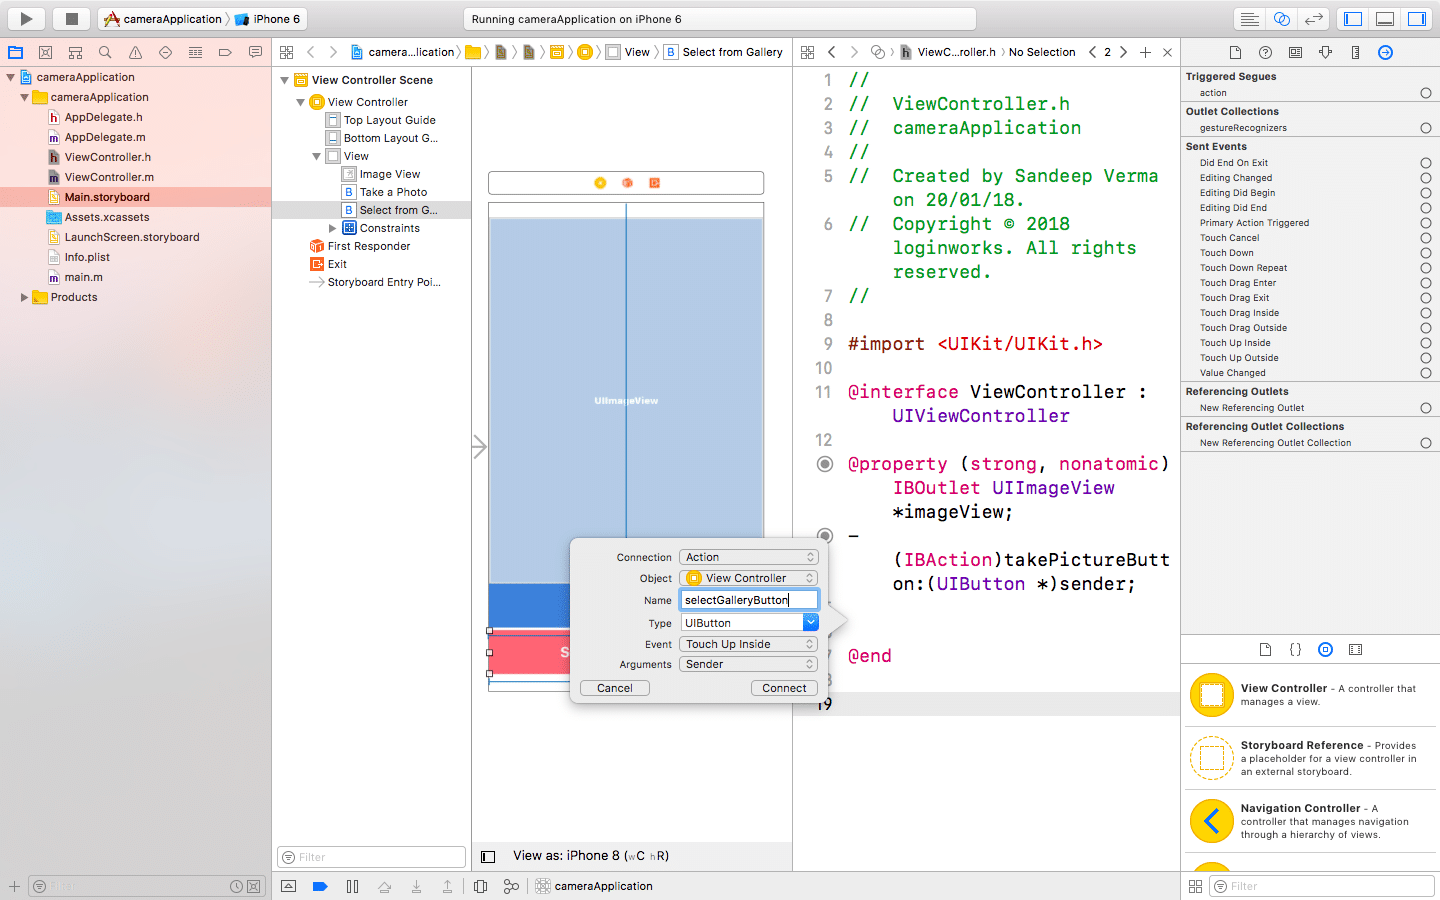
Now, select another button and drag n drop it into the view controller. Name it as selectGalleryButton and perform some action with it as shown below.
Implementation of the Coding Part
Now we are on the right path as we have created the design and already connected the buttons with the view controllers.
Finally, we can start the coding part to make the camera app work. So, let’s head into it now without wasting any time.
Step 1
Add these two delegate methods UIImagePickerControllerDelegate to get the camera popup.
Also, a UINavigationControllerDelegate method as we need to show the camera modally,
We need to use the navigation controller delegate as well.
You can see the code below and can compare it with your code.
@interface ViewController ()<UIImagePickerControllerDelegate, UINavigationControllerDelegate>
Step 2
Now, we need to specify what kind of picker we want to open when the user hits on a particular button. So, move to the “take a picture” button action and add the line of code into it as shown below.
- (IBAction)takePictureButton:(UIButton *)sender {

   UIImagePickerController *picker = [[UIImagePickerController alloc] init];

   picker.delegate = self;

   picker.allowsEditing = YES;

   picker.sourceType = UIImagePickerControllerSourceTypeCamera;


   [self presentViewController:picker animated:YES completion:NULL];

}
At this point, you must be wondering what is the meaning of picker.sourceType?
Let me tell you the meaning first. When you select the source type, then it says that the picker will be off-camera, because we want to access the camera of the device, not the gallery.
For the gallery, we have another type of source type which will be useful later on in the tutorial.
Step 3
Now go to another button action which is the “select from gallery” button and enter the line of code as shown below into it.
- (IBAction)selectGalleryButton:(UIButton *)sender {

   UIImagePickerController *picker = [[UIImagePickerController alloc] init];

   picker.delegate = self;

   picker.allowsEditing = YES;

   picker.sourceType = UIImagePickerControllerSourceTypePhotoLibrary;


   [self presentViewController:picker animated:YES completion:NULL];

}
As I told u before, we will be going to use another source which is UIImagePickerControllerSourceTypePhotoLibrary. It means that the picker will open the gallery instead of the camera to select the image from the gallery.
Step 4
So far, we have created the action of both the buttons.
Now, we need to catch the image that will be clicked by the user who needs to save it into the gallery,.
We will be using the predefined method which is didFinishPickingMediaWithInfo.
Here, it will get the image from the camera and will show it into the imageView which is above the two buttons (if you remember.)
I am adding each line of code below to make this tutorial as easy as possible:
- (void)imagePickerController:(UIImagePickerController *)picker didFinishPickingMediaWithInfo:(NSDictionary *)info {


   UIImage *chosenImage = info[UIImagePickerControllerEditedImage];

   self.imageView.image = chosenImage;


   [picker dismissViewControllerAnimated:YES completion:NULL];


}
Sometimes, it might happen for the user to tap on the cancel button and decide not to take the picture.
In that case, the app will call a method which is imagePickerControlerDidCancel. This will close the picker view when someone hits the cancel button.
- (void)imagePickerControllerDidCancel:(UIImagePickerController *)picker {

   [picker dismissViewControllerAnimated:YES completion:NULL];

}
Step 5
Now, if you think that you can test what we have so far on a simulator, then you are wrong. The simulator does not have a physical camera. If still, you do run it, then the application will crash. We need to handle this.
We will be using a line of code as shown below which will check whether the device has a physical camera in it or not. Add this line of code into your view did load method in the viewcontroller.m to save it from getting crashed.
Now, if you run it on the simulator, then it will show a message and will tell you the device has no camera.
if (![UIImagePickerController isSourceTypeAvailable:UIImagePickerControllerSourceTypeCamera]) {


       UIAlertController * alert = [UIAlertController

                                    alertControllerWithTitle:@"Alert!"

                                    message:@"Device has no Camera"

                                    preferredStyle:UIAlertControllerStyleAlert];


       //Add Buttons


       UIAlertAction* action = [UIAlertAction

                                   actionWithTitle:@"Okay"

                                   style:UIAlertActionStyleDefault

                                   handler:^(UIAlertAction * action) {

                                       //Handle your yes please button action here

                                   }];


       [alert addAction:action];

       [self presentViewController:alert animated:YES completion:nil];


   }
Step 6
This one is the last, yet a quite important step of the app. In order to access the user’s camera and gallery, we need their permission. In other words, you need to go to the info.plist file.
Now, this will be presented on the left side of the window below the LaunchScreen.storyboard and follow the steps as shown.
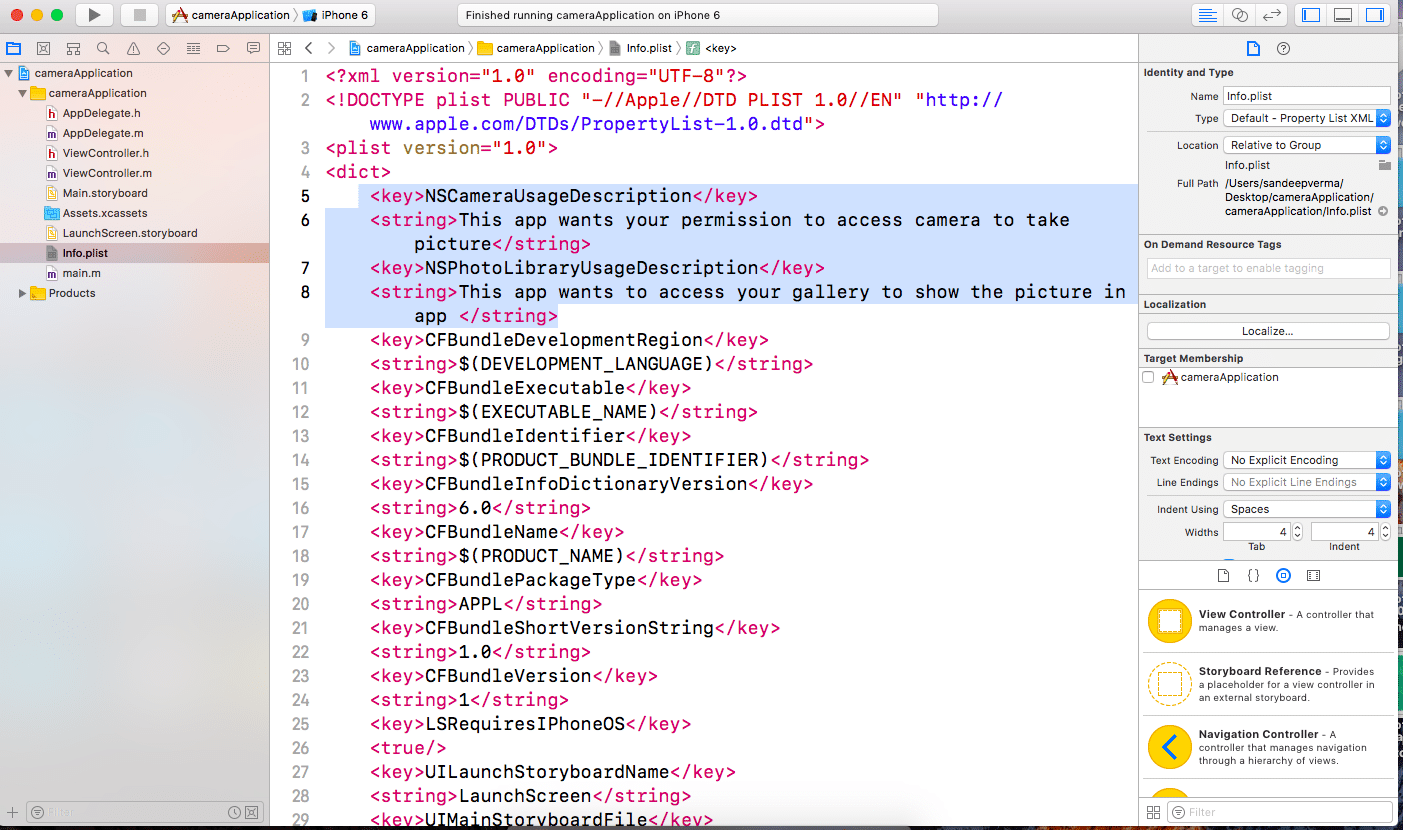
Double click on info.plist file → select open with source code → add the following code.
   <key>NSCameraUsageDescription</key>

   <string>This app wants your permission to access camera to take picture</string>

   <key>NSPhotoLibraryUsageDescription</key>

   <string>This app wants to access your gallery to show the picture in app </string>
You can change the string according to preference, as it will be shown to the user while asking for permission.
Time for Some Action
Finally, it’s time to run the application on a physical device. Just connect it to the physical device and run it to enjoy the processing.
Hope you enjoyed this tutorial. If you want any other tutorials like this, then let me know in the comments below!
- LinkedIn Scraper | LinkedIn Data Extractor Software Tool - February 22, 2021
- Is Web Scraping Legal? - February 15, 2021
- What Is Data Scraping? - February 10, 2021

