Hello guys, this tutorial will teach you the basics of how to build an Android app using the Android Studio development environment.
So, let’s get started.
As Android devices are becoming increasingly more common, it is eventually leading to the increased demand for the new apps. In the process of taking further steps towards this approach, the introduction of Android Studio was introduced!
Jump to Section
What Is Android Studio?
Android Studio is an easy to use (and free) development environment to learn on. It’s best if one has a working knowledge of Java programming. This knowledge can prove highly beneficial for understanding the functionality of Android.
I am sure this step-by-step tutorial is going to provide you with a better understanding and a bright future in mobile development.
Let’s get started.
Step 1: Install Android Studio
1.Go to http://developer.android.com/sdk/index.html to download Android Studio.
2.Use the installer to install Android Studio following the on-screen instructions.
Step 2: Open a New Project


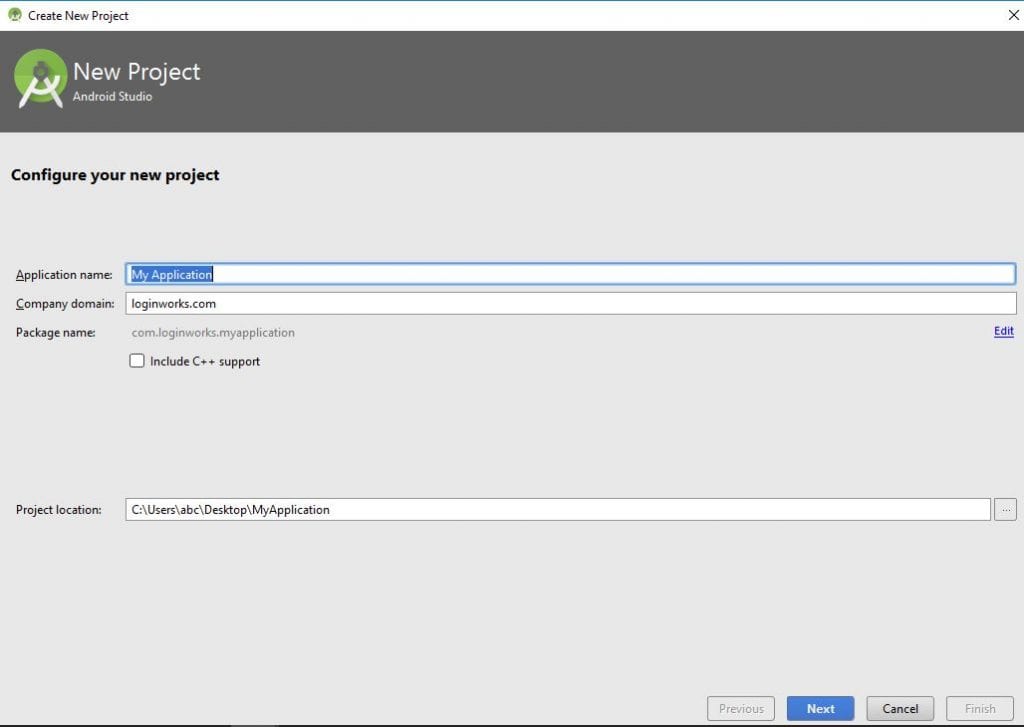
Also, there’s a mention of Open Android Studio in the above images. Let me throw a spotlight at the same. Here are the steps to proceed ahead with Open Android Studio:
- Select “Start a new Android Studio project under the “Quick Start” menu.”
- On the “Create New Project” window that opens, name your project “HelloWorld”.
- If you choose to, set the company name as desired*.
- Note where the project file location is and change it if desired.
- Click “Next.”
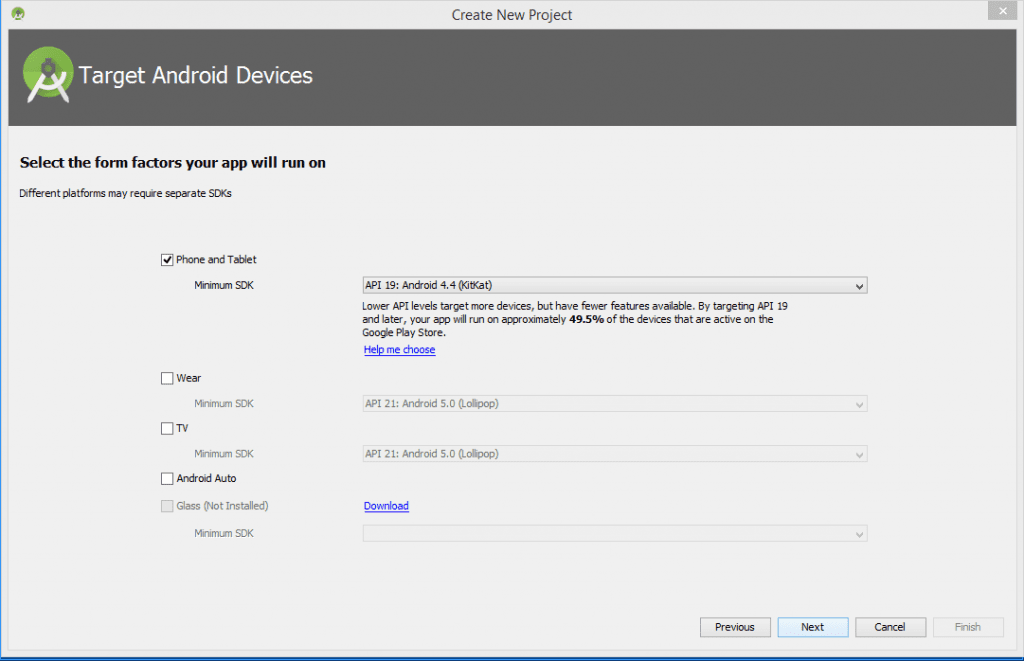
- Make sure that “Phone” is the only box that is checked.
- If you are planning to test the app on your phone, make sure the minimum SDK is below your phone’s operating system level.
- Click “Next.”
- Select “Blank Activity.”
- Click “Next.”
- Leave all of the Activity name fields as they are.
- Click “Finish.

Under this project module, there is a description of the following files:
Manifest.xml
This file contains information about your package, including components of the application such as activities, services, broadcast receivers, content providers, etc.
MainActivity
This is the main Java file, where you can define all the following functionality of java classes, objects, and methods.
activity main.xml
This is the main resource file, where you can define all the UI/widget elements by simply applying the drag and drop technique.
<RelativeLayout
xmlns:android="http://schemas.android.com/apk/res/android"
android:orientation="vertical"
android:layout_width="wrap_content"
android:layout_height="wrap_content">

<TextView
android:id="@+id/textView3"
android:layout_width="wrap_content"
android:layout_height="wrap_content"
android:text="Hello world!Welcome to my app!"

android:layout_alignginStart="97dp"
android:layout_marginTop="250dp" />


<Button
android:id="@+id/button2"
android:layout_width="wrap_content"
android:layout_height="wrap_content"
android:layout_alignStart="@+id/textView3"
android:layout_marginStart="48dp"
android:text="Button"
android:layout_marginTop="10dp"
android:layout_below="@id/textView3"/>
</RelativeLayout>
colors.xml
In this resource file, you can define any color code from the color material design and apply a gentle theme in your application.
<color name="colorPrimaryDark">#303F9F</color>
string.xml
A string resource provides text strings for your application with optional text styling and formatting. There are three types of resources that can provide your application with strings.
style.xml
A style resource defines the format and looks for a UI. A style can be applied to an individual view(from within a layout file) or to an entire Activity or application.
Step 3: Add a Button to the Main Activity


Now, navigate to the Design tab of the activity_main.xml display:
- In the Widgets menu to the left of the phone display, find Button (under the heading Palette).
- Click and just drag and drop the Button to be centered underneath your welcome message(TextView).
- Make sure your button is still selected.
- On the right side of the window, in the Properties menu scroll down to find the field for “text.”
- Change the android: text from “New Button” to “Next Page.”
Step 4: Create a Second Activity
At the top of the project’s file system tree, right-click on “app.”
- Under the app folder, go through New > Activity > Blank Activity.
- Change the name of this activity to “SecondActivity”.
- Click “Finish.”
- Check that you are in the Design view of activity_second.xml.
- Drag and drop the text box in the upper left of the phone display down to the center as you did on the Main Activity.
- Find the “id” field in the Properties menu on the right, and set it to “text2” in the TexView widget.
- Open strings.xml and add a new line under “Hello world! Welcome to my app!” that reads “Welcome to the second page!”.
- Navigate back to activity_second.xml.
Step 5: Write the Button’s “onClick” Method
Select the MainActivity.java tab along the top of the work environment:-
1. Create Button object under the onCreate method:
Button button;
button = (Button) findViewById(R.id.samplebutton);
button.setOnClickListener(new View.onClickListener()
{
@Override
public void onClick(View v) {
goToSecondActivity();
}
});
2. Define the following method at the bottom of the MainActivity class:
private void goToSecondActivity() {
Intent intent = new Intent(this, SecondActivity.class);
startActivity(intent);
}
3. Click the Alt+ enter to import at the third line of MainActivity.java to expand the import statements.
4. Add the following to the end of the import statements if they are not already there:
import android.content.Intent;
import android.view.View;
import android.widget.TextView;
Step 6: Test the Application

Click the green play symbol from the toolbar at the top of the Android Studio window:
You can run this app on a mobile device or in a default emulator.
For running this on a device, you need to enable USB debugging in the Developer options as follows:
1. Open the Settings app.
2. Scroll to the bottom and select About phone.
3. Scroll down and tap the Build number 7 times.
4. Return back and find Developer options near the bottom.
5. Open Developer options, and then scroll down to find and enable USB debugging.
6. Once the setting is finished, run the app and choose your android device.
For running on default emulator:
1. Select the “Launch emulator” option.
2. Click OK.
3. When the default emulator opens (this too could take a while), the app will automatically launch the app and opens the device.
4. Make sure that all of your text displays correctly and that the button takes you to the next page.
Step 7: Up, Up, and Away!
Output Description
Congrats! You have now completed your first Android application with some basic functionality.
Your finished app should have a page greeting the user and a button that takes the user to a second page.
Summing Up
From here, you have the cursory knowledge of Android and all you need to do is go and learn all about the following elements of Android application development.
- LinkedIn Scraper | LinkedIn Data Extractor Software Tool - February 22, 2021
- Is Web Scraping Legal? - February 15, 2021
- What Is Data Scraping? - February 10, 2021


Very Perfectly done!!….complete combo of nice explanation with detailing in the images
I need to design a app that will useful for farmers. could anyone please help me to create that app.