
The full meaning of SSIS is SQL Server Integration Services. This is used to do ETL operations where, ETL is Extract, Transform, and Load data. It helps us to answer complex business questions like copying or downloading files and keep updating data in our warehouse or data source sometimes used for cleaning and managing SQL Server objects and data.
Jump to Section
Minimum Requirements
- 64-Bit Windows XP or newer
- Microsoft SQL Server 2008 or newer
- 6 GB hard-disk space
- 4 GB RAM
- SQL Server Data Tool
Creation of first SSIS package
Following a step-by-step process can be followed for its further processing:
- After installation of SQL Data Tool, you will get a new option Integration Services Project in Visual Studio under Business Intelligence.
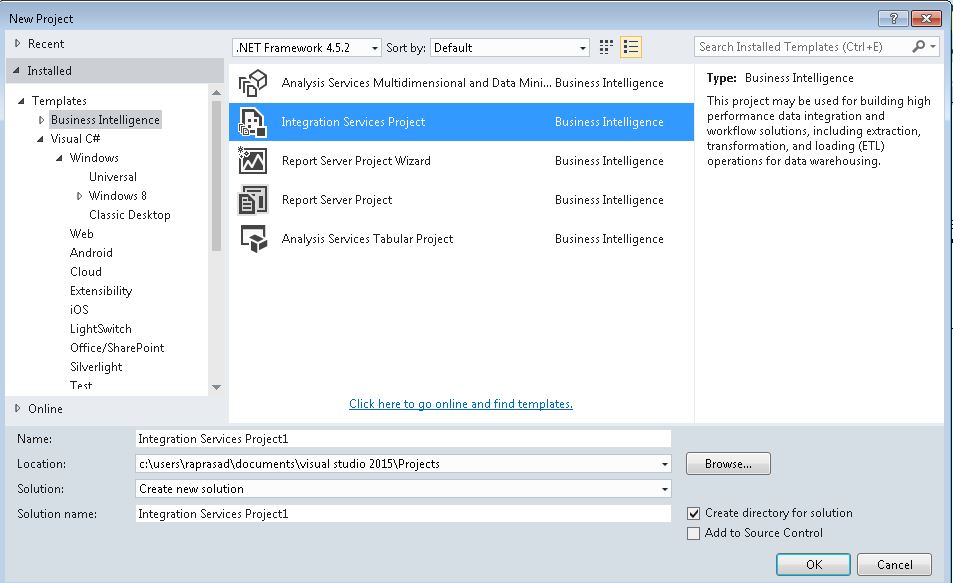
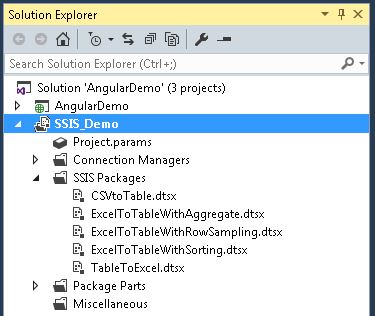
- After clicking on the OK button, a project with an empty package gets loaded and the solution explorer will be like the screenshot, which is on the left side. The project name is SSIS_DEMO and the default SSIS package name is package.dtsx
- There are five tabs in one package namely Control Flow, Data Flow, Parameters, Event Handlers, and Package Expression.

Step By Step Creation Of SSIS Package
- From the toolbox, drag and drop one SCRIPT TASK and DATA FLOW TASK under the control flow tab and rename if you want to.

SCRIPT TASK
In this, we use to write a script to manipulate data, show messages, check conditions, or do anything which you relate to do on the script.
On double click of script task, a popup box will appear with an option of edit script with suitable languages like C# and VB. Clicking on the edit script button will lead to another project and you have to write your code under main and save the file. Here’s a screenshot below:
public void Main()
{
   // TODO: Add your code here
      MessageBox.Show("All about to import data.");
      Dts.TaskResult = (int)ScriptResults.Success;
}
DATA FLOW TASK

Double-click on the data flow task will lead you to the Data Flow tab where actual data gets transferred from source to destination. In this sample package, we have to drag and drop one OLE DB Source (have to configure the connection from SQL) and Excel Destination in which the data of the database get to be exported to an Excel file with the help of this package. On source double click, you have to select a screenshot and table from which data needs to be exported. Since we are going to learn SSIS topic wise, here’s the following:
1. SSIS Package To Export Data From Flat File To Database Table
On right-clicking packages folder in solution explorer, select the option new package and rename that .dtsx file to “FlatFileToTable“. On the Control Flow tab, drag and drop, and in the Data Flow tab, “Flat File Source” and “OLE DB Destination“, but that flat file should be in comma-separated or pipe separated format. After that, create a flat-file connection, I’ll give that sample flat file below.
Step 1

Step 2

Data Conversion is a whole new topic which we will discuss after this topic. Now, you just have to double click on it and convert the data type of source column into that type in which the SQL server is ready to accept.

Our flat-file now contains 2 columns (ID & CountryName), and after linking both tools with each other by linking the blue arrow from source to destination, we are going to select one database table of the same types in our OLE DB source table (the name is Country) and map the column of the flat file/convert converted column from the left panel to the table’s column on the right panel.


After doing all these things, just run your SSIS package by right-clicking into a package in solution explorer and execute.

If you have any doubt, then check out my video of the creation of this SSIS package in the link below:
2. SSIS Package To Export Data From Database Table To Excel File
By right-clicking on the SSIS packages folder in solution explorer, select the option New SSIS Package. This will create a new package. Rename that .dtsx file to “TableToExcelFile.dtsx“.

On the Control Flow tab, drag and drop the Data Flow Task, and in the Data Flow tab, drag and drop OLE DB Source.
Create one connection under the connection manager folder for SQL DataSource by right click on the folder. After that, you have to choose the OLE DB type of connection string and click on the new button to provide SQL Server login credentials.


On double click of OLE DB Data Source, select the connection string and table from which you want to export data.
There’s one more connection string we have to create for the output excel file. For that, please follow the simple steps given below:
- Right-click on Connection Manager and select the new connection option.
- Choose Excel type of connection and click on Add button as per given image (SS No 1.)
- There’s one more dialog box popup in which you have to type the Excel file name and the version excel. (SS No 2)
- Click the OK button and link both components by dragging the blue arrow from the source component to the destination components.
SS No 1

SS No 2

After completion of the above steps, execute your package and you will see a green tick on both of the components indicating the package ran successfully.

As a result, here’s the output file which I have generated from the database table to the Excel file.

In case of any further doubt, check out the video of the creation of this SSIS package in the link below:
Data Conversion
Before learning more topics on SSIS, first of all, let’s check out what is data conversion in SSIS packages.
The Data Conversion component changes/transfer or convert the input column value into the desired datatype.
Example of Data Conversion in SISS Packages
In my first SSIS package, we export data from a flat file to a database table while using a Data Conversion component, changing the string value into Unicode DT_WSTR.
Basically, whenever we do change datatype, it will create a new output column to map on with prefix of “Copy of” like if we are changing FirstName column datatype then it will change into Copy of FristName
At the time of data conversion, there are some fields that need to be changed.
| SSIS Data Type | SSIS Expression | SQL Server |
| two-byte signed integer | (DT_I2) | smallint |
| four-byte signed integer | (DT_I4) | int |
| eight-byte signed integer | (DT_I8) | bigint |
| single-byte unsigned integer | (DT_UI1) | tinyint |
| float | (DT_R4) | real |
| double-precision float | (DT_R8) | float |
| string | (DT_STR, «length», «code_page») | char, varchar |
| Unicode text stream | (DT_WSTR, «length») | nchar, nvarchar, sql_variant, xml |
| date | (DT_DATE) | date |
| Boolean | (DT_BOOL) | bit |
| numeric | (DT_NUMERIC, «precision», «scale») | decimal, numeric |
| decimal | (DT_DECIMAL, «scale») | decimal |
| currency | (DT_CY) | smallmoney, money |
| unique identifier | (DT_GUID) | uniqueidentifier |
| byte stream | (DT_BYTES, «length») | binary, varbinary, timestamp |
| database date | (DT_DBDATE) | date |
| database time with precision | (DT_DBTIME2, «scale») | time(p) |
| database timestamp | (DT_DBTIMESTAMP) | datetime, smalldatetime |
| database timestamp with precision | (DT_DBTIMESTAMP2, «scale») | datetime2 |
| database timestamp with timezone | (DT_DBTIMESTAMPOFFSET, «scale») | datetimeoffset(p) |
| image | (DT_IMAGE) | image |
| text stream | (DT_TEXT, «code_page») | text |
| Unicode string | (DT_NTEXT) | ntext |
The Wrap-Up
In this post, I have tried providing a simple introduction to SSIS in the simplest form. Please feel free to comment on your queries below.
In my next post, I will explain the following topics:
- SQL Server Integration Services Variables,
- SQL Server Integration Services Expressions, and
- Table To Another Table Data Transfer.
I excel when it comes to making bespoke data dashboards and visualizations that users and clients absolutely love. Sharing about things I enjoy doing is my hobby, whether it's about a project, collaboration, feedback, or just simple how-to guides about visualization.
If you have something to ask or share, I'd love to hear from you!
- Business Intelligence Vs Data Analytics: What’s the Difference? - December 10, 2020
- Effective Ways Data Analytics Helps Improve Business Growth - July 28, 2020
- How the Automotive Industry is Benefitting From Web Scraping - July 23, 2020