Jump to Section
IsPostBack control event
Hello, readers here I come with another part of this series. In this article, we will continue for the same. IsPostBack control is a Page level control event property, it means either the page will be loaded completely with return-response to a client-side control postback, or if this is getting loaded and gets accessed for the same time.
You will face many conditions where this property event will be used. So, let’s understand with an example, assume the web form used to register every employee’s details. Let’s make a sample form view that we will use in the example. The form contains City, First & Last Name fields as follows.

You need to copy & paste the existing HTML code into a web form.
HTML Script
<table style=" font-family: Verdana">
<tr>
<td colspan = " 2 "> <b> Employee Details Form </b></td>
</tr>
<tr>
<td>First Name : </td>
<td> <asp: TextBox ID=" TextBox2" runat=" server "> </asp:TextBox> </td>
</tr>
<tr>
<td>Last Name : </td>
<td> <asp:TextBox ID =" TextBox3 " runat=" server "> </asp:TextBox> </td>
</tr>
<tr>
<td>City :</td>
<td>
<asp:DropDownList ID = " ddlCity " runat=" server ">
</asp:DropDownList>
</td>
</tr>
<tr>
<td></td>
<td>
<asp:Button ID= " Button1" runat=" server " onclick=" Button1_Click "
Text=" Register Employee "/>
</td>
</tr>
</table>
For now, you need to copy & Paste the above code in the web form as follows.
ASP Code Script
protected void Page_Load.(object sender, EventArge s)
{
LoadCityDropDownList();
}
public void LoadCityDropDownList()
{
ListItem li1 =new ListItem (" America" );
ddlCity.Items.Add(li1);

ListItem li2 =new ListItem(" Mumbai" );
ddlCity.Items.Add(li2);

ListItem li3 =new ListItem (" Sydney" );
ddlCity.Items.Add(li3);
}
protected void Button1_Click1(object sender, EventArge s)
{
}
Now execute the application.
First of all, just have a look at the City DropDownList. The cities, (America, Mumbai, and Sydney) will show as expected. Remember, the city names contained duplicated in the DropDownList. So, every time when you press the button, the city will be added again to the DropDownList.
So, let’s quickly understand the cause of this duplication. As you know all .NET control server retains their state across postback event. These control events make use of ViewState session. So, when the web form load then the cities get correctly added to the DropDownList and sent to the client in response.
Furthermore, when the client press the control button, and the web form page which posted back to the database server for processing. While the Page initialization, ViewState gets restored. At this point of the moment, all city names get fetched from the ViewState and that again will be added to the DropDownList control. The page_load event happens later in the control life cycle a web form page. While the page loading, we will have to add again another set of cities. But the question comes here, how to solve the DropDownList items duplication.
There are many ways to solve this duplication. The best way to get this situation is IsPostBack property event. So, in the Page_Load, it calls LoadCityDropDownList() method function, if the request does not relate to postback request.
Code Script
protected void Page_Load1(object sender, EventArge s)
{
if ( !IsPostBack)
{
LoadCityDropDownList();
}
}
There is one more way to solve this condition, which you need to simply disable the ViewState of the DropDownlist control. To disable the ViewState, just click on the DropDownList control, and put the status as ‘False’ in the EnableViewState property. Now execute your project, and the cities duplication issue would no longer exist.
But the problem with this situation is that the DropDownList list does not remember your selection criteria across postback event. Then select “Mumbai” as the name city, and submit the form. When the page gets loaded, an observer that selection is set to “America”. Again if you disable the ViewState that means DropDownList property may work correctly or not.
As a result, clear all of the DropDownList items but remember to call LoadCityDropDownList() method function before clearing the drop-down list items and the code as follows.
protected void Page_Load1(object sender, EventArge s)
{
ddlCity .Items.Clear ();
LoadCityDropDownList ();
}
So, we will discuss another control events like as Menu control.
Menu Control in ASP.NET
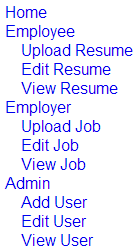
As the name itself, Menu control displays a menu in the .NET application screen window. The content can be specified straight in the control. It works with binding, it is a very important factor in menu control which we will learn later in brief in the menu control. So, let’s declare the content in the control. Menu control is a short collection of MenuItem objects. To achieve a menu as shown in the below.

we would configure the menu control as follows.
<asp:Menu ID=" Menu1 " runat =" server">
<Items>
<asp:MenuItem NavigateUrl=" ~/Home.aspx " Text = " Home " Value= "Home ">
</asp:MenuItem>
<asp:MenuItem NavigateUrl= "~/ Employee.aspx " Text = " Employee" Value =" Employee">
<asp:MenuItem NavigateUrl= " ~/ UploadResume.aspx " Text = " Upload Resume" Value =" Upload Resume">
</asp:MenuItem>
<asp:MenuItem NavigateUrl= " ~/ EditResume.aspx " Text = " Edit Resume" Value =" Edit Resume">
</asp:MenuItem>
<asp:MenuItem NavigateUrl= " ~/ ViewResume.aspx " Text = " View Resume" Value =" View Resume">
</asp:MenuItem>
</asp:MenuItem>
<asp:MenuItem NavigateUrl= " ~/ Employer.aspx " Text = " Employer" Value =" Employer">
<asp:MenuItem NavigateUrl= " ~/ UploadJob.aspx " Text = " Upload Job" Value =" Upload Job">
</asp:MenuItem>
<asp:MenuItem NavigateUrl= " ~/ EditJob.aspx " Text = " Edit Job" Value =" Edit Job">
</asp:MenuItem>
<asp:MenuItem NavigateUrl= " ~/ ViewJob.aspx " Text = " View Job" Value =" View Job">
</asp:MenuItem>
</asp:MenuItem>
<asp:MenuItem NavigateUrl= " ~/ Admin.aspx " Text = " Admin" Value =" Admin">
<asp:MenuItem NavigateUrl= " ~/ AddUser.aspx " Text = " Add User" Value =" Add User">
</asp:MenuItem>
<asp:MenuItem NavigateUrl= " ~/ EditUser.aspx " Text = " Edit User" Value =" Edit User">
</asp:MenuItem>
<asp:MenuItem NavigateUrl= " ~/ ViewUser.aspx " Text = " View User" Value =" View User">
</asp:MenuItem>
</asp:MenuItem>
</Items>
</asp:Menu>
By default, the menu control will display with the help of vertical orientation. If you want to change its significance (vertical to horizontal), then you need to use Orientation property.
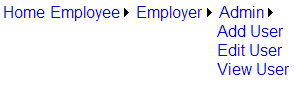
<asp:Menu ID="Menu1 " runat=" server" Orientation =" Horizontal ">
Here, StaticDisplayLevels property contains 1 by default which means only the first level will be displayed. If you want another 2 levels to get statically displayed, you will have to set 2 for this property.
<asp:Menu ID= " Menu1 " runat= " server" StaticDisplayLevels= "3">
Use the DisappearAfter property that contains in milliseconds. If you further want the menu to disappear just after 3 seconds, then you need to set it to 2009 milliseconds as follows.
<asp:Menu ID= " Menu1 " runat =" server" DisappearAfter = "2009">
Using styles with asp.net menu control
For now, I have discussed what is menu control. In this session, I would like to introduce menu control by using styles in ASP.NET. To measure styles for the displayed statically menu control portion, then use these styles as follows.
- StaticMenuStyle – This style is only applicable to the statically displayed entire menu control portion.
- StaticMenuItemStyle – This style is applicable to the individual menu control items displayed statically in the menu control portion.
- StaticSelectedStyle – This style is only applicable to the selected menu items displayed statically in the menu control portion.
- StaticHoverStyle – This style is only applicable to the displayed statically menu item over which mouse hovers over in menu control.
Now, if you want to configure styles for the displayed dynamically items in the menu control portion, then you have to use these dynamic controls as follows
- DynamicMenuStyle – This style is only applicable to the entire portion of dynamic items.
- DynamicMenuItemStyle – This style is applicable to the individual menu control items that dynamically displayed in the portion of the menu.
- DynamicSelectedStyle – This style is only applicable to the selected menu item that dynamically displayed in the portion of the menu control.
- DynamicHoverStyle – This style is only applicable to the displayed dynamically menu item over which mouse hovers over in menu control.
Now configure styles in the level of a menu as follows
LevelMenuItemStyles
If the menu control contains 2 levels of styles, then you will have the HTML code. A menulevel1 class object will be applicable for menu items at style level 1. Also, the MenuLevel2 class object will be applicable to menu items at style level 2 as follows.
<LevelMenuItemStyles>
 <asp: MenuItemStyle CssClass =" MenuLevel1" />
 <asp: MenuItemStyle CssClass ="MenuLevel2 " />
</LevelMenuItemStyles>
LevelSelectedStyles
If the menu control contains 2 levels of styles, then you can take the HTML code. The yellow color would be applicable to the selected menu item at style level 1. Maroon color will be applicable to the menu item selected at style level 2 as follows.
<LevelSelectedStyles>
 <asp:MenuItemStyle ForeColor = "Red" />
 <asp:MenuItemStyle ForeColor =" Blue" />
</LevelSelectedStyles>
Consequently, For all three styles like LevelSelectedStyles, StaticSelectedStyle, and DynamicSelectedStyle, these three styles will help in making the design good, then you need the following code in Page_Load object class of the master page as follows.
protected void Page_Load1(object sender, EventArge s)
{
 foreach ( MenuItem items in Menu1.Items)
 {
 Check(items);
 }
}

private void Check(MenuItem items)
{
 if (items.NavigateUrl. Equal( Request .AppRelativeCurentExecutionFilePath, StrngComparison. InvariantCulturIgnorCase )
)
 {
 items.Selected =true;
 }
 else if (items.ChildItems.Count> 0)
 {
 foreach ( MenuItem in items.ChildItems)
 {
 Check(menuItem);
 }
 }
}
Now use the HTML code of the menu control.
<asp:Menu ID=" Menu1 " runat =" server " >
 <LevelMenuItemStyles>
 <asp:MenuItemStyle CssClass = " MenuLevel2" />
 <asp:MenuItemStyle CssClass= "MenuLevel3" />
 </LevelMenuItemStyles>
 <LevelSelectedStyles>
 <asp:MenuItemStyle ForeColor="Red” />
 <asp:MenuItemStyle ForeColor="Blue" />
 </LevelSelectedStyles>
 <%--<StaticSelectedStyle ForeColor="Yellow" />
 <DynamicSelectedStyle ForeColor="Yellow" /> --%>
 <Items>
 <asp:MenuItem NavigateUrl = " ~/ Home.aspx" Text = " Text = " Home" Value = " Home" >
 </asp:MenuItem>
 <asp:MenuItem NavigateUrl = " ~/ Employee.aspx" Text = " Employee" Value = " Employee" >
 <asp:MenuItem NavigateUrl = " ~/ UploadResume.aspx" Text = " Upload Resume" Value = " Upload Resume" >
 </asp:MenuItem>
 <asp:MenuItem NavigateUrl = " ~/ EditResume.aspx" Text = " Edit Resume" Value = " Edit Resume" >
 </asp:MenuItem>
 <asp:MenuItem NavigateUrl = " ~/ ViewResume.aspx" Text = " View Resume" Value = " View Resume" >
 </asp:MenuItem>
 </asp:MenuItem>
 <asp:MenuItem NavigateUrl = " ~/ Employer.aspx" Text = " Employer" Value = " Employer" >
 <asp:MenuItem NavigateUrl = " ~/ UploadJob.aspx" Text = " Upload Job" Value = " Upload Job" >
 </asp:MenuItem>
 <asp:MenuItem NavigateUrl = " ~/ EditJob.aspx" Text = " Edit Job" Value = " Edit Job" >
 </asp:MenuItem>
 <asp:MenuItem NavigateUrl = " ~/ ViewJob.aspx" Text = " View Job" Value = " View Job" >
 </asp:MenuItem>
 </asp:MenuItem>
 <asp:MenuItem NavigateUrl = " ~/ Admin.aspx" Text = " Admin" Value = " Admin" >
 <asp:MenuItem NavigateUrl = " ~/ AddUser.aspx" Text = " Add User" Value = " Add User" >
 </asp:MenuItem>
 <asp:MenuItem NavigateUrl = " ~/ EditUser.aspx" Text = " Edit User" Value = " Edit User" >
 </asp:MenuItem>
 <asp:MenuItem NavigateUrl = " ~/ ViewUser.aspx" Text = " View User" Value = " View User" >
 </asp:MenuItem>
 </asp:MenuItem>
 </Items>
 </asp:Menu>
Now, run these following code and get the result.
Bind menu control to an XML file using xmldatasource control
In this session, I will tell you about binding menu control using an XML file with xmldatasource. There are some important checkpoints in binding menu control which you need to follow.
Step 1. First of all, add an XML file and give a meaningful name for it as like MenuData.xml. Then, copy & paste the existing XML code as follows.
<?xml version = " 1.1" encoding = " utf -8" ?>
 <Items>
 <MenuItem NavigateUrl = " ~/ Home.aspx" Text= " Home"/ >
 <MenuItem NavigateUrl = " ~/ Employee.aspx" Text = " Employee ">
 <MenuItem NavigateUrl = " ~/ UploadResume.aspx" Text = " Upload Resume"/ >
 <MenuItem NavigateUrl = " ~/ EditResume.aspx" Text = " Edit Resume"/ >
 <MenuItem NavigateUrl = " ~/ ViewResume.aspx" Text = " View Resume"/ >
 </MenuItem>
 <MenuItem NavigateUrl = " ~/ Employer.aspx" Text = " Employer ">
 <MenuItem NavigateUrl = " ~/ UploadJob.aspx" Text = " Upload Job"/ >
 <MenuItem NavigateUrl = " ~/ EditJob.aspx" Text = " Edit Job"/ >
 <MenuItem NavigateUrl = " ~/ ViewJob.aspx" Text = " View Job"/ >
 </MenuItem>
 <MenuItem NavigateUrl = " ~/ Admin.aspx" Text = " Admin ">
 <MenuItem NavigateUrl = " ~/ AddUser.aspx" Text = " Add User"/ >
 <MenuItem NavigateUrl = " ~/ EditUser.aspx" Text = " Edit User"/ >
 <MenuItem NavigateUrl = " ~/ ViewUser.aspx" Text = " View User"/ >
 </MenuItem>
 </Items>
Step 2. Now, just drag & drop your XmlDataSource control on the web form, then Set X_Path and DataFile attribute as below. Note that DataFile attribute always points to the XML source file that we added in Step 1.
<asp:XmlDataSource ID = " XmlDataSource1" runat = " server"
XPath = " /Items/MenuItem" DataFile = " ~/ MenuData.xml ">
</asp:XmlDataSource>
Step 3. Here, you need to do it again drag & drop a menu bar control and set DataSourceID attribute points to the XML data source control that we have created in Step 2. Also, set DataBindings as follows.
<asp:Menu ID =" Menu1 " runat="server" DataSourceID="XmlDataSource1"
 OnPreRender= " Menu1_PreRender">
 <DataBindings>
 <asp:MenuItemBinding DataMember=" MenuItem"
 NavigateUrlField="NavigateUrl " TextField="Text " />
 </DataBindings>
</asp:Menu>
Step 4. In the end, to set the styles for the menu control items, you need to copy & paste the existing code into the code-behind file as follows.
private void Check(MenuItem items)
{
 if (item.NavigateUrl.Equal(Request. AppRelativCurrentExecutonFilePath,
 StringComparison.InvariantCultureIgnoreCase))
 {
 items.Selected = true;
 }
 else if (items.ChildItems.Count> 0)
 {
 foreach (MenuItem menuItem in items.ChildItems)
 {
 Check(menuItem);
 }
 }
}

protected void Menu_PreRende (object sender, EventArge s)
{
 foreach (MenuItem items in Menu1.Items)
 {
 Check(item);
 }
}
Bind menu control to the database table
In this session, I will tell you about the binding menu control with the database table. For this reason, we will need some SQL tables. There are certain steps to achieve the result as follows.
Step 1. First of all, create the required database tables by using the script as follows. We will create a demo table as tblMenuItemsLevelA.
Table Script 1
Create Table tblMenuItemsLevelA

(

ID int identity(primary key),

MenuText varchar(60),

NavigateURL varchar(60)

)
Insert into tblMenuItemsLevelA values('Home ' ,' ~/Home.aspx')

Insert into tblMenuItemsLevelA values('Employee' , '~ /Employee.aspx')

Insert into tblMenuItemsLevelA values('Employer' , '~ /Employer.aspx')

Insert into tblMenuItemsLevelA values('Admin' , '~/Admin.aspx')
For this reason, we have our first table, now we need to create another table as tblMenuItemsLevelB. In this table, we need to get access to the primary key to making the column constant (Not Null) and foreign key takes the reference to the primary key in the database as follows.
Table script 2
Create Table tblMenuItemsLevelB

 (

 ID int identity (primary key),

 MenuText varchar(60),

 NavigateURL varchar(60),

 ParentId int foreign key references tblMenuItemsLevelA(ID)

 )

 Insert into tblMenuItemsLevelB values ('Upload Resume ' , '~ /UploadResume.aspx',2)

 Insert into tblMenuItemsLevelb values ('Edit Resume ' , '~ /EditResume.aspx',2)

 Insert into tblMenuItemsLevelB values ('View Resume ' , '~ /ViewResume.aspx',2)

 Insert into tblMenuItemsLevelB values ('Upload Job ' , '~ /UploadJob.aspx',3)

 Insert into tblMenuItemsLevelB values ('Edit Job ' , '~ /EditJob.aspx',3)

 Insert into tblMenuItemsLevelB values ('View Job ' , '~ /ViewJob.aspx',3)

 Insert into tblMenuItemsLevelB values ('Add User ' , '~ /AddUser.aspx',4)

 Insert into tblMenuItemsLevelB values ('Edit User ' , '~ /EditUser.aspx',4)

 Insert into tblMenuItemsLevelB values ('View User ' , '~ /ViewUser.aspx',4)
2. So, we have our both the tables, now we create an SP “stored procedure” that returns data records from both the tables as follows
Create Proc spGetMenuData

as

Begin

Select * from tblMenuItemsLevelA

Select * from tblMenuItemsLevelB

End
3. Here, you need to drag & drop a menu control on the web form page.
<asp:Menu ID="Menu1 " runat =" server ">

</asp:Menu>
4. Now, copy and paste the existing asp.net code in the behind code file.
protected void Page_Load1 (object sender, EventArge s)

{

GetMenuItems();

}

private void GetMenuItems()

{

string cs =ConfigurationManagr.ConnectionStrings [" DBCS"].ConnectionString;

SqlConnection conn = new SqlConnection1(cs);

SqlDataAdaptr da = new SqlDataAdaptr(" spGetMenuData", conn);

dA.SelectCommands.CommandType =CommandType.StoredProcedures

DataSet ds1 =new DataSet1();

da.Fill(ds1);

ds1.Relations.Add1("Child Rows", ds1.Tables[0].Columns [" ID"], ds1.Tables[1].Columns [" ParentId"]);

foreach (Data Row level1DataRow in ds1.Tables[0].Rows)

{

MenuItem items= new MenuItem1();

item.Text = level1DataRow [" MenuText"].ToString();

item.NavigateUrl = level1DataRow [" NavigateURL"].ToString();

DataRow[] level2.DataRows = level1.DataRow.GetChildRows(" ChildRows" );

foreach (Data Row level2DataRow in level2DataRow)

{

MenuItem childItem=new MenuItems();

childItem.Text = level2DataRow [" MenuText"].ToString();

childItem.NavigateUrl= level2DataRow [" NavigateURL" ].ToString( );

item.ChildItems.Add(childItems);

}

Menu2.Item.Add(item);

}

}
Note: Please use the following namespaces for declarations like
using System.Data;

using System.Data.SqlClient;

using System.Configuration;
Therefore, if you want the menu control to apply selected menu item, then include OnPreRender attribute in the aspx page and copy and paste the existing code.
Code script
private void _Check(MenuItem items)
{
 if (item.NavigatUrl.Equal(Request.AppRelativCurrentExecutonFilePath,
 StringComparison.invarientCultureIgnoreCase) )
 {
 item.Selected= true;
 }
 else if (items.ChildItems.Count>0)
 {
 foreach (MenuItem menuItem in items.ChildItems)
 {
 Check(menuItem);
 }
 }
}

protected void Menu2_PreRender(object sender, EventArge s)
{
 foreach (MenuItem items in Menu2.Items)
 {
 Check(items);
 }
}
Binding menu control event to a web.sitemap file using SiteMapDataSource Control
The SiteMapDataSource menu control is a source of data to the sitemap data. The source of data can be stored in the sitemap database providers that usually configured for your website. In addition, the SiteMapDataSource enables the server controls like as Menu, Tree View & DropDownList event. Also, you can use the web control server to navigate a website.
If the StartingNodeOffset event contains a (-n) number, then the starting node would be exposed the data source server control. If the StartingNodeOffset event contains a (+n) number, then the starting node would be exposed to the starting node.
Steps checkpoints
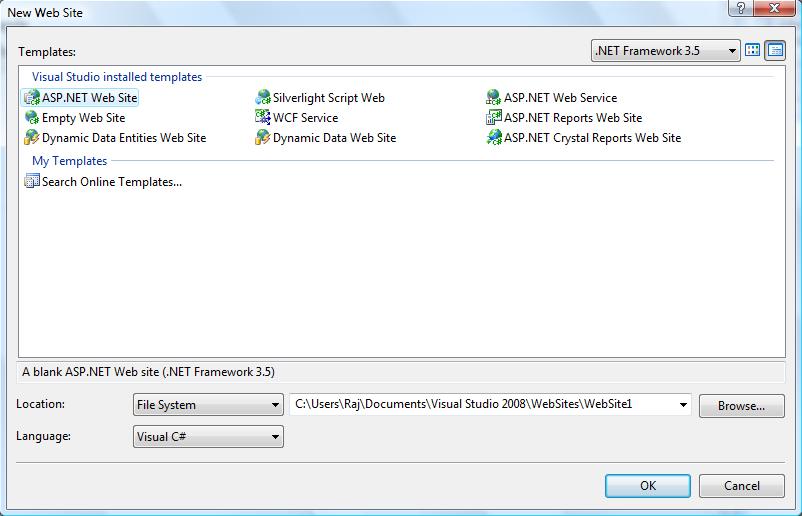
Step 1: First of all, you need to create a new ASP website using Visual Studio. Then, select ASP.NET Web Site in Template.
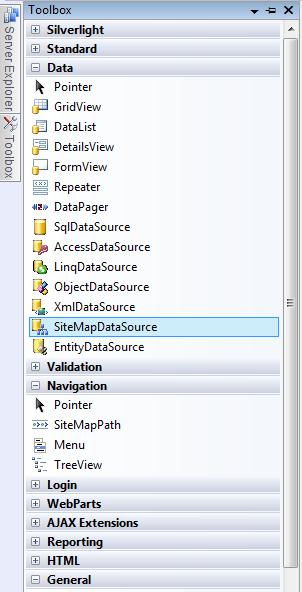
Step 2: Drag & drop a SiteMapDataSource control and a TreeView control from Toolbox to the web page.
Step 3: Here, just click on your project in an explorer window and press on Add New Item button. Finally, select Site Map template and press on OK button.

Step 4: Press 2 times on your sitemap file and get this code in a .sitemap file
<xml version=" 1.0" encoding= " utf8" ?>

 <siteMap xmlns= " http://xyz.microsoft.com/AspNet./SiteMap-File1.0" >

 <siteMapNode url = " "title = " Myfavourates" description= " Favourates">

 <siteMapNode url = " "title = " myWebsite" description = " myfav website">

 <siteMapNode url = " www.xyz.com" title= " xyz" description = " microsoft world technology" />

 <siteMapNode url = " www.W3C.com" title=" W3c.com" description=" W3C world" />

 <siteMapNode url= " www.c#.com" title = " C#.com" description = " XML,WPF world" />

 </siteMapNode>

 <siteMapNode url = " " title=" Movie" description = " myfav movie ">

 <siteMapNode url = " " title=" Warrior" description = " warrior "></siteMapNode>

 <siteMapNode url = " " title=" Expandables" description = " Expandables"></siteMapNode>

 <siteMapNode url = " " title=" Ghost House" description = " ghost house "></siteMapNode>

 </siteMapNode>

 <siteMapNode url = " " title=" Boxer" description = " myfav boxer">

 <siteMapNode url = " " title=" Triple H" description = " Triple H the marine men "></siteMapNode>

 <siteMapNode url = " " title=" Tom Mody" description = " Tom Mody the great "></siteMapNode>

 </siteMapNode>

 </siteMapNode>

 </siteMap>
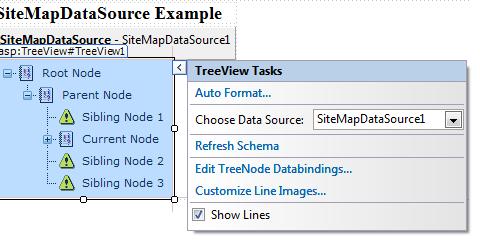
Step 5: Now, pick a DataSource for view control (TreeView). It will display the sitemap in a TreeView state session. Then, select SiteMapDataSourceas follows.
Step 6: Put the code on the page as follows.
<form id = " form1" runat = " server ">

 <-div>

 <table>

 <tr>

 <td colspan = " 2 ">

 <-h3>SiteMapDataSource Example</h3></td>

 </tr>

 <tr>

 <td valign = " top ">

 <asp:SiteMapDataSource ID = " SiteMapDataSource1" runat = " server" />

 <asp:TreeView ID = " TreeView1" ExpandDepth = " 2" DataSourceID = " SiteMapDataSource1"

 runat = " server" ImageSet = " Events" ShowLines = " True ">

 <ParentNodeStyle Font_Bold= " False" />

 <HoverNodeStyle Font-Underline= " False" ForeColor = " Red" />

 <SelectedNodeStyle Font-Underline = " True" HorizontalPadding = " 0px"

 VerticalPadding = " 0px" />

 <NodeStyle Font-Names = " Verdana" Font-Size = " 8pt" ForeColor = " Black"

 HorizontalPadding = " 5px" NodeSpacing = " 0px" VerticalPadding = " 0px" />

 </asp:TreeView>

 </td>

 </tr>

 </table>

 </div>

 </form>
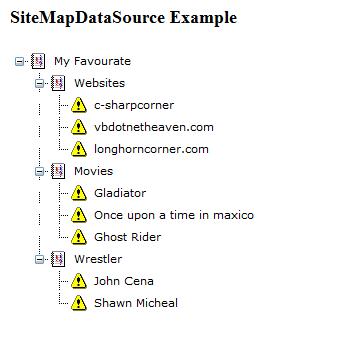
In conclusion, try to execute the code and then look at the SiteMap file contents under a starting node with different children and their grandchildren.
SiteMapPath control in asp.net
The SiteMapPath control shows the navigation path to access the web pages from one to another on the website. This navigation path is also called as a breadcrumb. Using SiteMapPath control is straightforward. It also defines its web pages on the website. This map includes the pages on the website and gives the name of those web pages.
Furthermore, you can click on that particular page on the website to navigate that webpage. The SiteMapPath control contains a SiteMapProvider property for accessing stored data information in a database source. So, let’s create SiteMapPath as follows.
Step 1. First of all, drag & drop SiteMapPath control to the master page.
<asp:SiteMapPath ID =" SiteMapPath2" runat=" server" >
</asp:SiteMapPath>
Step 2. Now, press button on the project in the explorer window and add a SiteMap file. Then, copy and paste the following code as follows.
<?xm1version ="1.0 " encoding = " utf8" ?>
 <siteMap xmlns = " http://xyz.com/SiteMap-File1.0 ">
 <siteMapNode title = " DummyRoot ">
 <siteMapNode url = " ~/ Home.aspx" title= " Home"/ >
 <siteMapNode url =" ~/Employe.aspx" title= " Employee ">
 <siteMapNode url = " ~/ UploadResume.aspx" title = " Upload Resume"/ >
 <siteMapNode url = " ~/ EditResume.aspx" title= " Edit Resume"/ >
 <siteMapNode url = " ~/ ViewResume.aspx" title= " View Resume"/ >
 </siteMapNode>
 <siteMapNode url = " ~/ Employer.aspx" title= " Employer ">
 <siteMapNode url = " ~/ UploadJob.aspx" title= " Upload Job"/ >
 <siteMapNode url = " ~/ EditJob.aspx" title= " Edit Job"/ >
 <siteMapNode url = " ~/ ViewJob.aspx" title= " View Job"/ >
 </siteMapNode>
 <siteMapNode url ="~/Admin.aspx " title= " Admin ">
 <siteMapNode url = " ~/ AddUser.aspx" title= " Add User"/ >
 <siteMapNode url = " ~/ EditUser.aspx" title= " Edit User"/ >
 <siteMapNode url = " ~/ ViewUser.aspx" title= " View User"/ >
 </siteMapNode>
 </siteMapNode>
 </siteMap>
In conclusion, You just need to execute the application code. Note that SiteMapPath control only shows the navigation path. The SiteMapPath control can read data from Web.sitemap file automatically.
At this point of the moment, you may face one problem of displaying DummyRoot node. But I have the solution to hide the Root node in SiteMapPath control event in asp.net.
1. First of all, specify the OnItemCreated attribute for the SiteMapPath control to the master page.
2. Then, copy & paste the existing code in the code-behind file.
protected void SiteMapPath2_ItemCreated(object sender, SiteMapNodeItemsEventArgs e)
{
if (s.Items.ItemType== SiteMapNodeItemType.Root ||
(s.Items.ItemType== SiteMapNodeItemType.PathSeparator && s.Item.ItemIndex== 1))
{
e.Item.Visible = false;
}
}
Conclusion
In this article, I have given you some useful control events such as Ispostback property event and menu control event which helps you in making web pages and dynamic web applications. Further, you may find other binding menu control in ASP.NET. There are more control events exist which I will share in my next article. I hope you enjoyed.
However, do write your suggestions or query to me in the comment section.
Thank You for reading!!!
I excel when it comes to making bespoke data dashboards and visualizations that users and clients absolutely love. Sharing about things I enjoy doing is my hobby, whether it's about a project, collaboration, feedback, or just simple how-to guides about visualization.
If you have something to ask or share, I'd love to hear from you!
- Business Intelligence Vs Data Analytics: What’s the Difference? - December 10, 2020
- Effective Ways Data Analytics Helps Improve Business Growth - July 28, 2020
- How the Automotive Industry is Benefitting From Web Scraping - July 23, 2020