If you are interested in building mobile apps with ease, Ionic 3 comes greatly recommended. Regardless of the level of your expertise, learning to develop apps using Ionic 3 is extremely easy. You will learn the workings of this framework in no time. The framework itself will save your time as if you need to develop mobile applications that run on multiple platforms.
It is not necessary to build unique codes for all platforms. With Ionic 3 you can easily achieve making a functionality that can run on multiple platforms. You can achieve it in just developing a single code that does need any rewriting of any kind. The Ionic 3 is thus a web technology that is taking an impact in the world of programming. And, many programmers, as well as front-end developers are turning to it as a solution to build hybrid apps. These apps can run on multiple platforms such as Windows, iOS, and Android with a little task to the programmer.
Jump to Section
What Is Ionic?
Ionic App is an open-source mobile app development framework. It allows you to write an app for Windows Phone, Android, and iOS. Once you write these apps you can proceed to publish it on any mobile platform. With the Ionic 3, you do not need to be a programming guru. You also not need to have any specialized experience or knowledge in developing Android and iOS apps.

The workings of Ionic
Ionic allows you to develop mobile apps using languages and web technologies such TypeScript, Angular, HTML, CSS, and Javascript. Thus, Ionic is a front-end software development kit which you can target at building hybrid mobile applications. In comparison to native apps, Hybrid mobile apps will have multiple advantages. These will be in terms of platform support, speed of development, and access to 3rd party code.
Why Use Ionic?
While writing native apps, you need to know the Java programming language. Also leaning the whole functionality of the Android Studio IDE. It can be extremely difficult. This is the same scenario with the development of iOS apps. There are many concepts such as MAC’s specific concepts as well as the Swift programming language. Hence if you need an app that can run on multiple platforms, the functionality you are seeking to implement, you have to rewrite in three different languages.
This is quite a difficult task and challenging one as you are basically rewriting the same code. This is where Ionic greatly excels. Ionic allows you to write code that will basically run on these three platforms without ever needing to rewrite the code. These hybrid apps will take advantage of the interface components a well as the libraries of each platform. These apps will use a mix of native with JavaScript, CSS, and HTML.
Passing Data Using Ionic 3
If you need to send data from one app to another, the crucial thing you have to consider is the data itself and how you can store it. The aim of this article will be to see how passing data from one app to another in Ionic 3.
The data you are transferring from an App to another somewhere, you will have to store in a database taking into consideration what type of data you are sending. If it’s a text you will need to use a database that stores it there. If the data you are sending is a file it will also demand that you upload it somewhere.
Hence, in order to successfully pass data from one app to another, you should consider the database as well. This is because if you want to achieve real-time functionality or any other advantages, the choice of your database will play a crucial role in ensuring whether you achieve your targets or not.
Firebase
This is an excellent choice of a database and it will fit in just right with your Ionic 3. This article will thus show how you can simply build an Ionic mobile app as well as connecting it to the Firebase where we will use a CLI tool.
Ionic 3 Mobile App Creation
The first step you need to do before actually sending data is creating an app that will send the data to another app which you can achieve using a series of small and easy steps. The first step is to install the Ionic CLI tool onto your computers. In order for this article to be of great assistance to you, ensure that the node version that you have is 4 or higher. Using the installation tool is relatively simple as you just need to run the following command.
npm install -g ionic
pm install -g Cordova
The second command is necessary as it installs Cordova which will be necessary for what we need to achieve by the end of the article. A lot of functionalities are provided by this app but we still need to scaffold our app before we begin with the development of our app. In order to create a new Ionic 3 app, you can run the following command:
ionic start app_name blank --v2
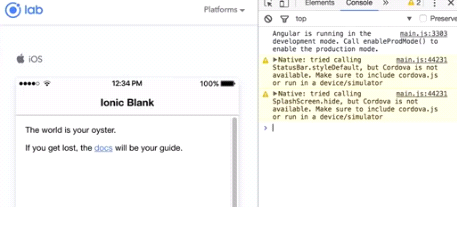
This code will present you with the Ionic 3 app and the parameter “v2” simply means that we are going to develop our app using the version 2 app while the “blank” will simply present us with a blank template of the Ionic 3 app. The image below shows whatever you expect once you finish setting up the Ionic 3 mobile App.

Integrating ionic 3 app and Firebase to our project
We have already set up the basics that we need to run our project so the next step is to ensure the integration of both the Firebase and Angular Fire 2 to our project through the addition of a reference to both. To achieve this, we will have to open our project folder and while there we will have to write down the following command.
npm install angularfire2 firebase –save
This command is responsible for the installation of all the necessary files we require in our project. The next important step is to configure our Firebase project so that any data we store in it can be easily updated in the other app we wish to send the data. To do this we need to explore the app.module.ts where our main aim will be to complete the successful importation of AngularFireModule while the configurations we get from Firebase will be exported.
All the snippets we get from the Firebase app will involve variables that will change from one machine to the other. In this article, the firebaseConfig is the integration of the details of our Firebase into the project which the user will fill depending on the variables of their machines.
import { BrowserModule } from '@angular/platform-browser';
import { ErrorHandler, NgModule } from '@angular/core';
import { IonicApp, IonicErrorHandler, IonicModule } from 'ionic-angular';
import { SplashScreen } from '@ionic-native/splash-screen';
import { StatusBar } from '@ionic-native/status-bar';
import { MyApp } from './app.component';
import { HomePage } from '../pages/home/home';
import { Databaseservice } from "../providers/databaseservice";
import { AngularFireModule } from "angularfire2";
export const firebaseConfig = {
apiKey: '',
authDomain: '',
databaseURL: '',
storageBucket: '',
messagingSenderId: ''
};
@NgModule({
declarations: [
MyApp,
HomePage
],
imports: [
BrowserModule,
IonicModule.forRoot(MyApp),
AngularFireModule.initializeApp(firebaseConfig)
],
bootstrap: [IonicApp],
entryComponents: [
MyApp,
HomePage
],
providers: [
StatusBar,
SplashScreen,
{provide: ErrorHandler, useClass: IonicErrorHandler},
Databaseservice
]
})
export class AppModule {}
Further Configuration of the Database
We have completed the firebase configuration now the next step is to ensure that we get the access to our database through the creation of the database layer. In this step, we are going to use the Angular 2 CLI. Key in the following command in this CLI:
ionic generate provider database service
The above command will be responsible for the generation of a new service that will prove essential in the running of the Ionic app. However, the service cannot be solely relied on to achieve the required results as something else is needed. This extra addition is the is the inclusion of the database service into the provider’s array and this will ensure that Angular is capable of inserting the service into the AppComponent
import { Injectable } from '@angular/core';
import { AngularFire, FirebaseObjectObservable, AngularFireAuth, FirebaseListObservable } from 'angularfire2';
@Injectable()
export class Databaseservice {
constructor(private_af: AngularFire) {
}
publiclistAccounts(): FirebaseListObservable<any[]>{
returnthis._af.database.list('/accounts');
}
}
This whole process of creating the Angular object will ensure that we get access to all the functionalities of the database. This means that our Ionic app will be able to not only send the data to the Firebase upon which the other app will receive but will also be capable of manipulating the database in other ways such as updating and uploading content.
Using the Database
The Ionic syntax is one that is similar to HTML. And, hence grasping it should not provide plenty of difficulties. Since the language of the app is quite straightforward especially if you have a limited background in the world of programming.
In order to use the database layer, we are inclined to insert it directly using the constructor. And, the most important part of this article is to call the method directly. This will ensure that the data will get directly into the constructor. This is how data can be manipulated between multiple apps. And, it is why the choice of the Firebase was important as we take advantages of its capabilities of easy access.
import { Component } from '@angular/core';
import { NavController } from 'ionic-angular';
import { Databaseservice } from "../../providers/databaseservice";
import { FirebaseListObservable } from "angularfire2";
@Component({
selector: 'page-home',
templateUrl: 'home.html'
})
export class HomePage {
accounts:FirebaseListObservable<any[]>
constructor(publicnavCtrl: NavController, publicdb: Databaseservice) {
this.accounts = this.db.listAccounts();
}
}
Conclusion
By using the AngularFire, you have an access to the features that will enable you to manipulate the Firebase quite easily. You will be able to send data to one or more apps. The AngularFire also makes quite easy manipulations such as adding, updating and removing of information. Using the AngularFire makes the task of handling the data accessible in just a few touches and learning the workings of the Ionic 3 is quite simple.
This is because the Ionic does not concern itself with the intensive programming of the database. Since all you have to do is to integrate it into your project. And, you are ready to begin once you successfully key in the values of the variables of the database. It will enable you to access as well as use the database. Such variables have been presented in the code and include the database URL, the API key, storage bucket, and the messenger sender id. These are the key components ensuring that you are able to successfully communicate with multiple applications.
- LinkedIn Scraper | LinkedIn Data Extractor Software Tool - February 22, 2021
- Is Web Scraping Legal? - February 15, 2021
- What Is Data Scraping? - February 10, 2021

