
Hey folks, Today we will be going to learn more about social sharing feature of iOS, As we all know a few years back developers have to make use of facebook and twitter API to provide the sharing feature.
But later after the release of ios 6 Apple provides a much easier way to share the post directly without even make use of an API. With the help of SocialSharing Library of iOS.
Jump to Section
Social Framework
After the introduction of iOS 6 version, a new framework arrives which is known as “Social Framework”. This framework enables users to integrate your app with any supported social networking services. Currently, it supports Facebook and Twitter. This framework gives you an interface to interact with different social media and it enables you from learning the internals. Even you don’t have to implement any of the Twitter/Facebook APIs, how to handle network connection, handle single sign-on, etc. The social framework simplifies everything.
You just need to write a few lines of code to bring up the composer and users can tweet/publish a Facebook post on your app.
The social framework comes with a very handy class named SLComposeViewController. The SLComposeViewController class presents a standard view controller for users to compose the tweet or Facebook post. This also allows developers to preset the initial text, attach images and also adding URL to the post, If you want to implement the simple sharing feature, this is the only class you need to know and that we will go through today.
If you’re not familiar with the SLComposeViewController, this is what it looks like within your app.
So Let’s get started now.
Initial Setup
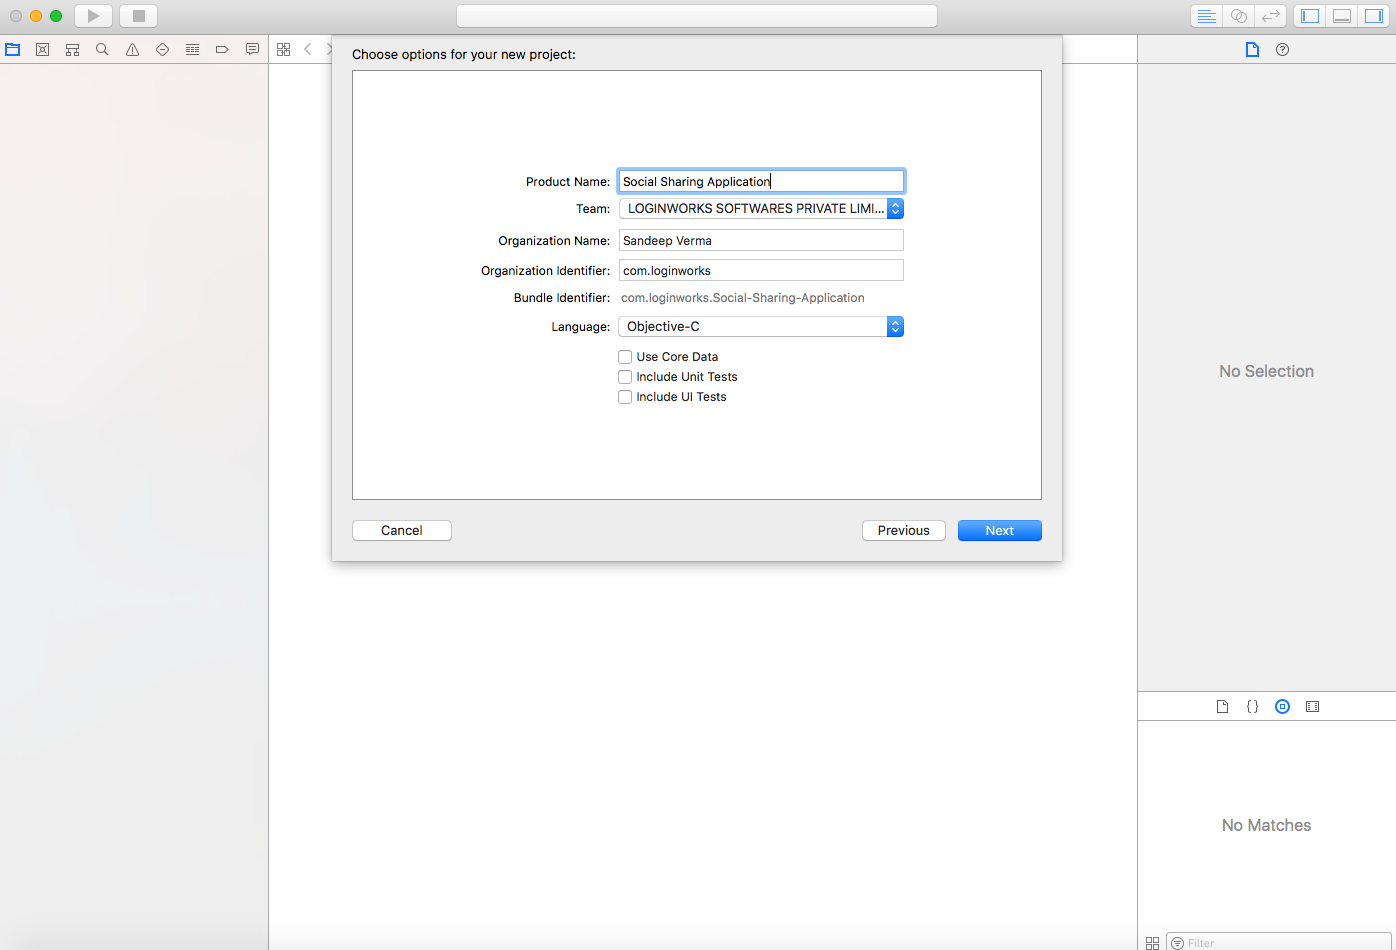
Go to the Xcode and select create a new application and after this Click on the SingleViewApplication.
After this Name your application as Social Sharing Application as mentioned in the image below.
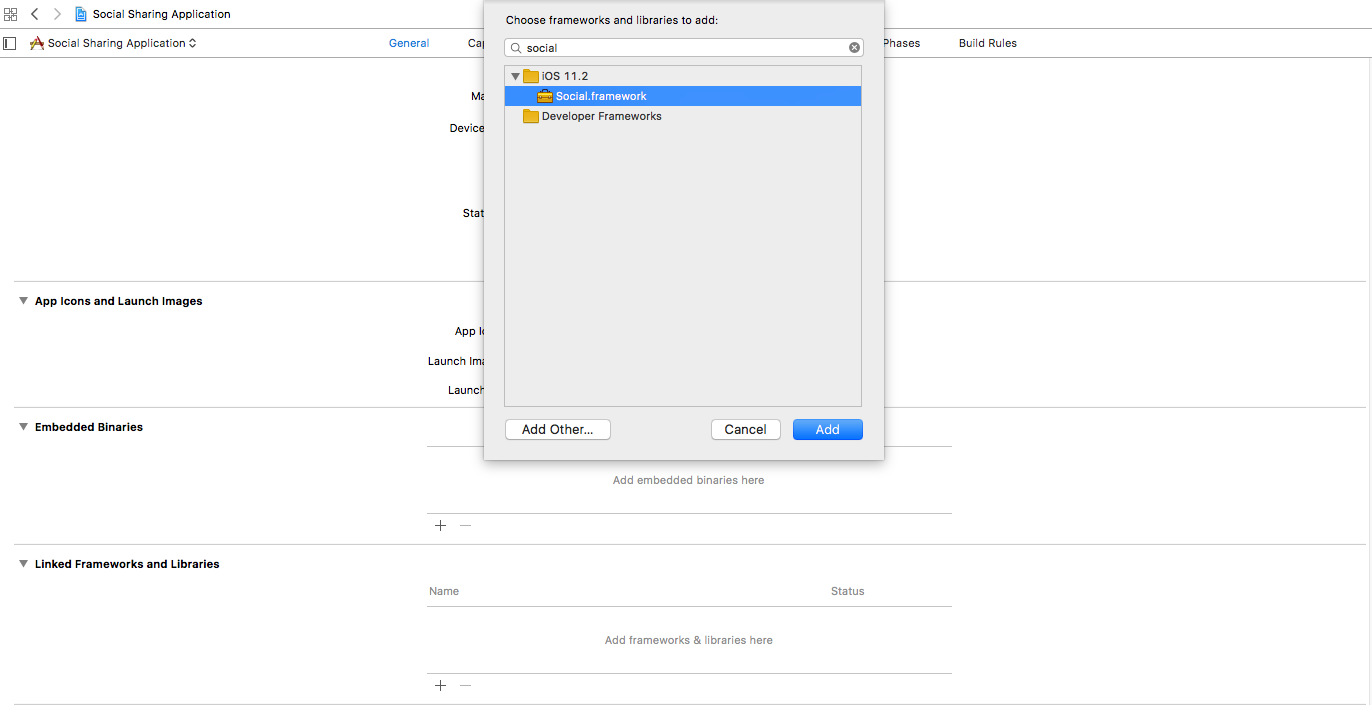
Import Framework
Now head to the framework section of your Xcode and add the Social Framework to your application as I mentioned below.
Designing Interface
Now we will be going to design the interface for our application and to this, we need to add few objects to our view controller.
But first, we will be going to create our own view and to do this.
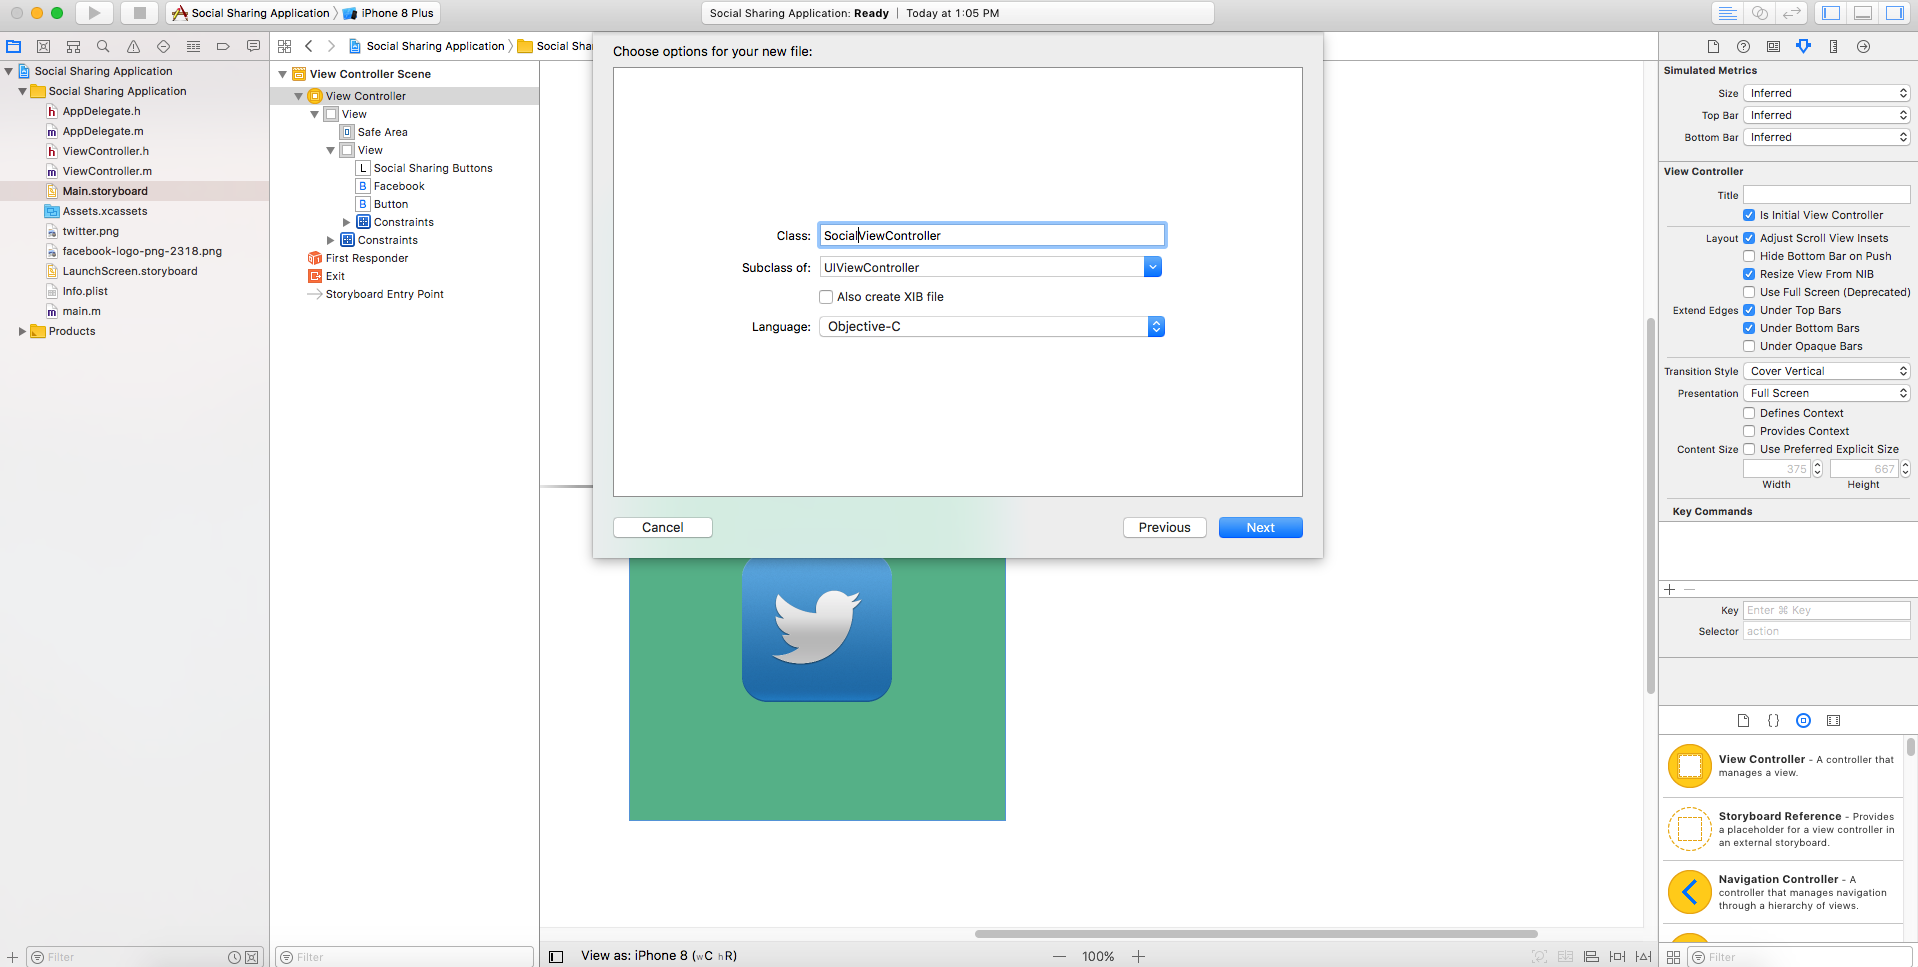
Go to File -> New -> File -> Cocoa Touch Class -> UIViewController .
Then name the view controller file as SocialViewController as shown below.
Attach that viewcontroller file with the view in which we will going to make our designing and functionality.
Establishing Connection Between Variables and Elements
Now we need to add few objects to our view controller.
- UIView – We will be going to add a custom color to our view. I will be using Hexa color #008040 for my design you can choose a color of your choice.
- UILabel – With the help of this Label I am going to write a text to it which is “Social Sharing Buttons” so that the design looks better here.
- UIButtons – We will be going to use two buttons here so that we can add action to them later to handle facebook and twitter share feature.
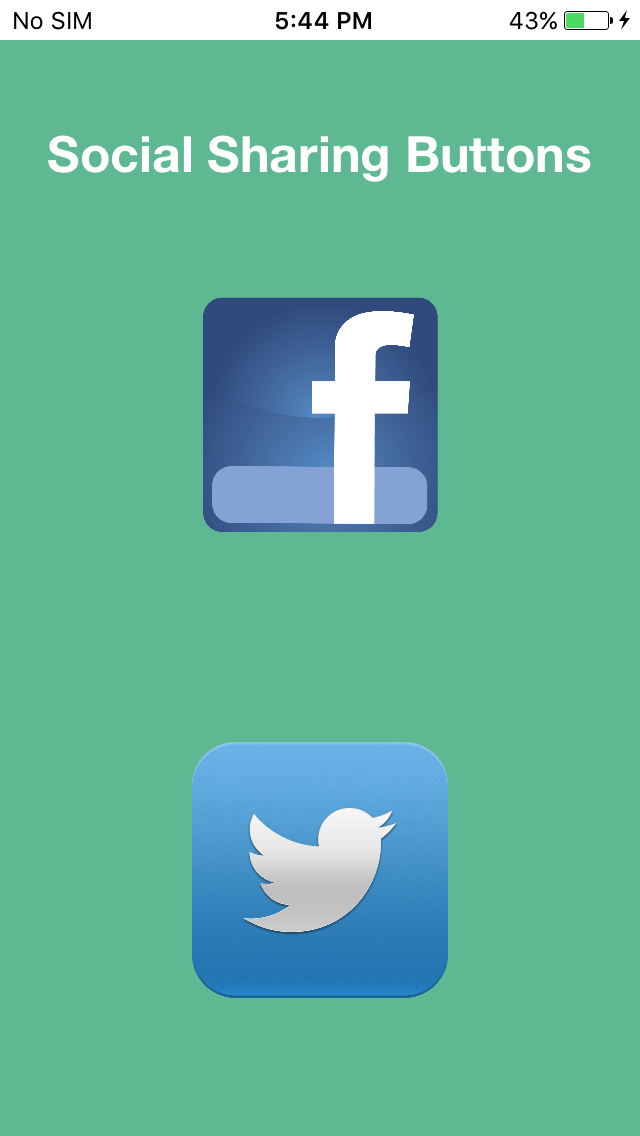
After doing all the objects designing our view will looks similar to this.
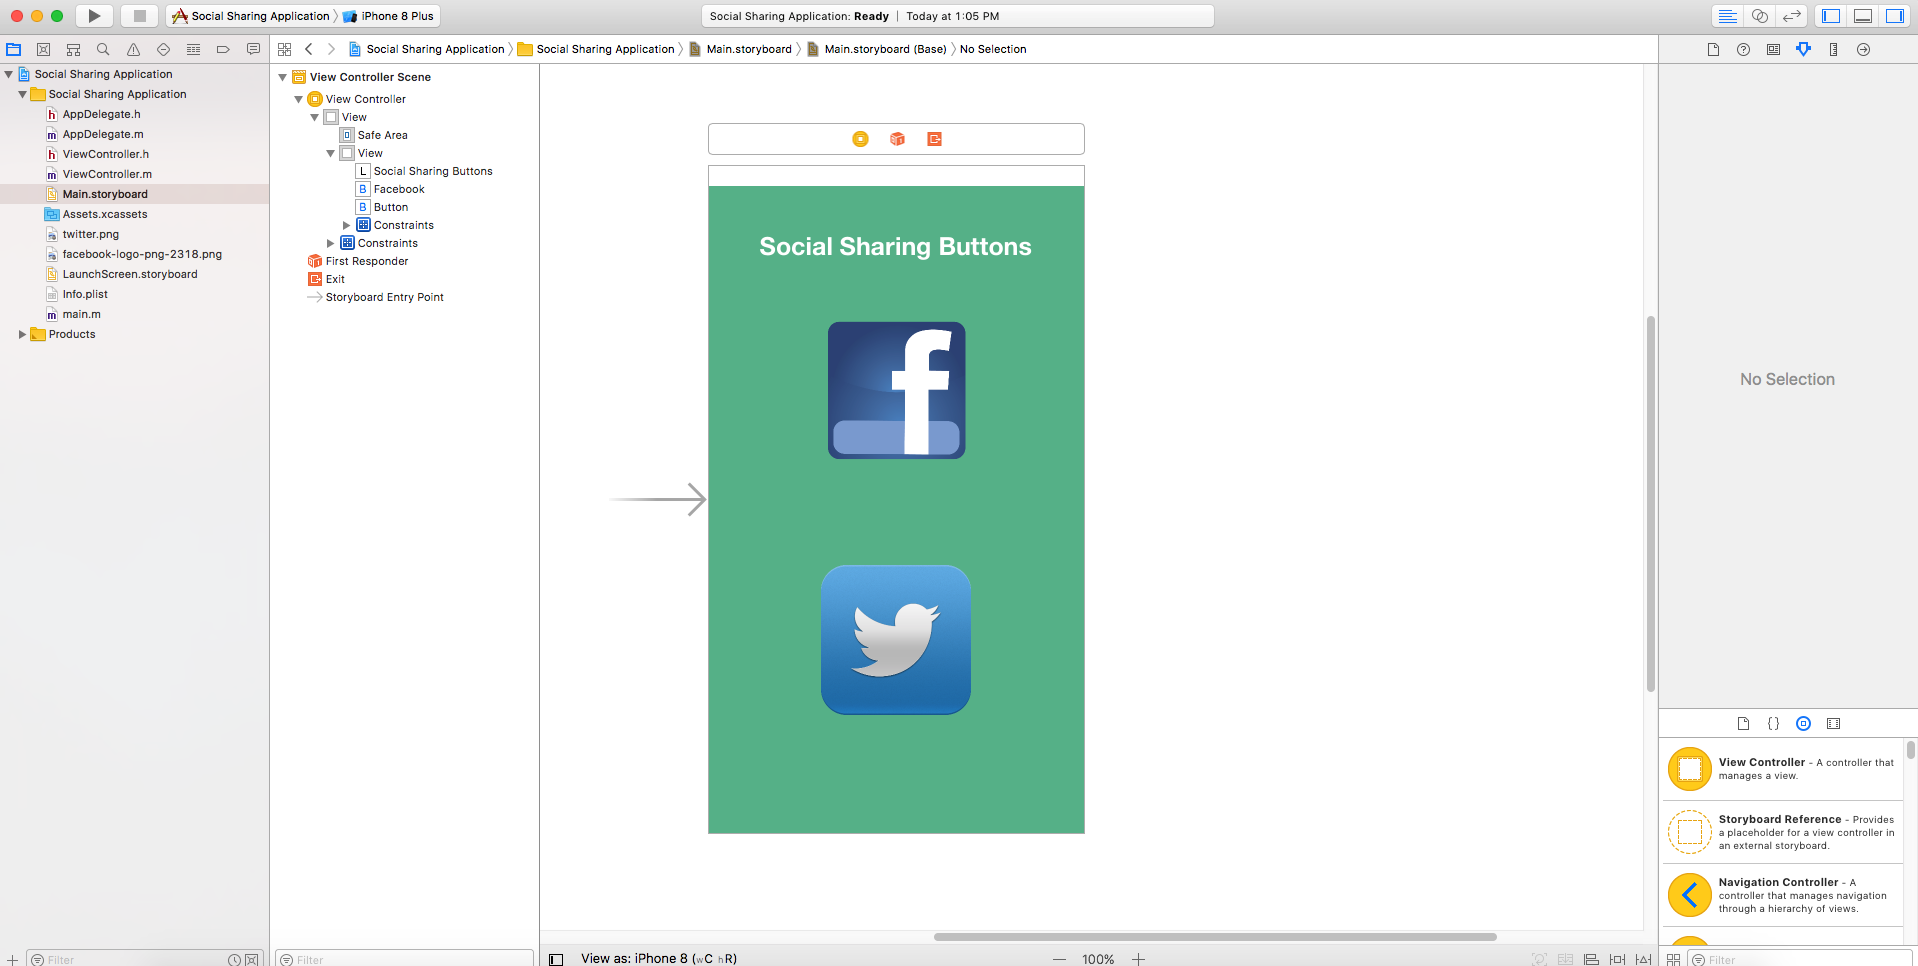
As you can see that I have added two images to my asset folder and using them to set an image on buttons so that both of them looks different and are identical.
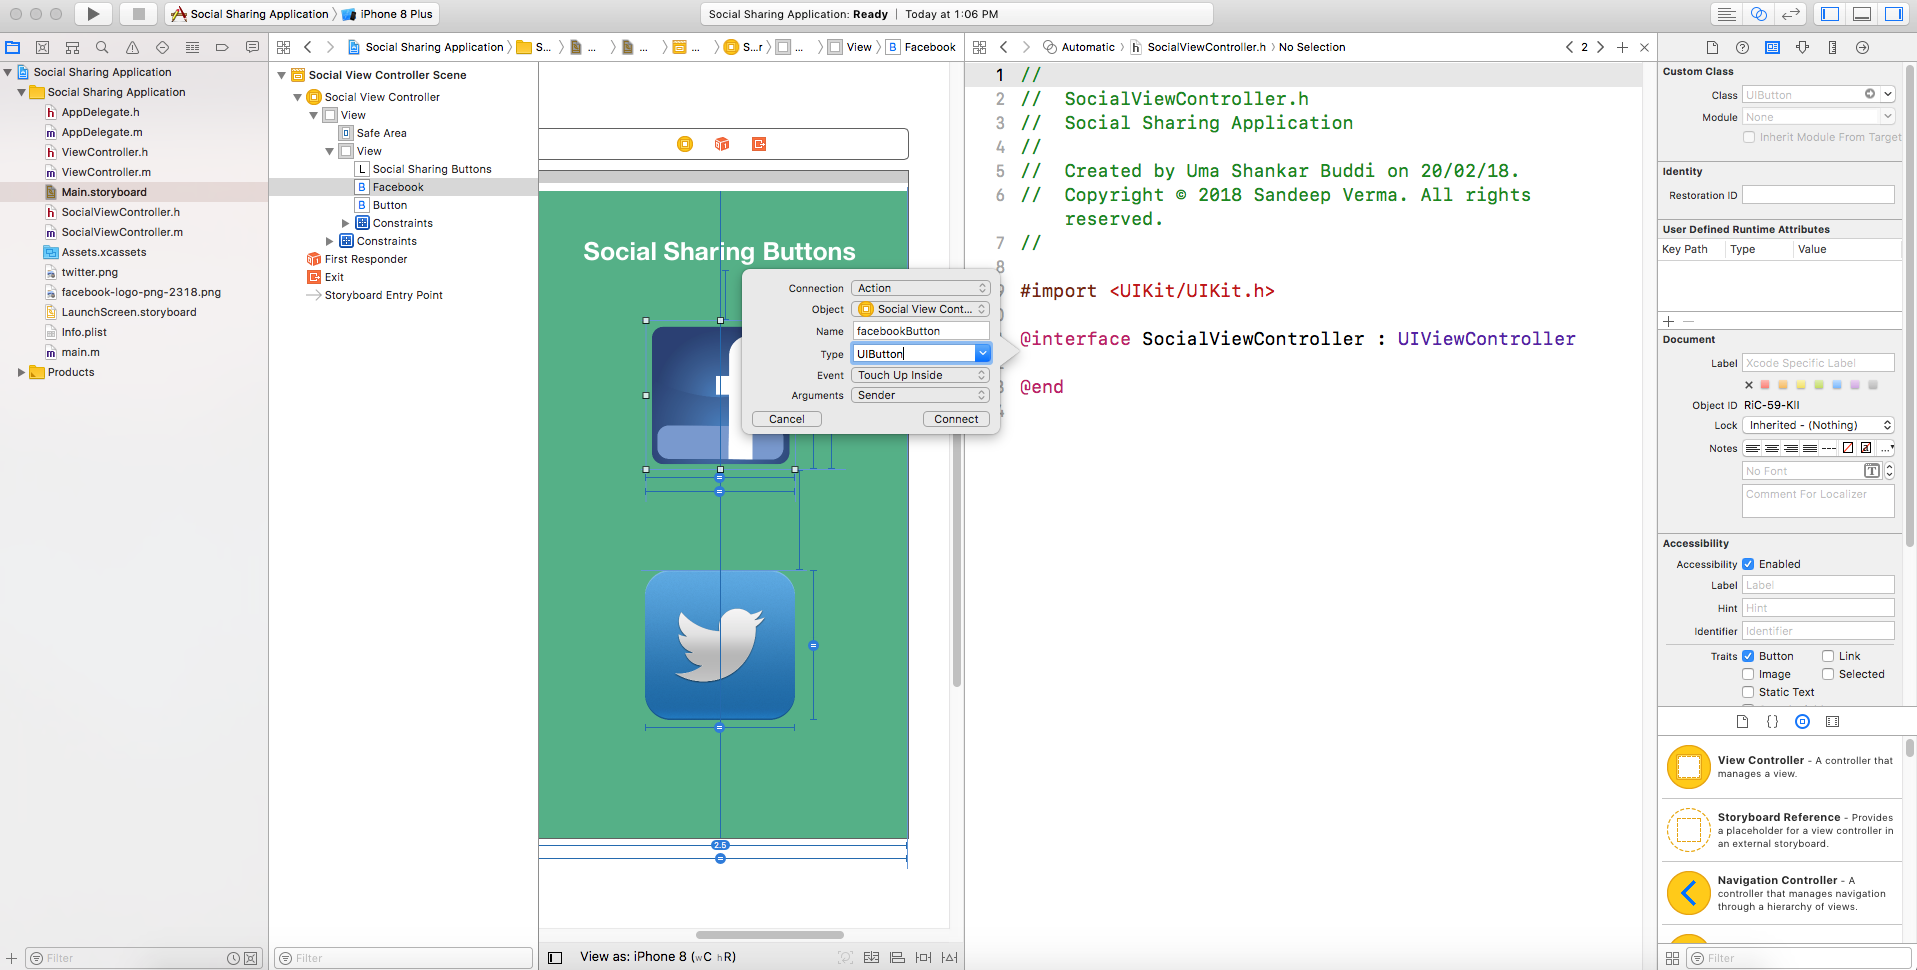
Now to make the connection between the objects and view we need to drag and drop all objects one by one to our viewcontroller.h file.
- Drag the first button which is facebook button and create an action of it.
-
Now drag the second button which is twitter button and create an action to it as shown below.
#import <UIKit/UIKit.h>

@interface SocialViewController : UIViewController

- (IBAction)facebookButton:(UIButton *)sender;

- (IBAction)twitterButton:(UIButton *)sender;

@end
Adding Facebook Support
Here we will be going to add the functionality which will handle the facebook sharing feature of ios using the social framework, So add the social framework to your view controller file.
#import <Social/Social.h>
After doing this we will be going to use the SLComposeViewController class to add the view which will then allow us to share the social media update on facebook.
So let’s get into it and add our first line of code inside the facebook button action:
Action for Facebook
- (IBAction)facebookButton:(UIButton *)sender {

    SLComposeViewController *controller = [SLComposeViewController composeViewControllerForServiceType:SLServiceTypeFacebook];

   [controller setCompletionHandler:^(SLComposeViewControllerResult result) {

        switch (result) {

            case SLComposeViewControllerResultCancelled:

            {

                NSLog(@"Post Failed");

                UIAlertController* alert;

                alert = [UIAlertController alertControllerWithTitle:@"Failed!!" message:@"Something went wrong while sharing on Facebook, Please try again later." preferredStyle:UIAlertControllerStyleAlert];

                UIAlertAction* defaultAction = [UIAlertAction actionWithTitle:@"Okay" style:UIAlertActionStyleDefault handler:^(UIAlertAction * action) {}];

                [alert addAction:defaultAction];

                dispatch_async(dispatch_get_main_queue(), ^{

                    [self presentViewController:alert animated:YES completion:nil];

                });


                break;

            }

            case SLComposeViewControllerResultDone:

            {

                NSLog(@"Post Sucessful");

                UIAlertController* alert;

                alert = [UIAlertController alertControllerWithTitle:@"Success" message:@"Your post has been successfully shared." preferredStyle:UIAlertControllerStyleAlert];

                UIAlertAction* defaultAction = [UIAlertAction actionWithTitle:@"Okay" style:UIAlertActionStyleDefault handler:^(UIAlertAction * action) {}];

                [alert addAction:defaultAction];

                dispatch_async(dispatch_get_main_queue(), ^{

                    [self presentViewController:alert animated:YES completion:nil];

                });

                break;

            }

                   default:

                break;

        }

    }];

    [self presentViewController:controller animated:YES completion:Nil];

}
At this point, We will be going to check whether the performing function contains facebook type or not.
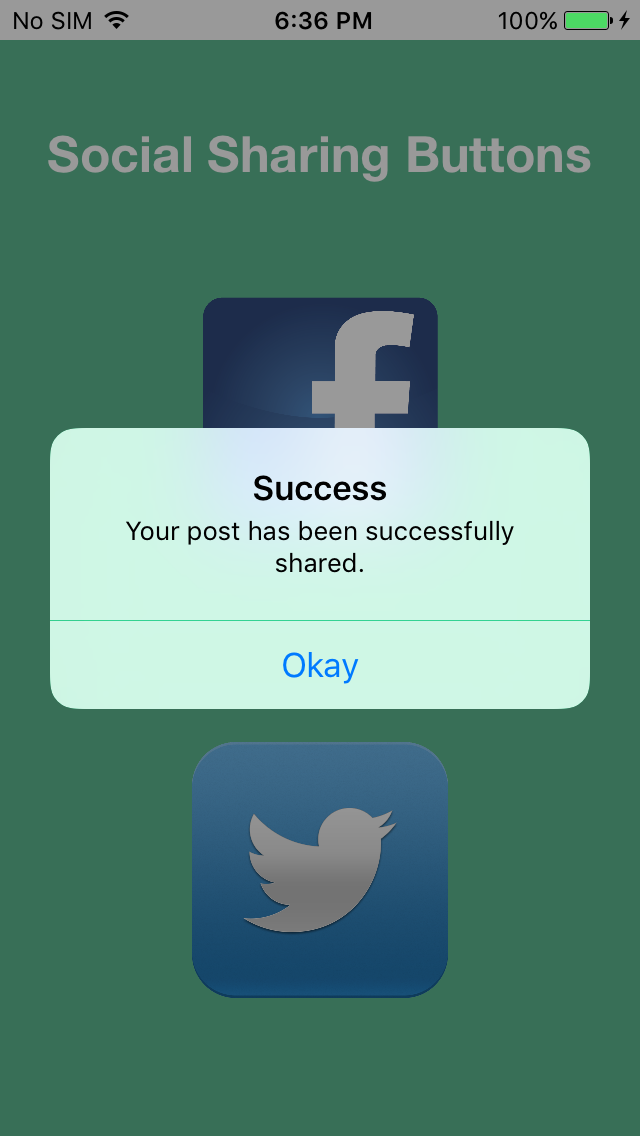
On the basis of a result if the performing result is ok then it will show an alert that your post has been successfully posted, else it will show an alert about an unsuccessful post.
Point to Remember
It is important that your social media account should be configured inside your iPhone settings and if there is no account present in it then it will going to show you two choice
with a custom alert either to choose to cancel or to choose settings option as shown.
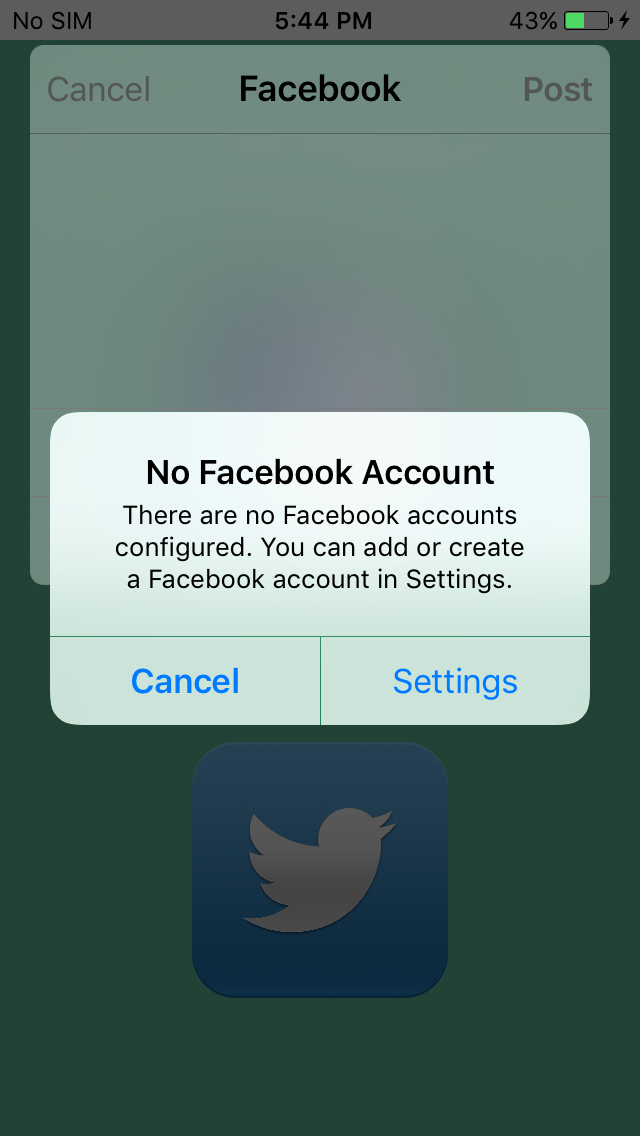
Choice 1
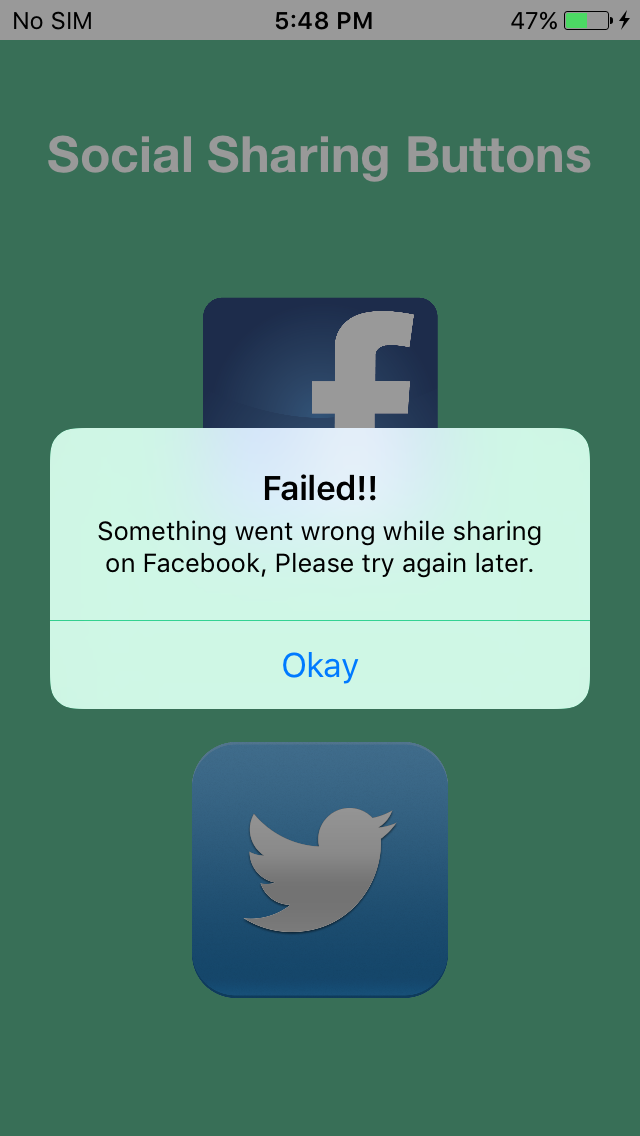
If you choose to cancel button then it will be going to show you the alert i.e – “Something went wrong while sharing on Facebook, Please try again later.”
Choice 2
If you choose Settings button then it will be going to redirect you to settings of your device through which you can add the details to your social media account and configure it from there, So that next time if you re-run the application then it can easily be going to update the social media post through this application.
Adding Twitter Support
Now it’s time to add some functionality to Twitter so that we can share our social media update using twitter button also.
Twitter is also one of the best ways to share our feeling or some tweet using twitter, iOS provides twitter support using its SocialFramework similar to facebook.
Step 1
We will be going to add the code inside our twitter button so that we can use its action to share our tweet on twitter profile.
First add your Twitter credentials into your twitter setting inside your iPhone so that it will not ask you, again and again, to add the account to it.
Step 2
Add the following code to perform the functionality of the twitter button as shown below.
- (IBAction)twitterButton:(UIButton *)sender {

        SLComposeViewController *tweetSheet = [SLComposeViewController composeViewControllerForServiceType:SLServiceTypeTwitter];

    [tweetSheet setCompletionHandler:^(SLComposeViewControllerResult result) {

        switch (result) {

            case SLComposeViewControllerResultCancelled:

            {

                NSLog(@"Post Failed");

                UIAlertController* alert;

                alert = [UIAlertController alertControllerWithTitle:@"Failed!!" message:@"Something went wrong while sharing on Twitter, Please try again later." preferredStyle:UIAlertControllerStyleAlert];

                UIAlertAction* defaultAction = [UIAlertAction actionWithTitle:@"Okay" style:UIAlertActionStyleDefault handler:^(UIAlertAction * action) {


                }];

                [alert addAction:defaultAction];

                dispatch_async(dispatch_get_main_queue(), ^{

                    [self presentViewController:alert animated:YES completion:nil];

                });


                break;

            }

            case SLComposeViewControllerResultDone:

            {

                NSLog(@"Post Sucessful");

                UIAlertController* alert;

                alert = [UIAlertController alertControllerWithTitle:@"Success" message:@"Your post has been successfully shared." preferredStyle:UIAlertControllerStyleAlert];

                UIAlertAction* defaultAction = [UIAlertAction actionWithTitle:@"Okay" style:UIAlertActionStyleDefault handler:^(UIAlertAction * action) {}];

                [alert addAction:defaultAction];

                dispatch_async(dispatch_get_main_queue(), ^{

                    [self presentViewController:alert animated:YES completion:nil];

                });

                break;

            }

            default:

                break;

        }

    }];

    [self presentViewController:tweetSheet animated:YES completion:Nil];

   }
This will be going to work similar to facebook code we did earlier and will show your either success or either failure status while updating your status.
Adding Image to your Post
If you want to add an image to your post then it is quite simple here. All we need to do is to write a single line of code and rest will be handled by itself only.
We will be using tweetsheet image sharing feature through which we can add our own custom image inside it.
[tweetSheet addImage:[UIImage imageNamed:@"twitter.png"]];
Through this code, it will add an image to your post. Remember to add your image to your asset folder before calling it with this code. You can check the snapshot below after adding the image how it looks.
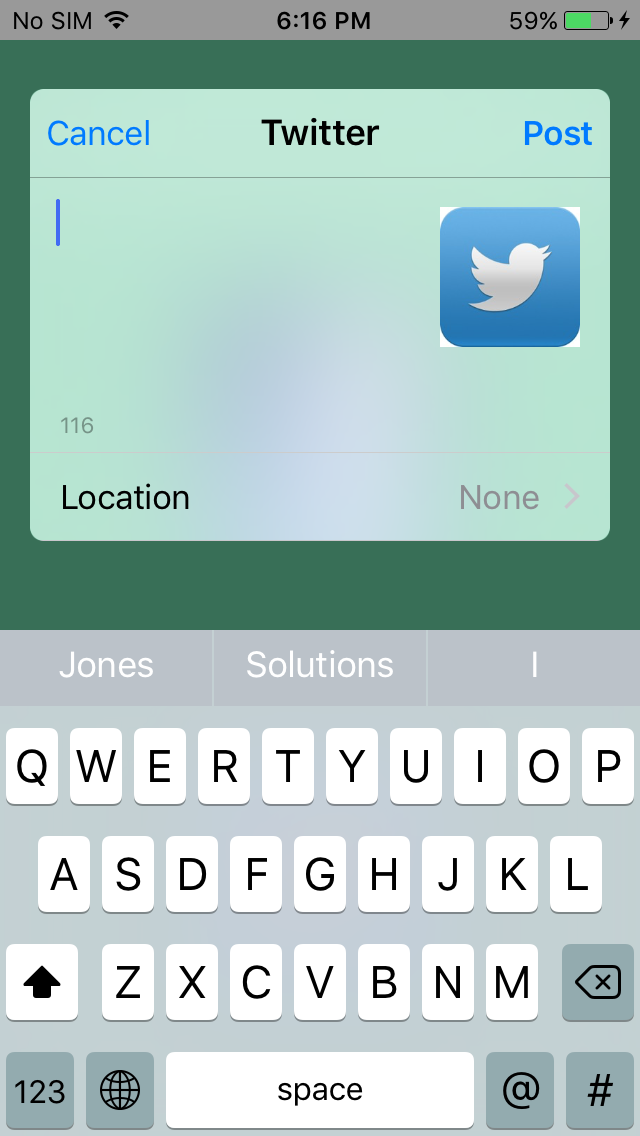
As you can see that the image is attached to the twitter post and you can add an image of your choice into it. After adding the image the final code should look like this:
SLComposeViewController *tweetSheet = [SLComposeViewController composeViewControllerForServiceType:SLServiceTypeTwitter];

    [tweetSheet addImage:[UIImage imageNamed:@"twitter.png"]];

    [tweetSheet setCompletionHandler:^(SLComposeViewControllerResult result) {

        switch (result) {

            case SLComposeViewControllerResultCancelled:

            {

                NSLog(@"Post Failed");

                UIAlertController* alert;

                alert = [UIAlertController alertControllerWithTitle:@"Failed!!" message:@"Something went wrong while sharing on Twitter, Please try again later." preferredStyle:UIAlertControllerStyleAlert];

                UIAlertAction* defaultAction = [UIAlertAction actionWithTitle:@"Okay" style:UIAlertActionStyleDefault handler:^(UIAlertAction * action) {


                }];

                [alert addAction:defaultAction];

                dispatch_async(dispatch_get_main_queue(), ^{

                    [self presentViewController:alert animated:YES completion:nil];

                });


                break;

            }

            case SLComposeViewControllerResultDone:

            {

                NSLog(@"Post Sucessful");

                UIAlertController* alert;

                alert = [UIAlertController alertControllerWithTitle:@"Success" message:@"Your post has been successfully shared." preferredStyle:UIAlertControllerStyleAlert];

                UIAlertAction* defaultAction = [UIAlertAction actionWithTitle:@"Okay" style:UIAlertActionStyleDefault handler:^(UIAlertAction * action) {}];

                [alert addAction:defaultAction];

                dispatch_async(dispatch_get_main_queue(), ^{

                    [self presentViewController:alert animated:YES completion:nil];

                });

                break;

            }

            default:

                break;

        }

    }];

    [self presentViewController:tweetSheet animated:YES completion:Nil];
Final Run
Now if you run the final project after finishing all the task performed earlier then your application should look like this as shown
Looks Amazing Right!!
After Successfully sharing your status it will be going to show you the success message as mentioned below.
Additional Lesson
If you don’t know how to create a custom alert of your choice then I am adding the method to do it below as we know that in iOS 9, The alert view is depreciated and in the place of it we will be going to use alert controller which contains the updated code according to Apple’s guidelines.
First, Create an alert controller object and add the title and message and alert type to it.
UIAlertController* alert;

                alert = [UIAlertController alertControllerWithTitle:@"Success" message:@"Your post has been successfully shared." preferred style:UIAlertControllerStyleAlert];
Second, Add an alert action which will be going to perform an action when a user clicks on a particular action object.
UIAlertAction* defaultAction = [UIAlertAction actionWithTitle:@"Okay" style:UIAlertActionStyleDefault handler:^(UIAlertAction * action) {}];
Third, Add that action inside the alert controller object and then show the view using the presentViewController method.
[alert addAction:defaultAction];
[self presentViewController:alert animated:YES completion:nil];
Summary
This is it, You have successfully made an application that can help you share your status on social media without even using any API and with fewer efforts.
As you can see from this tutorial, it’s quite easy to add Twitter and Facebook supports using the Social Framework in iOS 6. If you’re building your app, there is no reason why you shouldn’t use the social features. With this support, it adds values to your app and may boost its popularity.
The tutorial introduces the basics of Facebook and Twitter integration. You can try to make a demo application and upload multiple images to the social networks.
However, if you want to access more advanced features such as display users’ Facebook email and friend list, you’ll need to understand the Facebook API.
I hope you enjoy the tutorial about the social framework. If you want more tutorial related to this then let me know.
I excel when it comes to making bespoke data dashboards and visualizations that users and clients absolutely love. Sharing about things I enjoy doing is my hobby, whether it's about a project, collaboration, feedback, or just simple how-to guides about visualization.
If you have something to ask or share, I'd love to hear from you!
- Business Intelligence Vs Data Analytics: What’s the Difference? - December 10, 2020
- Effective Ways Data Analytics Helps Improve Business Growth - July 28, 2020
- How the Automotive Industry is Benefitting From Web Scraping - July 23, 2020
1 thought on “How to Integrate Twitter and Facebook Sharing in IOS App?”