Hello guys, in my previous blog I have explained how to create and execute Maven project. So, moving further, Here I am going to tell you about the fundamental part of the Maven project.
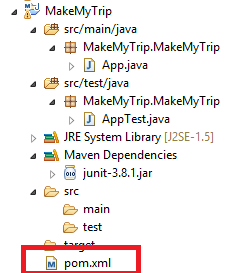
As you can see in the root directory of your Maven project, there is an XML file named as pom.xml. In this part, we are going to discuss all the aspects of this XML file.
Before going in-depth first, you need to have a basic idea regarding POM. So, let’s start the discussion about the introductory part of POM.
Jump to Section
What is POM?
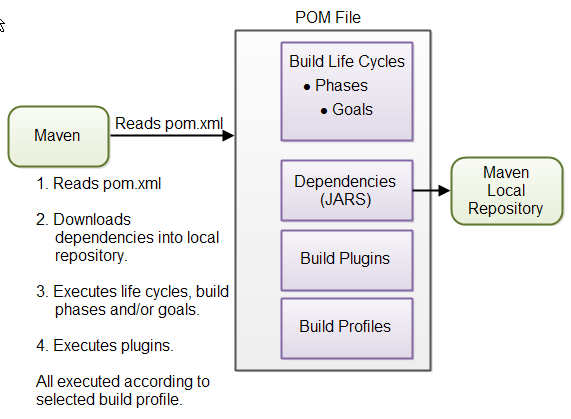
The POM or Project Object Model is the basic unit of Maven. POM is actually an XML file that contains all the configuration and information which is useful to build the Maven project.
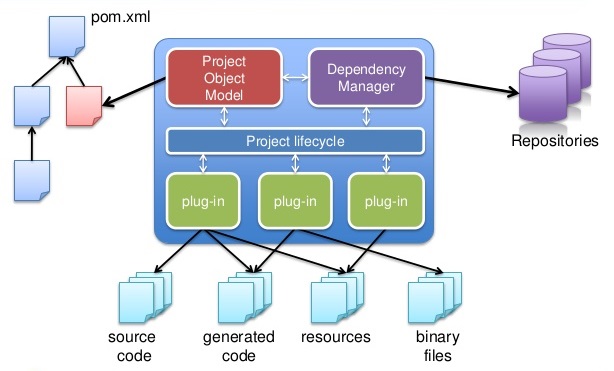
Inside the POM, the configurations which are specified are nothing but the dependencies and the goals that can be executed. You can specify some other information as well inside POM like project version, developers, mailing list etc.
Advantages
The main advantages of the pom.xml are,
- When you declare the required dependency inside pom.xml then Maven download all the required dependencies in the form of a jar. It will be available to java classpath in Eclipse IDE.
- You can also add new libraries to your project.
- You don’t have to search anywhere to download the files. Maven automatically downloads all the required files for the given version from Maven central repository.
- It can work in IDEs, in the CI servers, as well as on the command line.
Now, I am going to explain the major elements of Maven pom.xml file. If you want to create a pom.xml file then you should have following elements.
Elements of pom.xml
- project – It is the root element of pom.xml file.
- modelVersion – This element is mandatory and its value should be 4.0.0 which can support both versions of Maven 2 and 3.
- groupID – This element must be unique as it specifies the project id.
- artifactID – This should be same as the name of your project. This element specifies the id for the project.
- version – This element defines the version of the project. For example, if you have started a project then initially the value will be 1.0. It will change according to the changes made in the project like 1.1 or 2.0 depending on the major and minor changes.
- A sample XML code for the usage of above-mentioned elements is given below.
<project xmlns="http://maven.apache.org/POM/4.0.0" xmlns:xsi="http://www.w3.org/2001/XMLSchema-instance"
 xsi:schemaLocation="http://maven.apache.org/POM/4.0.0 http://maven.apache.org/xsd/maven-4.0.0.xsd">
 <modelVersion>4.0.0</modelVersion>

<groupId>MakeMyTrip</groupId>
 <artifactId>MakeMyTrip</artifactId>
 <version>0.0.1</version>

</project>
- name – You can use this element to give a meaningful name to the project.
- packaging – This element defines the packaging standard for the project. It defines that how a project is bundled after completion. If you don’t define it then by default the packaging for the project is the jar.
- url – This element defines that after completion, where the project will be live by default the location is set to SVN.
- dependencies/dependency – This element defines all the required dependencies for the project.
- scope – Provides scope for the compilation of Maven project.
<project xmlns="http://maven.apache.org/POM/4.0.0" xmlns:xsi="http://www.w3.org/2001/XMLSchema-instance"
 xsi:schemaLocation="http://maven.apache.org/POM/4.0.0 http://maven.apache.org/xsd/maven-4.0.0.xsd">
 <modelVersion>4.0.0</modelVersion>

<groupId>MakeMyTrip</groupId>
 <artifactId>MakeMyTrip</artifactId>
 <version>0.0.1-SNAPSHOT</version>
 <packaging>jar</packaging>

<name>MakeMyTrip</name>
 <url>http://maven.apache.org</url>

<properties>
 <project.build.sourceEncoding>UTF-8</project.build.sourceEncoding>
 </properties>

<dependencies>
 <dependency>
 <groupId>junit</groupId>
 <artifactId>junit</artifactId>
 <version>3.8.1</version>
 <scope>test</scope>
 </dependency>
 </dependencies>
</project>
Steps to add dependencies in pom.xml
Before adding dependencies in pom.xml, you need to fulfill some prerequisites first.
Prerequisites:-
- Eclipse IDE
- Active Internet Connection
- Maven installed for Eclipse IDE
Now, create a Maven project or if you have already created it, then go to pom.xml file and open it.

Once you open it a tab will open in Eclipse IDE, in the footer section of the tab there is an option for adding dependencies.
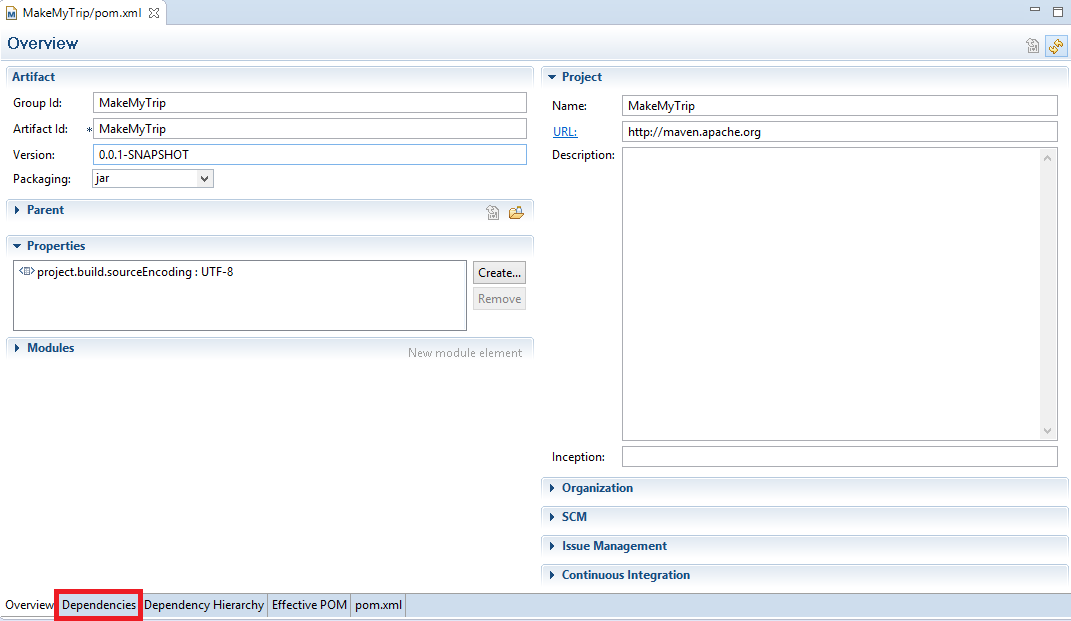
Click on Dependencies and a panel will open where you can add the required dependencies for your project. Click on add button.
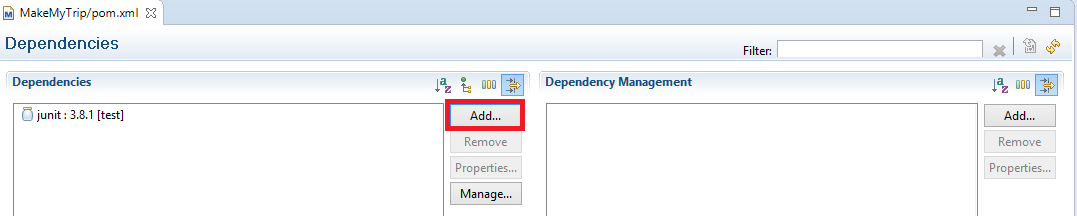
Once you click on add button a new window will open and you need to enter the name of the dependency which you want to add to your project. After providing the necessary details it will start searching the dependency inside the repository.
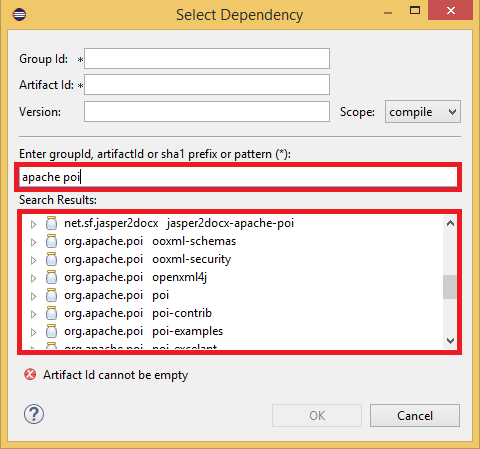
After the search gets finished it will display the search results to you. You need to select the dependency and click on OK button and it will be added to your project.
For Example, I am going to add the dependency for Apache poi libraries. First of all, I need to search for it then select the desired one and then add that dependency to my project.
The first step is to search for the dependency.
The second step is to select the required dependency. Once you select the required dependency its Group Id, Artifact Id and version will get displayed in the related text fields.
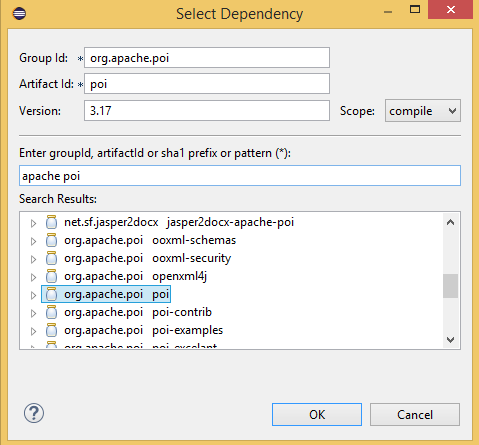
Finally, click on OK button and the required dependency will get added to your project.
This process is time taking and complex because you need to search your required dependency among all the search results and then only you can add it to your project.
Alternative
You can add and manage your required dependencies in an alternative and easier way. You need to follow some simple steps for it.
Steps to add dependencies in pom.xml
- Goto the root directory of your Maven project in Eclipse IDE and open pom.xml file.
- A new tab will open in your Eclipse IDE, there you will find a small tab for pom.xml at the bottom, click on it.

- After clicking on it, an xml file will open having xml code of your Maven project.
- The xml code will look like as the code given below.
Sample Code
<project xmlns="http://maven.apache.org/POM/4.0.0" xmlns:xsi="http://www.w3.org/2001/XMLSchema-instance"
 xsi:schemaLocation="http://maven.apache.org/POM/4.0.0 http://maven.apache.org/xsd/maven-4.0.0.xsd">
 <modelVersion>4.0.0</modelVersion>

<groupId>MakeMyTrip</groupId>
 <artifactId>MakeMyTrip</artifactId>
 <version>0.0.1-SNAPSHOT</version>
 <packaging>jar</packaging>

<name>MakeMyTrip</name>
 <url>http://maven.apache.org</url>

<properties>
 <project.build.sourceEncoding>UTF-8</project.build.sourceEncoding>
 </properties>


</project>
- Now, if you want to add dependencies to this pom.xml file. First, you need to have a clear idea that what are the required dependencies for your project.
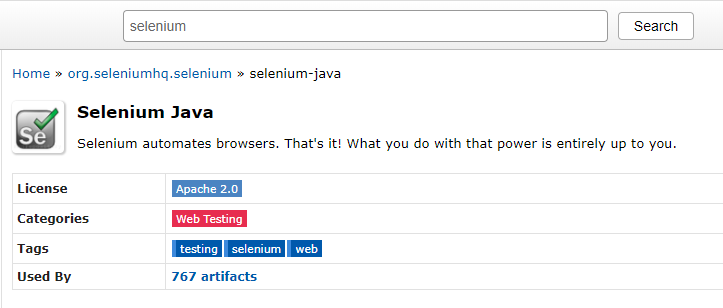
- First and the foremost thing you need to do to add dependencies to your pom.xml file, you need to go to the Maven Central Repository
- In the search box type the name of the required dependency and click on search button. For example, If you want to add the dependency for selenium, then search for selenium there and select the dependency for the required version. Let’s say that we need to add the dependency for selenium 2.53.1 version.
- Once the search is finished a list of all the versions of selenium will be displayed on the website. You need to click on the desired version to get the dependency.
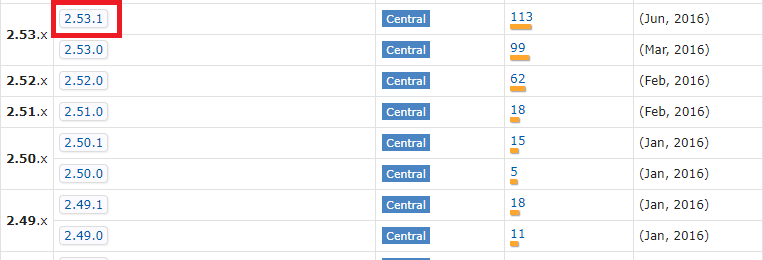
- Click on the version number and the dependency code will get displayed on the website.

- Select this code and copy it to add to your pom.xml file in your Maven project.
- Now go to your pom.xml file in Eclipse IDE and add a tag <dependencies></dependencies> in it before the </project> tag and then paste the dependency code for selenium inside the dependencies tag.
Sample Code
<project xmlns="http://maven.apache.org/POM/4.0.0" xmlns:xsi="http://www.w3.org/2001/XMLSchema-instance"
 xsi:schemaLocation="http://maven.apache.org/POM/4.0.0 http://maven.apache.org/xsd/maven-4.0.0.xsd">
 <modelVersion>4.0.0</modelVersion>

<groupId>MakeMyTrip</groupId>
 <artifactId>MakeMyTrip</artifactId>
 <version>0.0.1-SNAPSHOT</version>
 <packaging>jar</packaging>

<name>MakeMyTrip</name>
 <url>http://maven.apache.org</url>

<properties>
 <project.build.sourceEncoding>UTF-8</project.build.sourceEncoding>
 </properties>
<dependencies>

<dependency>
 <groupId>org.seleniumhq.selenium</groupId>
 <artifactId>selenium-java</artifactId>
 <version>2.53.1</version>
</dependency>

</dependencies>

</project>
- Finally, Save the pom.xml file. The process for building your workspace will take some time you can check the status at the bottom of the right-hand side.
- Once the process is finished, your required dependencies will get added to your project.
Before adding any dependency to your Maven project, first please make sure that the version of that dependency must be compatible with your project. If you add a dependency without checking the compatibility then it will result in failure of the execution of your project.
Special Commands to Analyze the Dependencies
When you start working on a big Maven project, there are possibilities that at some point you can forget the track of the dependencies in your project. It can happen when you are adding some new dependencies to your project or remove some older scripts from your project, then, in that case, some dependencies become out of date.
At this point of time, you need to analyze all the dependencies including previously added and currently added to your project. Without analyzing these dependencies we cannot be able to find those dependencies which are used but undeclared. This usually happens when you use some transitive dependencies in your code directly.
Analyzing Dependencies
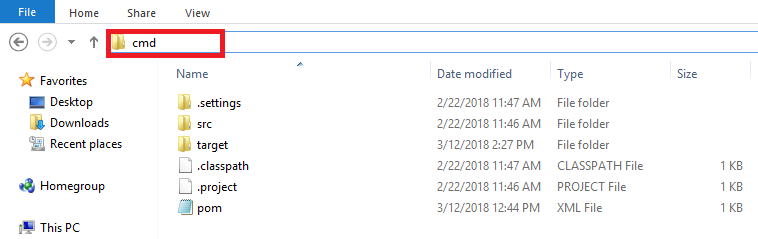
Before telling you about these commands first, I need to tell you that how can run these commands with cmd.
- Open cmd and move into the folder where pom.xml is located, or simply open the folder where pom.xml is present and in the path url section type cmd and press enter and as a result cm will open at the desired location.
Now, I am taking an example of a demo Maven project to show you how you can analyze the dependencies for your project.
mvn dependency:tree
Go to cmd and type mvn dependency:tree command and press enter. After running this command, it will start scanning your Maven project. This will take some time as it will scan the complete project.
After the process is completed it will display the hierarchy of dependencies added to your project as a result. The result will look like this,
 C:\workspace\MakeMyTrip>mvn dependency:tree
[INFO] Scanning for projects...
[INFO]
[INFO] ------------------------------------------------------------------------
[INFO] Building MakeMyTrip 0.0.1-SNAPSHOT
[INFO] ------------------------------------------------------------------------
[INFO]
[INFO] --- maven-dependency-plugin:2.8:tree (default-cli) @ MakeMyTrip ---
[INFO] MakeMyTrip:MakeMyTrip:jar:0.0.1-SNAPSHOT
[INFO] \- junit:junit:jar:4.12:test
[INFO] \- org.hamcrest:hamcrest-core:jar:1.3:test
[INFO] ------------------------------------------------------------------------
[INFO] BUILD SUCCESS
[INFO] ------------------------------------------------------------------------
[INFO] Total time: 1.267 s
[INFO] Finished at: 2018-03-12T14:53:39+05:30
[INFO] Final Memory: 12M/114M
[INFO] ------------------------------------------------------------------------
This is just a demo project example, the real projects will surely have a much bigger hierarchy structure.
mvn dependency:analyze
Now you need to analyze the dependencies which are declared but not used and causing issues in the execution. For that, you need to run a simple command cmd at the same location where pom.xml is present. The command is mvn dependency:analyze, once you run this command you will see those dependencies which are not correct.
The output will get displayed like this,
C:\workspace\MakeMyTrip>mvn dependency:analyze
[INFO] Scanning for projects...
[INFO]
[INFO] ------------------------------------------------------------------------
[INFO] Building MakeMyTrip 0.0.1-SNAPSHOT
[INFO] ------------------------------------------------------------------------
[INFO]
[INFO] >>> maven-dependency-plugin:2.8:analyze (default-cli) > test-compile @ Ma
keMyTrip >>>
[INFO]
[INFO] --- maven-resources-plugin:2.6:resources (default-resources) @ MakeMyTrip
 ---
[INFO] Using 'UTF-8' encoding to copy filtered resources.
[INFO] skip non existing resourceDirectory C:\workspace\MakeMyTrip\src\main\reso
urces
[INFO]
[INFO] --- maven-compiler-plugin:3.1:compile (default-compile) @ MakeMyTrip ---
[INFO] Nothing to compile - all classes are up to date
[INFO]
[INFO] --- maven-resources-plugin:2.6:testResources (default-testResources) @ Ma
keMyTrip ---
[INFO] skip non existing resourceDirectory C:\workspace\MakeMyTrip\src\test\reso
urces
[INFO]
[INFO] --- maven-compiler-plugin:3.1:testCompile (default-testCompile) @ MakeMyT
rip ---
[INFO] Nothing to compile - all class are up to date
[INFO]
[INFO] <<< maven-dependency-plugin:2.8:analyze (default-cli) < test-compile @ Ma
keMyTrip <<<
[INFO]
[INFO]
[INFO] --- maven-dependency-plugin:2.8:analyze (default-cli) @ MakeMyTrip ---
[INFO] No dependency problems found
[INFO] ------------------------------------------------------------------------
[INFO] BUILD SUCCESS
[INFO] ------------------------------------------------------------------------
[INFO] Total time: 5.821 s
[INFO] Finished at: 2018-03-12T15:48:30+05:30
[INFO] Final Memory: 13M/179M
[INFO] ------------------------------------------------------------------------
That’s how you can add and manage dependencies in pom.xml file of your Maven project. It is the most important part of a Maven project if you want to get the best out of your Maven project then you must know about the dependency management of pom.xml.
Additionally, if there is any issue regarding dependencies at the build time then you can easily analyze that by using the above-mentioned commands.
- COVID-19: How We Are Dealing With It as a Company - March 23, 2020
- Agile Testing – The Only Way to Develop Quality Software - February 8, 2019
- How to Perform System Testing Using Various Types Techniques - May 16, 2018