
TFS (Team Foundation server) is a Microsoft development which is integrated with Visual Studio in 2013. It makes a team work together and organize their combined efforts towards a project completion. It is infused with the primary aim of making the team collaborate, thus making the task sound easier and ensuring its on-time delivery.
There are various versions of projects available in the industry. The most common among all is Software project, which involves developing and launching a software product that is typically all about a new product, or a minor update release.
A collaboration through improved communication, tracking work status, supporting multidisciplinary roles, integration of software and enacting the group’s procedure is empowered through Team Foundation.
The tool named TFS works for both methods including Agile and Waterfall models. In short, it maintains the application lifecycle.
Jump to Section
Use Of TFS
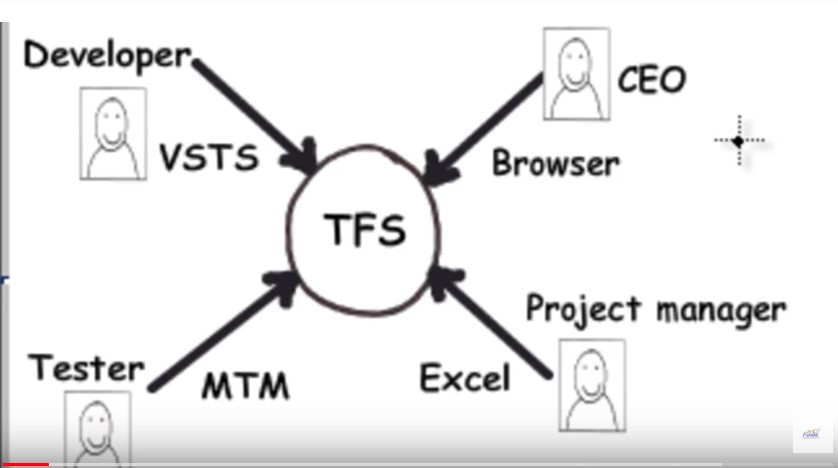
A successful software project is all about collaboration. When we talk about software project, then it includes the involvement of different people working on it. Like, it has CEO of the company who is indirectly involved in the project, Project Manager, Developer, Testers, End users etc.
TFS is a server product which helps in the collaboration with each team member. It offers complete flexibility to the end user by serving them the way, they want to connect. As summarizing, TFS is a central server product where team members can connect.
Architecture Of TFS
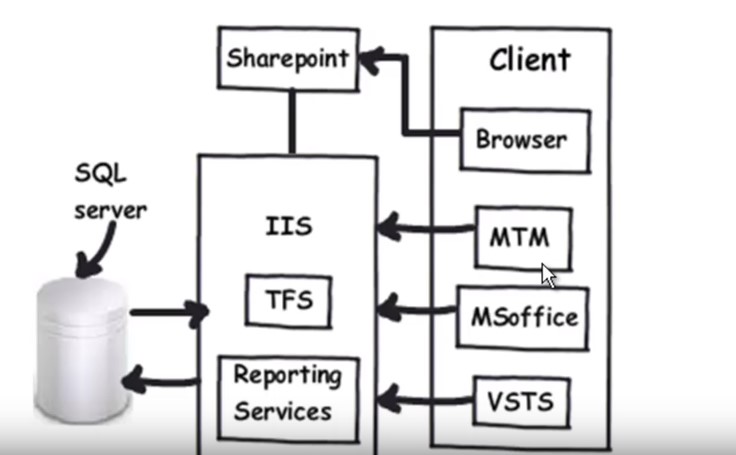
TFS is majorly divided into two parts Server Side and Client-side, connecting to TFS. For example, as explained in the diagram, developers can connect through VSTS (visual studios), Manager can connect using MS office, Testers can connect using MTM.
Now one of the main thing in a software project is reporting. Managers and the client would probably like to know how the project is doing etc. So, in order to show the report TFS uses SQL Server Reporting Services. Another important part of TFS is SQL Server.
Now any data project team member can push is stored in SQL server like any code, any planning by the manager through MS office, defects everything is stored in SQL server. So it gives the ease of changing the server in another location and in case you need to backup it also gives the backup of your Data through the backup database of SQL server.
How To Use TFS In Visual Studio?
As in 2013, TFS was already merged in VS (Visual Studio). So now we are going to learn how to work in VS?
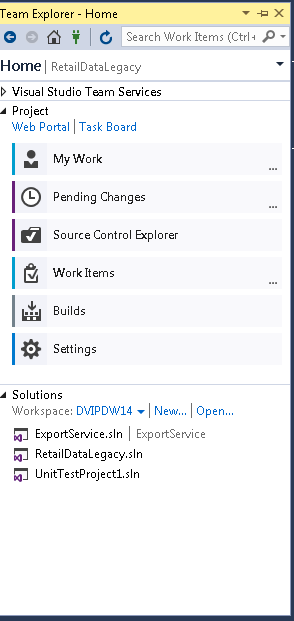
The user can directly work on VS in the case if the project is already created. So it will automatically display in the VS under Team Explorer.
Click on home, then click on connect team project, then the user will automatically get connected to its project. So, it can be stated that TFS work as a repository in VS.
And if the project is not created in TFS, then for that the user has to install the TFS (Team server foundation) on its local machine. Only after the follow-up of this process, the user will be allowed to create a project, in connection with the VS.
Installation Of TFS
A user can install the TFS from “ https://www.visualstudio.com/en-us/news/releasenotes/tfs2017-relnotes “.When you start the installation of TFS, there are two types of installation one is Basic installation and the other is Advance 9in Basic.
In the diagram listed below, you can see the simple wizard which displays the installation of TFS. The difference between the Basic and Advance 9in Basic is that Advance 9in Basic doesn’t provide the option of share point portal and reporting services.
TFS is easy to get installed on Client as well as Server Operating System. Platforms including 32-bit or 64-bit, Windows 7 or Windows 8 can be used for Clients. Follow below for knowledge about the complete list of system requirements for TFS.
If you installing it on a server operating system, you can add a Share Point portal and SQL Server reporting later, even if you skip those features during initial installation.
It is advised to follow the use of the Basic configuration wizard for a quick and simple installation. During installation, we can create the project.
Now, we can paste this above create TFS URL”http:loginworks-000:8080/tfs/DefaultCollection/” link in the below space in the Visual Studio.
Click on Home icon<click on Web portal link. It will take the user to the web access.
How to write Test cases?
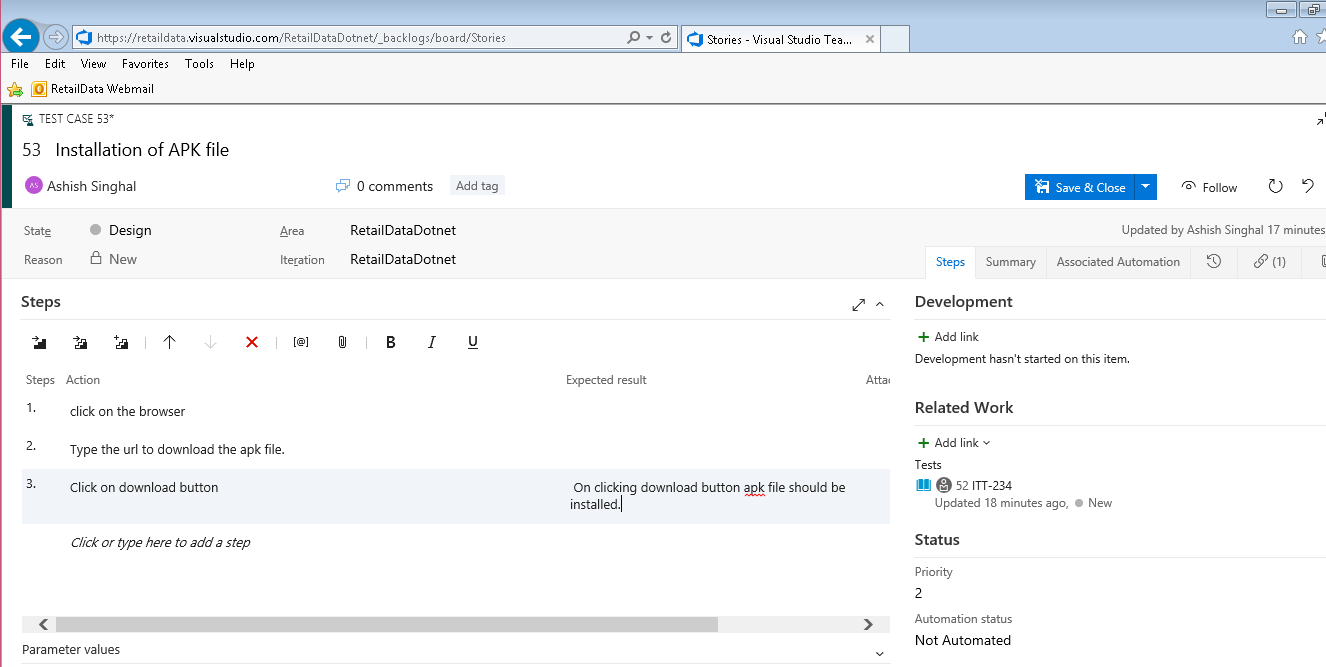
- Go to the Visual Studio- Click on Home icon<click on Web portal link. It will take the user to the web access Click on Work from the top.
- Click on New item icon to add the story number.
- After giving the story number or title click on “Add Test” to add the test cases for that particular story
- The user can add test scenarios by again clicking on the Add test link.

- Click on the particular test scenario user can complete the test case steps and expected results on the right-hand side.
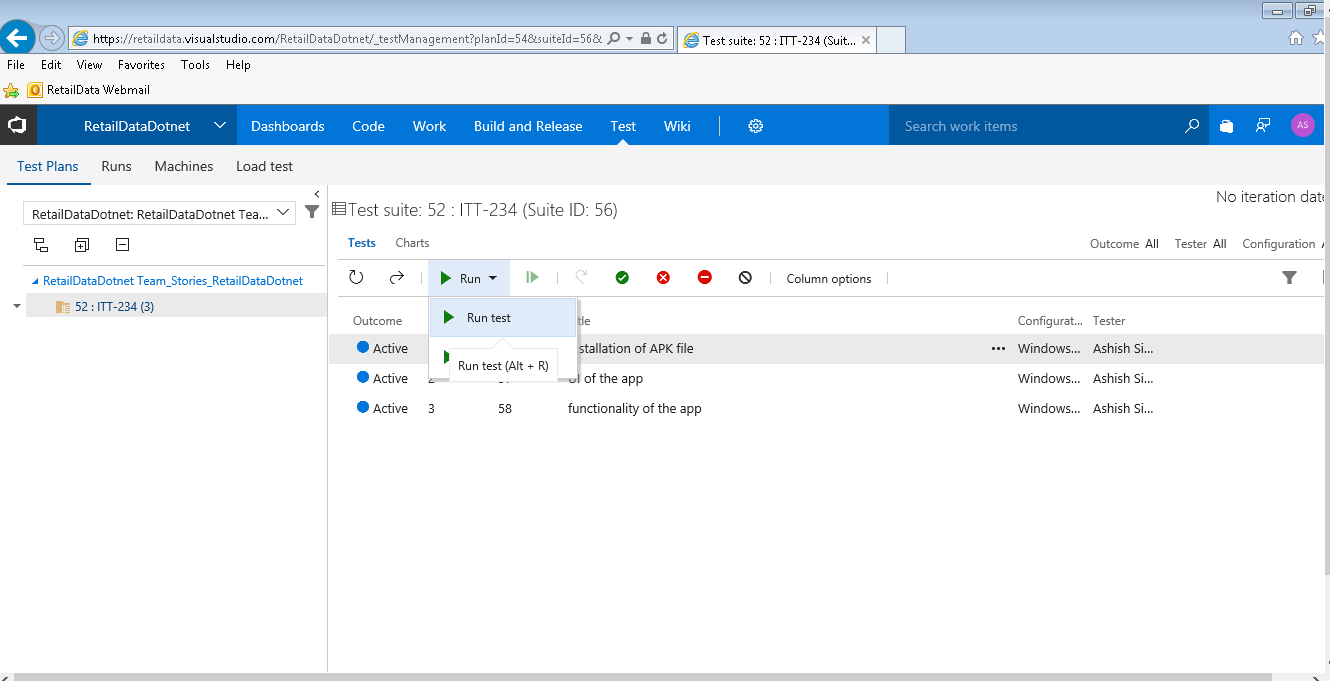
- After creating the test cases user have to run the created test cases for that go to Test<Test Plans.
- User Can either Pass or Fail the test case accordingly.
- Failed denotes with the red cross icon and Passed denotes with the green check mark.
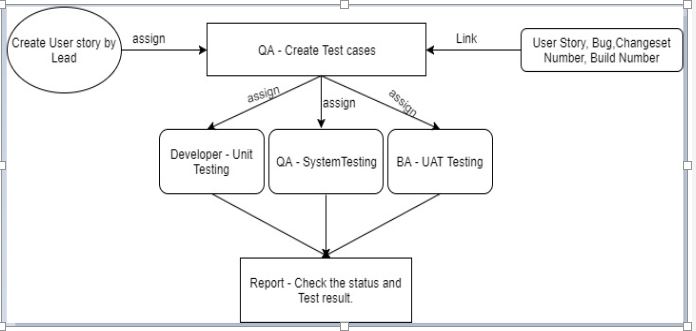
Workflow of Testing lifecycle by using TFS
Below is the workflow of the Testing life cycle where QA, Developer and BAs use the TFS:
- Lead can create user story and assign the story to QA who will be responsible for creating the Test cases of this user story.
- QA also assign the story from the backlog to Iteration/Sprint.
- QA can create Test cases with respect to User story and linked the user story with the test cases.
- Also, he can then assign the test cases to the developer for Unit testing, can assign another QA for executing the test cases and assign BAs for UAT testing.
- QA/Developers/BAs can execute the created the Test cases and check the status and test result accordingly in form of the report also.
- QA/Developers can also link the development work ex: Changeset number, Build Number w.r.t Test cases and user story created in TFS.
- QA can also create the Tasks ex: QA Test Case review and assign the task to the respective team member.
Benefits of TFS
- Testing assets are centralized: Test cases, defects and other testing assets are saved in one location – the Team Foundation Server. They can be reviewed, edited and available for execution fast.
- Easy collaboration: Multiple testers can access and concurrently test in the same test suite, executing test cases in various environments and platforms.With this, there is no need to use formulas to see test results.
- Traceability and coverage: User Stories with Acceptance Criteria or Requirements can be input and stored in TFS. All test cases can be linked to your User Stories or Requirements. This makes it easy to see if you have the testing coverage you need. Coverage can be defined based on features, user stories, tasks or custom sorting.
- No Worry about Data Loss: Excel sometimes behaves improperly due to which we lose our whole data. But in TFS we can create and save our data instantly.
- Email Functionality: User can send any work items via email to any other user(s).
- Dashboard: User can view the stories or tasks and which are assigned to them. The user can add/edit/view the work items.
- Real-Time Reporting: User can quickly view the status of the testing using lightweight charts. For example, find out how many test cases are ready to run, or how many tests are passing and failing in each test suite. We can also pin these charts to your homepage/Dashboard, then all the team can see the progress at a glance.
I hope I am quite clear about the use of TFS in terms of doing a Quality Analysis. However, you are free to place your further queries in the comments section below.
- COVID-19: How We Are Dealing With It as a Company - March 23, 2020
- Agile Testing – The Only Way to Develop Quality Software - February 8, 2019
- How to Perform System Testing Using Various Types Techniques - May 16, 2018