CodeIgniter is one of the most powerful PHP Framework. This is a well-known and highly accepted fact. And may be this is the reason why people really love to stick to this framework. Well, I think this is not just the one, actually there are multiple including wonderful documentation, small footprint, nearly zero configuration, exceptional performance and much more!
Moving ahead, do you now that the fundamental piece of a CodeIgniter system is its libraries. Yes, it gives a rich arrangement of libraries, which in a roundabout way increment the speed of developing an application. It will probably engage you to make expands fundamentally speedier than you could if you were creating code with no readiness.

Jump to Section
CodeIgniter Provides Extreme Core Libraries
Here are some useful CodeIgniter libraries that will undoubtedly make your life less demanding, when you pick CodeIgniter for your web application:
- Benchmarking Class
- Caching Driver
- Calendaring Class
- Shopping Cart Class
- Config Class
- Email Class
- Encrypt Class
- Encryption Library
- File Uploading Class
- Form Validation
- Image Manipulation Class
- Input Class
- Pagination Class
- Security Class
- Session Library
- URI Class
- User Agent Class
- XML-RPC and XML-RPC Server Classes
Benchmarking Class
If you need to quantify the time taken to execute an arrangement of lines or memory use, you can ascertain it by utilizing Benchmarking focuses in CodeIgniter.
Benchmarking class is constantly active, empowering the time contrast between any two checked focuses to be figured.
This class is introduced naturally by the framework so there is no compelling reason to do it physically.
It always starts the moment the system is invoked and finished just before sending the last view. Enabling an extremely precise planning of the whole framework execution to appear.
The Benchmark class can be utilized inside your controllers, views, or your models. The process for its usage is listed below:
- Mark a start point
- Mark an endpoint
- Run the “elapsed time” function to view the results
Here’s a case utilizing genuine code:
$this->benchmark->mark('code_start');

// Some code happens here

$this->benchmark->mark('code_end');

echo $this->benchmark->elapsed_time('code_start', 'code_end');
Caching Driver
Caching a page will enhance the page stack speed. In the event that the page is cached, at that point it will be stored in its completely rendered state.
CodeIgniter highlights wrappers around probably the most well-known types of quick and dynamic reserving. Everything except document based storing requires particular server necessities. A Fatal Exception will be tossed if server prerequisites are not met.
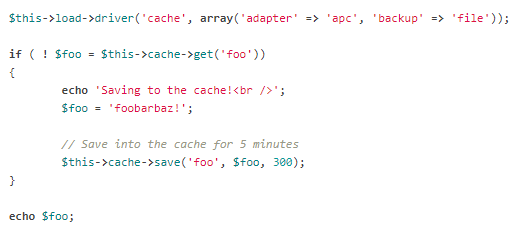
The accompanying code will stack the store driver, determine APC as the driver to utilize, and fall back to record.
Calendaring Class
Add events to specific dates into your calendar!!
By utilizing calendar template you can arrange the calendars in your own specific manner as it gives 100% control over each part of its plan.
The Calendar class empowers you to powerfully make calendars. Your calendars can be organized using a date-book layout, permitting 100% control over each part of its outline.
Using Calendar Class
Like most different classes in CodeIgniter, the Calendar class is introduced in your controller utilizing
$this->load->library('calendar');
Once stacked, the Calendar object will be accessible utilizing
$this->calendar
Displaying Calendar:
$this->load->library('calendar');
echo $this->calendar->generate();
Passing Data to your Calendar Cells
$this->load->library('calendar');

$data = array(
        3  => 'http://example.com/news/article/2006/06/03/',
        7  => 'http://example.com/news/article/2006/06/07/',
        13 => 'http://example.com/news/article/2006/06/13/',
        26 => 'http://example.com/news/article/2006/06/26/'
);

echo $this->calendar->generate(2006, 6, $data);
The above illustration, day numbers 3, 7, 13, and 26 will progress toward becoming connections indicating the URLs.
Shopping Cart Class
A shopping basket is a software bundle and E-commerce application that goes about as an online store’s list and requesting process.
When a user is perusing your site around then Cart Class enables the things to be added to a session that stays active. These things can be retrieved and displayed in a standard “shopping basket” organize.
Now, I am going to explain how we can use “Cart class in CodeIgniter?”
The Cart Class permits items to be added to a session that stays dynamic while a client is perusing your site. These things can be recovered and shown in a standard “shopping cart” design. Enabling the client to refresh the amount or expel things from the truck.
Using the Cart Class
$this->load->library('cart');
Once loaded, the Cart object will be available using
$this->cart
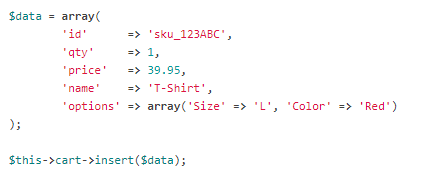
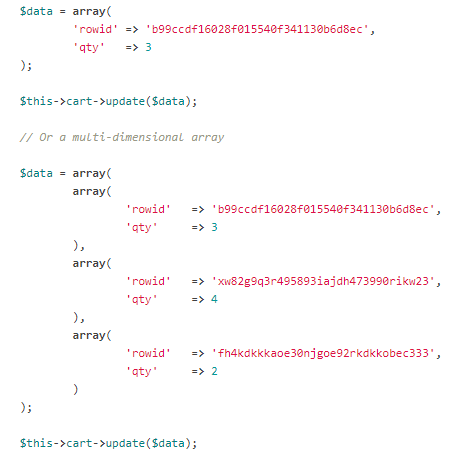
Adding an Item to The Cart:
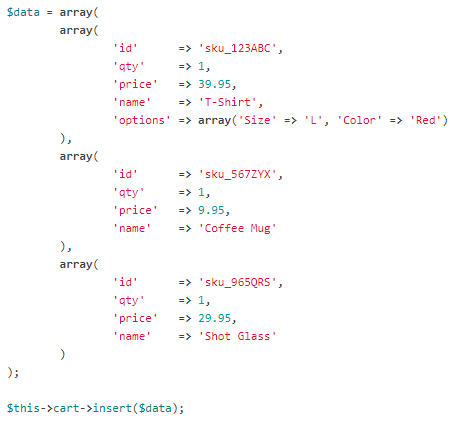
Adding Multiple Items to The Cart:
Updating The Cart:
Config Class
Under this heading, I am going to reveal ‘How to manually configure your CodeIgniter framework?’
The Config class gives a way to recover arrangement inclinations. These inclinations can originate from the default config file.
Open application/config/config.php file with any text editor and set your base_url(), likewise set an encryption key (if there is a requirement of a session in your CodeIgniter application).
Fetching Config Items
To retrieve an item from your config record, utilize the accompanying capacity:
$this->config->item('item_name');
Email Class
Sending email in CodeIgniter is much easier.
CodeIgniter’s vigorous Email Class supports the accompanying features:
- Multiple Protocols: Mail, Sendmail, and SMTP
- TLS and SSL Encryption for SMTP
- Multiple recipients
- CC and BCC
- HTML or Plaintext email
- Attachments
- Word wrapping
- Priorities
- BCC Batch Mode, enabling large email lists to be broken into small BCC batches
- Email Debugging tools
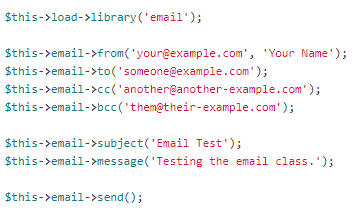
Sending Email:
Encrypt Class
Encryption is picked by the developers to make the information secured like for secret key, URL, credit card numbers and so on.
If you are utilizing CodeIgniter than to encrypt the data becomes much simpler as compared to native PHP code.
The Encrypt Class gives two-way information encryption. It scrambled utilizing the Mcrypt PHP expansion, which is required for the Encrypt Class to run.
Like most different classes in CodeIgniter, the Encrypt class is instated in your controller
$this->load->library('encrypt');
Performs the data encryption and returns it as a string. Example:
$msg = 'My secret message';

$encrypted_string = $this->encrypt->encode($msg);
Alternatively, pass encryption key by the second parameter on the off chance that you would prefer not to utilize in a config file.
$msg = 'My secret message';
$key = 'super-secret-key';

$encrypted_string = $this->encrypt->encode($msg, $key);
File Uploading Class
Utilizing File Uploading class, we can transfer files and likewise, restrict the type and size of the file to be uploaded.
CodeIgniter’s File Uploading Class licenses files to be transferred. You can set different inclinations, limiting the type and size of the files.
Uploading a file includes the accompanying general process:
- An upload form is displayed, enabling a user to choose a file and transfer it.
- At the point when the form is submitted, the file is transferred to the goal you determine.
- Along the way, the file is approved to ensure it is allowed to be transferred to the preferences you set.
- Once transferred, the user will be demonstrated a success message.
To show this procedure here is a short instructional exercise. A while later, you’ll discover reference data.
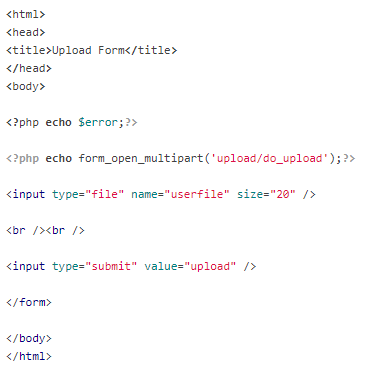
Creating the Upload Form
Utilizing a text editor, make a form called upload_form.php. In it, put this code and save it to your application/views/ directory:
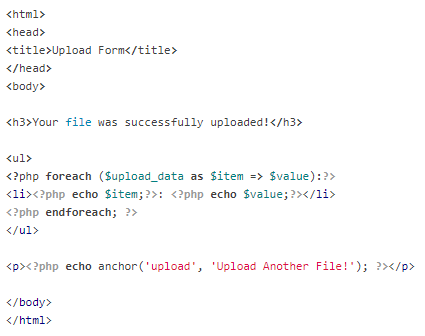
The Success Page
Create a form called upload_success.php. In it, put this code and save it to your application/views/ directory:

The Controller
Create a controller called Upload.php. In it, put this code and save it to your application/controllers/ directory:
To attempt your form, visit your site utilizing a URL like this one:
example.com/index.php/upload/
Form Validation
To validate various form fields using CodeIgniter framework.
CodeIgniter gives a far-reaching form validation and data preparing a class that limits the measure of code you’ll compose.
Let’s describe the ideal scenario how to Codeigniter works on form validation:
- A form is displayed.
- You fill it in and submit it.
- If you submitted something invalid, the form is reappeared containing data with an error message portraying the issue.
- This procedure proceeds until you have submitted a valid form.
The end goal to actualize form validation you’ll require three things:
- A View file containing a form.
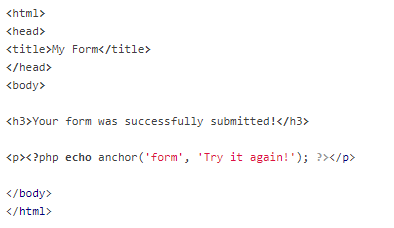
- A View file containing a “success” message to be visible upon successful submission.
- A controller method to get and process the submitted data.
How it works?
The Form

The Success Page
The Controller
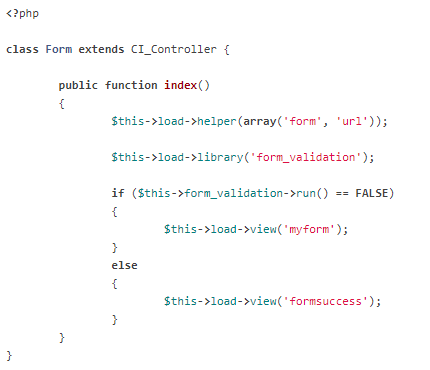
Image Manipulation Class
While building up any web application there is a need to manipulate image progressively, such as while transferring a picture. CodeIgniter’s image library providing Image Manipulation.
CodeIgniter’s Image Manipulation class perform the following actions:
- Resizing
- Thumbnail Creation
- Cropping
- Rotating
- Watermarking
Like most other classes in CodeIgniter, the image class is initialized in your controller utilizing:
$this->load->library('image_lib');
Processing an Image
To create an image thumbnail you’ll need to do this:

Processing Methods
There are four available processing methods:
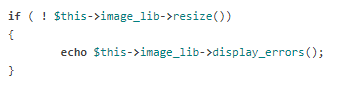
- $this->image_lib->resize()
- $this->image_lib->crop()
- $this->image_lib->rotate()
- $this->image_lib->watermark()
These methods return boolean TRUE upon success and FALSE for failure. If they fail you can retrieve the error message using this function:
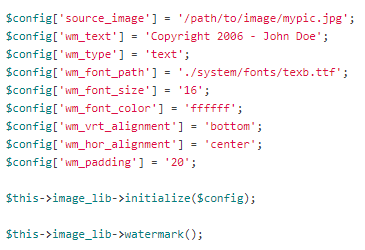
Watermarking an Image
Here is an example:
Input Class
The Input Class serves two purposes:
- It pre-processes global input data for security.
- It gives some helper methods to getting input data and pre-preparing it.
Input Filtering:
- Security Filtering
- XSS Filtering
Security Filtering
The security filtering method includes:
- If $config['allow_get_array'] is FALSE (default is TRUE), destroys the global GET array.
- Destroys all global variables in the event register_globals is turned on.
- Filters the GET/POST/COOKIE array keys, permitting only alpha-numeric (and a few other) characters.
- Provides XSS (Cross-site Scripting Hacks) filtering. This can be enabled globally or upon request.
- Standardizes newline characters to PHP_EOL (\n in UNIX-based OSes, \r\n under Windows). This is configurable.
XSS Filtering
The Input class can filter input consequently to prevent cross-site scripting attacks. For automatically run every time, you can enable it by opening your application/config/config.php file:
$config['global_xss_filtering'] = TRUE;
Accessing Form Data
The main methods are:
- $this->input->post()
- $this->input->get()
- $this->input->cookie()
- $this->input->server()
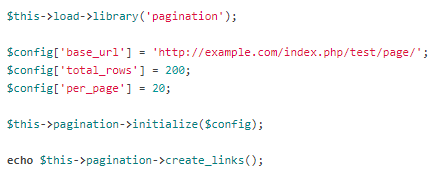
Pagination Class
Wherever we have a majority of data and need to show them, then it enables you to explore from page to page, at that time we require pagination.
How to make “Pagination in CodeIgniter?”
Here is a basic illustration showing to make pagination in one of your controller methods:
Security Class
Codeigniter gives “security” class which contains methods that assist you to create a safe application.
- XSS Filtering
- Cross-site request forgery (CSRF)
XSS Filtering
CodeIgniter accompanies a Cross Site Scripting prevention filter, which looks for techniques to trigger JavaScript or different sorts of code that endeavor to hijack cookies or do different malicious things. If anything denied is encountered it is rendered safe by changing the data to character entities.
To filter data through the XSS filter utilize the xss_clean() method:
$data = $this->security->xss_clean($data);
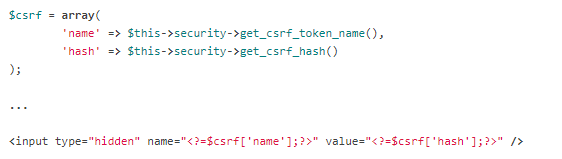
Cross-site request forgery (CSRF)
You can enable CSRF protection by modifying your application/config/config.php file in an accompanying way:
$config['csrf_protection'] = TRUE;
If you use the form helper, then form_open() will automatically embed a hidden csrf field in your forms. If not, then you can use get_csrf_token_name() and get_csrf_hash()
Session Library
Sessions will commonly run globally with each page load. The Session class should either be initialized in your controller constructors, or it can be auto-stacked by the system.
To initialize the Session class manually in your controller constructor
$this->load->library('session');
Once loaded, the Sessions library object will be available using:
$this->session
Session Data
Session data is simply an array associated with a particular session ID.
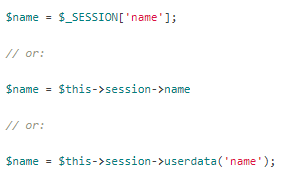
Retrieving Session Data
Any snippet of data from the session array is accessible through the $_SESSION superglobal:
$_SESSION['item']
Or through the magic getter:
$this->session->item
And for backward compatibility, through the userdata() method:
$this->session->userdata('item');
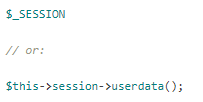
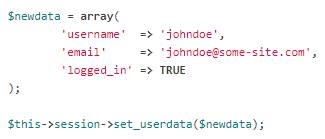
To retrieve all of the existing userdata
Adding Session Data
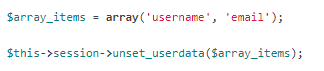
Removing Session Data
![]()
This method also accepts an array of item keys to unset:
Flashdata
CodeIgniter supports “flashdata”, or session data that may be accessible for the next request, and is then naturally cleared.
To mark an existing item as “flashdata”
$this->session->mark_as_flash('item');
If you want to mark multiple items as flashdata, simply pass the keys as an array:
$this->session->mark_as_flash(array('item', 'item2'));
To add flashdata:
$this->session->set_flashdata('item','value');
Reading flashdata
$this->session->flashdata('item');
URI Class
The URI Class gives methods that assist you to recover information from your URI strings.
Segments are numbered from left to right. For example, if your full URL is this:
http://example.com/index.php/news/local/metro/crime_is_up
The segment numbers would be this:
- news
- local
- metro
- crime_is_up
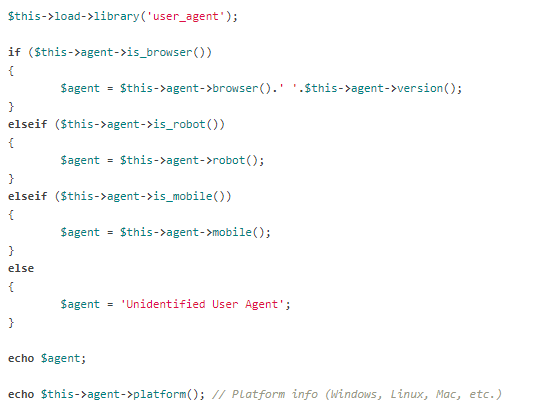
User Agent Class
The User Agent Class gives functions that assistance recognizes information about the browser, cell phone, or robot visiting your site.
Initializing the Class
$this->load->library('user_agent');
Example
XML-RPC and XML-RPC Server Classes
CodeIgniter’s XML-RPC classes allow you to send requests to another server or set up your own XML-RPC server to get requests.
Initializing Class
Like most other classes in CodeIgniter, the XML-RPC and XML-RPCS classes are introduced in your controller.
To load the XML-RPC class you will utilize:
$this->load->library('xmlrpc');
To load the XML-RPC Server class you will utilize:
$this->load->library('xmlrpc');
$this->load->library('xmlrpcs');
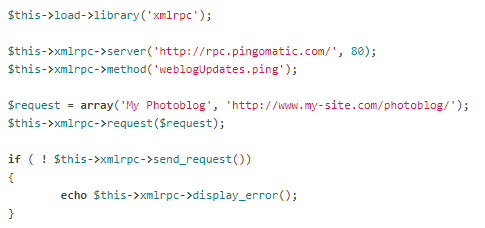
Sending XML-RPC Requests
To send a request to an XML-RPC server you should indicate the accompanying information:
- The URL of the server
- The method on the server you wish to call
- The request data
Here is a basic example:
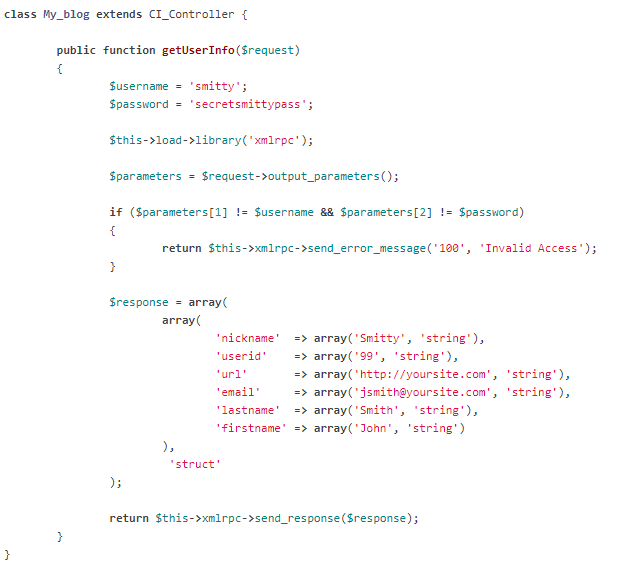
Processing Server Requests
When the XML-RPC Server gets a request and loads the class/method for preparing, it will pass an object that strategy containing the information sent by the client.
For example an XML-RPC Client can send the Server a username and password, consequently, the Server sends back data about that specific user.
Overall, it can be stated that CodeIgniter is an application development framework, which can be utilized to create websites, using PHP. It is an Open Source framework. It has an extremely rich arrangement of usefulness, which will increase the speed of website development work.
So, wait no more and get started!
- What Is Big Data Visualization? - January 22, 2021
- Five Benefits of Big Data Analytics for E-commerce - July 9, 2020
- Google Data Studio Vs. Tableau: Which One is More Suitable for Your Business? - June 25, 2020