Angular is a very powerful framework which is developed and maintained by Google. There are 6 versions of angular, the latest version is Angular 6 which was released recently. It provides many features like data binding, two-way data binding, services, pipes, directives, scope, controller, filters, templates, routing, dependency injection and many more. It has a wide community on github angular which makes things very easy.
Angular also follows MVC pattern which is model-view-controller. If any of you work with any framework which follows MVC then you should know that model is the database, view is where HTML code is written and the controller is where your logic should be placed. Basically controller loads the view and sends a request to model, but in angular, it’s different and it makes the application very easy.
Angular has gained popularity as an open-source web application development framework
due to its intent to simplify application development.
Angular is a very powerful spa (single page application) framework. It makes easy to develop web application very fast. Now, let’s understand how you can run angular in a browser, its very easy.
Basic Application
Let’s make a very simple application in angular where you can see a login or signup page and navigate between those pages.
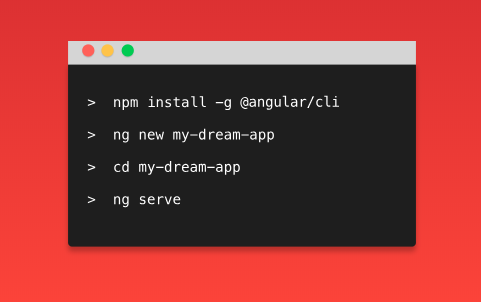
Step 1
First install cli globally, Open cmd and type the below command.
npm install -g @angular/cli


This command will install angular cli globally.
Step 2
Now, after you install cli, create a folder anywhere, or on a desktop or on a ‘C’ drive and type the command for creating a new project called ang_app, ng new ang_app, this command will create your project.
Open your folder with vs code and open your command line terminal, and open another terminal and go to the root directory of your project.
Now hit the below command to see the app in the browser.
This command will create a server with port 4200, you can visit by hitting the below url in browser http://localhost:4200, and you will see your application running.
If you want to run your application on a different port, simply you can type the below command
Now, open your project in any editor and you will see a file called src, basically you have to do everything in this file. Inside this file you’ll see app component which holds components. Components are like a controller which hold your HTML or logic to manipulate dom (document object model). Now we need to install bootstrap so that our application looks little bit better. For installing bootstrap, see the below command.
If you want to install any specific version of bootstrap just see the below command
Now we need some configuration so that bootstrap will work. Visit .angular-cli.json file which is in the root directory of your project. You will see styles array, just replace it with below code or copy it, and stop your server by hitting the ctrl+c . This combined key will stop the server. Now start your server again
Lets create a component, well there are two ways to create a component manually or through cli, that’s the reason we install angular cli globally . Now for creating components, you have to type this command.
This command will create a component for you, now there is a more easy way to create component.
Just use this command.
This command is the shorter version for creating components.
After, creating both components you will see that both components will be imported automatically in app.module.ts file.
This file holds our every component and cli imports those components for us. There is no need to manually bring those components.
Now in app.module.ts file, you need to do some imports so that our router link will work.
So, in order to navigate between those pages, paste the below code in app.module.ts file
Now, create a file in app folder , app-routing.module.ts , this file will hold our routes. After that, we need to bring our components in app-routing.module.ts file, below is the code for this file.
Now, an Important thing we forgot we need header component so that we can navigate between login component and signup component. You can copy the below code for navbar and copy it into your navbar-component.html.
In order to copy this code we need to create header component first
import { BrowserModule } from '@angular/platform-browser';
import { NgModule } from '@angular/core';
import { AppComponent } from './app.component';
import { LoginComponent } from './login/login.component';
import { SignupComponent } from './signup/signup.component';
import { HeaderComponent } from './header/header.component';
import { AppRoutingModule } from './app-routing.module';
@NgModule({
declarations: [
AppComponent,
LoginComponent,
SignupComponent,
HeaderComponent
],
imports: [
BrowserModule,
AppRoutingModule
],
providers: [],
bootstrap: [AppComponent]
})
export class AppModule { }
Now if you see your app in the browser, you can navigate between pages very easily without refreshing the page. Therefore, this the only reason why we use angular 6 for developing the single page web application. It can make your application very fast, and the user experience will be much better. I hope this article will be a great source of information for you while developing the other single page web applications as well. If you have any queries, you can post them in the comment section below. Thank You!