Jump to Section
Introduction:
To start developing an e-commerce application from scratch is really very challenging and time taking task for any developers. Codeigniter has the solution to this problem. It has its own CMS(content management system) named Gocart. It has reach features of a built-in database, easy to use customized shopping cart and custom structure. This satisfies most of the basic requirements of e-commerce need an application.
It is an open source e-commerce platform built in CodeIgniter by Clear Sky Designs.
Requirements:
Needed things are mentioned below:
- PHP 5.4 or greater PHP version
- PHP_INTL library
- MySQL
Download and Install Gocart:
You can download Gocart from the internet and install it.
http://domainname.com/install
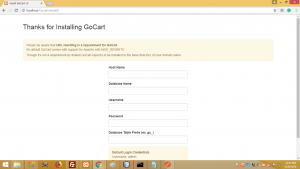
If you properly followed all the instruction to install it, you will successfully run all default pages of Gocart easily. Else if your server is not configured for URL rewriting, you can run into a 404 error on this redirect.
Configuration:
It supports the ability to configure some elements of the platform from the admin panel like other CMS.

The GoCart configuration form is located in the Administrative submenu in admin. Configuration is broken into some primary sections. Have a look.
Shop Details:
In Shop details, we set the most basic details of the shop. Here we’re going to enter the Name of the store, GoCart Theme, Homepage, Products per Category Page, Default Meta Keywords & Default Meta Description etc.
Email Settings:
This is one of the more important sections of the Configuration page in Gocart. You will need to configure your shop’s email. It uses the Swift Mailer PHP Class for sending the email and supports 3 different methods. Other options include SMTP (Simple mail transfer protocol) & Send mail which will require additional settings.
Ship From Address:
The Ship From Address is only required if you are utilizing a real-time rates shipping method that requires a point of origin.
Security:
The URL has defined in such a way that it redirects to 404 pages every time if URL is not appropriate or as per our defined routing.
Package Details:
These settings are utilized by some real-time shipping rates modules present in its admin section.
Orders & Inventory:
This section in the Configuration details allows you to add or delete the default statuses available in the drop list.
Tax Settings:
Whether or not to apply taxes to shipping charges done in the TAXES & LOCALIZATION section in the admin panel.
Shipping Methods:
By default, it only comes with the flat rate shipping module.
Administration:
The administrator list is accessible in the Administrative submenu. Here also we go to add admin users to your GoCart Installation. It also supports two users types i.e Admins & Order users. An admin has access to every part of the administration panel. But Order users only have access to the order management portion of the system.
Customers:
Customers are accessible via the Sales submenu in the admin panel. From here customers details can be modified(add, edit, and delete) from its list.
Banners:
Banners are groups of images organized into collections that can be displayed on pages using shortcodes. To access the banner system click banners in the context submenu. You can add a banner collection by clicking the “Add New Banner Collection” button in the top right. The only field for a banner collection is the name. Enter the name of the collection and click save. Now, you can click the image button beside the collection you want to add banners too. New banners can be added by clicking the Add new Banner button.
Also Read: How to integrate google captcha with php?
Developer’s Guidelines
Introduction:
From here, we will discuss from the developer’s point of view to develop an application using Gocart.
Core:
GoCart 3 begins by utilizing a feature in CodeIgniter to bypass the routing system and set a default controller and method in its own way. We’re using this to redirect Codeigniter to the bootstrap controllers init method. This method is the heart of GoCart.
The bootstrap controller does:-
- It initializes the session.
- Load the manifest configuration file.
- Autoload some essential libraries, helpers, and models.
- Set its configuration from the database into the config class present in it.
- Initialize any HTTP Authentication as designated by its configuration.
- Load Alto-router, parse the URI and load the appropriate controller and method.
Modules:
Modules are components in Gocart. This is an organizational method that enables modules to be aware of themselves and replaced without having a major impact on the rest of the system in Gocart. The modules located in the application/modules folder are core components in Gocart. Each module should contain the files for its own controllers, views, manifest, models and language files.
Manifest File:
GoCart has many manifest files in a different location. Each module requires one manifest file. This file contains the routes for a particular module. The manifest file is the heart of the Gocart.
GoCart makes the manifest file automatically.
Themes:
GoCart themes are located in the base folder present inside the themes directory.
GoCart views are associated with the module. To override a module view simply create a view in the theme with the same filename as the view you want to override.
Shortcodes
GoCart 3 is laying the foundation for front end shortcode support. By default, GoCart comes with shortcodes for categories and banners.
The line below is a sample manifest entry for a new shortcode. This example of a Category module can explain it properly.
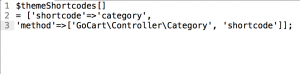
A shortcode manifest entry requires a key called “shortcode” and a key called “method”. Creating a shortcode will result in a Twig_SimpleFunction being available for use in your content. The shortcode key will be the function name.
Alto-router
GoCart uses Alto-router for mapping controllers and methods to URLs.
Alto-router supports several HTTP verbs as mentioned below:
- GET
- POST
- PATCH
- PUT
- DELETE
Conclusion:
In this blog, we have learned Gocart basics. It has a very simple folder and directory structure. You can easily understand the flow of Gocart if you have good command over CodeIgniter. Please start using Gocart to develop an e-commerce application to avoid starting from scratch.
For any queries, suggestion or feedback, please write in comment box. For more tech related stuff of mine, please follow my blogs.
- What Is Big Data Visualization? - January 22, 2021
- Five Benefits of Big Data Analytics for E-commerce - July 9, 2020
- Google Data Studio Vs. Tableau: Which One is More Suitable for Your Business? - June 25, 2020