A proper understanding of loops and how to use it in an efficient way in programming is a very basic thing that must be in practice by every programmer, in order to write an efficient code.
In this blog, I have covered a brief explanation of all the loops present in PHP with examples in an easy manner.
Many times we have to repeat a particular set of function again and again while writing codes. Performing them individually will increase the line of codes and time consumed. Hence, it makes the program more complex. So, instead, we can use loops for performing the code!
A loop, in simpler terms, is used to automate the repeated execution of a set of code, until a particular condition is satisfied. While using loops in programming, the main thing that must be kept in mind that condition must be placed accurately to avoid infinite looping that halts the execution process.
In PHP, we have four types of loops:
- For loop
- Foreach loop
- While loop
- Do-while loop
Jump to Section
For loop
For loop is used to execute a particular code for a specified number of times. It is used only when we know in advance that how many times a particular code should run.
The syntax for this loop in PHP is:
<?php

for (initialize; condition; increment/decrement)

{

//code to be executed

}

?>
Here,
- “initialize” is used to set the initial value of the counter; it is often an integer value;
- “condition” is where we write the conditional expression to be evaluated for repeated code execution, and;
- “increment/decrement” is used to increment or decrement the initial value.
How does it work?
Let’s take an example:-
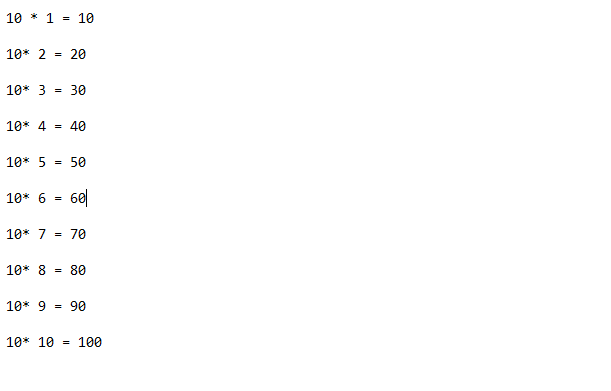
To print a table of 10 using For loop, the code will be:
<?php

for ($i=1; $i<=10;$i++)

{

$product = 10 * $i;

echo “10 * $i = $product <br/>”;

}

?>
Here, ‘i’ will be initialized with the value 1. Then the condition is tested, whether the value of ‘i’ is less than or equal to 10. If found true, the code inside the block is executed and the output is printed on the screen. And when found false, the control is directly transferred outside the loop code block. So, output in this case is:
Foreach loop
To understand foreach loop, the concept of an array must be clear because foreach loop is used for looping with arrays.
The syntax for this loop in PHP is:
<?php

foreach ($array_data as $arravy_values)

{

//code

}

?>
Here,
- “$array_data” is the array of variables to be iterated,
- “$array_value” is the temporary variable holding the current array item values.
How does it work?
For example:-
You want to read and print the elements of an array using foreach loop, the code will be:
<?php

$birds_list = array (“Parrot”, “Pigeon” , “peacock”, “sparrow”, “crow”);

foreach($birds_list as $array_values)

{

echo $array_values. “<br>”;

}

?>
Here, the every element of the “birds_list” is assigned an array number, i.e., “Parrot” is array[0], “Pigeon” is array[1], “Peacock” is array[2], “Sparrow” is array[3], and “Crow” is array[4]. Everytime the control reaches the foreach loop, “array_values” gets the current value of the “birds_list” and prints the value. That means the “array_values” get the value of array[0], array[1], array[2], array[3], and array[4], respectively. Beyond that, the “array_values” could not get any further value from “birds_list” and hence, the loop terminates.
So, the output will be:
- Parrot
- Pigeon
- Peacock
- Sparrow
- Crow
WHILE LOOP
While Loop is used to execute code until the set condition is satisfied. It is useful when the number of iterations is not known in advance. However, if your loop is non-deterministic, simplify your code and use a while loop as they’re semantically a lot better than other loops.
The syntax for this loop in PHP is:
<?php

while (condition)

{

//code


}

?>
Here,
- “condition” is the condition that will be evaluated by the while loop.
How does it work?
Let’s suppose you want to print number from 1 to 10 using while loop. The code will be:
<?php

$i=0;

while ($i<10)

{

echo $i+1. “<br>”;

$i++;

}

?>
At first, the value of “i” will be 0. When the control reaches the while loop, the condition will be checked, i.e., if the value of “i” is less than 10 or not. When found true, the echo command is executed followed by the increment of value of “i” by 1. Again, the condition inside the while loop is checked, i.e, if the value of “i” (which is 1 now) is less than 10 or not. The code written inside the while loop code block is executed until the condition is satisfied. When the condition is false, the control is shifted outside the while loop block code, indicating the termination of while loop.
So, the output will be:
1
2
3
4
5
6
7
8
9
10
DO-WHILE LOOP
The do-while loop is taken into consideration where you want to get at least one output, even when the condition is false. It results true if the initial condition keeps becoming true, and then stops the execution if something does not fall within the statement. It has more control with the user’s input as they may define different loops which may become true if the condition holds for them.
The syntax for this loop in PHP is:
<?php

do

{

//code

}

?>

while (condition);
Here,
- “condition” is the condition while loop evaluates.
How does it work?
To understand it better, let’s have a look on the following explanation,
<?php

$i=9;

do

{

echo “$i is”. “<br>”;

}

While ($i<9);

?>
Here, the control flows from the initialization of “i” with value 9 to the code written inside the do-while block. The code written is executed and then, the condition is checked. Since the condition is false, the control is transferred to the end of the loop.
So, the output is: 9
Concluding Words
We have learned basic introduction to PHP loops, how to write a loop in code, how they work, how we can use a loop in PHP based on our requirements in order to save the number of lines.
I hope you like this tutorial and will find it useful. Do you have any query? Wish to know more about the different loops in the PHP or have any suggestion? Do share in the comment section below. Till then Happy Coding!!
- What Is Big Data Visualization? - January 22, 2021
- Five Benefits of Big Data Analytics for E-commerce - July 9, 2020
- Google Data Studio Vs. Tableau: Which One is More Suitable for Your Business? - June 25, 2020