Web Service is a web-based application which is designed to interact with other applications over the internet. Also, we can use the protocols of the web services used by the web applications.
The Web service customers invoke calls method on remote objects by using SOAP and HTTP in the Web. Therefore, It is an independent Web Service which can be communicated by using standard web protocols and data formats, such as HTTP, XML, and SOAP.
SOAP is frequently used in web service and it stands for simple object access protocol which is a remote call method function that only executes with remote machine and converts the object communication into XML format sent via HTTP.
There are three elements in web service development as follows.
- Creating the web service
- Creating a proxy
- Consuming the web service
Jump to Section
How to create the web service
There are some checkpoints for creating the web service as follows
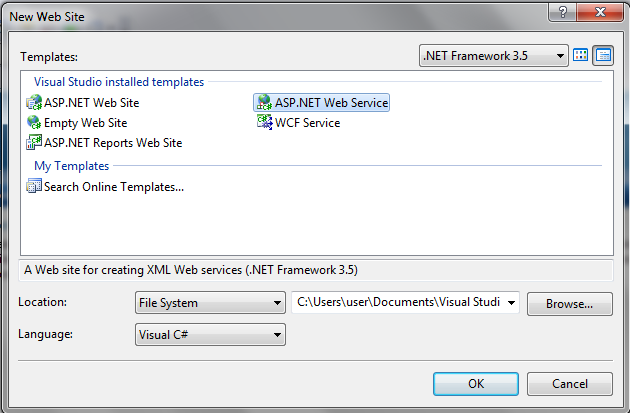
Step 1: Open your visual studio and select File> New> Website>ASP.NET web service
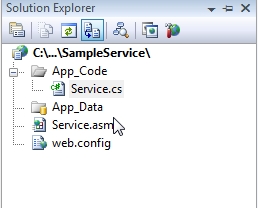
Step 2: A web service file contains its file extension name with Service.asmx and its code-behind file page, Service.cs gets created in the App_Code directory of the main project.
Now, open your file with the name extension of Service.cs in web service website to write the code to get the details of the user from the database. Before the WebMethod in Service.cs first you need to add following namespaces as follows.
<%@ WebService Language="C#" Class="GetInfo" %>
using System;
using System.Data;
using System.Data.SqlClient;
using System.Web.Services;
[WebService(Description="My Suppliers List Web Service")]
public class GetInfo : WebService
{
[WebMethod(BufferResponse=true)]
public DataSet ShowSuppliers (string str)
{
SqlConnection dbConnection = new SqlConnection("server=(local);
uid=sa;pwd=;database=Northwind;");
SqlDataAdapter objCommand = new SqlDataAdapter

("select ContactName, CompanyName, City, Phone from Suppliers
where Country = '" + str + "' order by ContactName
asc", dbConnection);
DataSet DS = new DataSet();
objCommand.Fill(DS);
return DS;
dbConnection.Close();
dbConnection = null;
}
}
The <%@ WebService Language=”C#” Class=” GetInfo” %> directive setup file in a Web Service, which gives it an appropriate name and specify the language it uses. Once you add the namespaces then write the following method GetUserDetails in Service.cs file.
Step 3: Here you need to change the file name of stockservice.asmx to stockservice.cs which contain simply a web service directive on it.
<%@ WebService Language="C#" CodeBehind="~/App_Code/StockService.cs" Class="StockService" %>
Step 4: Then, open this service.cs file and the simple code “Hello World” generated with the basic code as follows.
Script with namespaces
using System;
using System.Collections;
using System.ComponentModel;
using System.Data;
using System.Linq;

using System.Web;
using System.Web.Services;
using System.Web.Services.Protocols;

using System.Xml.Linq;

namespace StockService
{
   // <summary>
   // Summary description for Service1
   // <summary>

   [WebService(Namespace = "http://zigzag.org/")]
   [WebServiceBinding(ConformsTo = WsiProfiles.BasicProfile1_1)]
   [ToolboxItem(false)]

   // To allow this Web Service to be called from script,
   // using ASP.NET AJAX, uncomment the following line.
   // [System.Web.Script.Services.ScriptService]

   public class Service1 : System.Web.Services.WebService
   {
      [WebMethod]

      public string HelloWorld()
      {
         return "Hello World";
      }
   }
}
Step 5: Now change your code-behind the file page and add the 2D string arrays for the stock symbol, name, price, and two web calls methods for getting the stock information.
Script with namespaces
using System;
using System.Linq;

using System.Web;
using System.Web.Services;
using System.Web.Services.Protocols;

using System.Xml.Linq;

[WebService(Namespace = "http://zigzag.org/")]
[WebServiceBinding(ConformsTo = WsiProfiles.BasicProfile1_1)]

// To allow this Web Service to be called from script,
// using ASP.NET AJAX, uncomment the following line.
// [System.Web.Script.Services.ScriptService]

public class StockService : System.Web.Services.WebService
{
   public StockService () {
      //Uncomment the following if using designed components
      //InitializeComponent();
   }

   string[,] stocks =
   {
      {"TATAIND", "TATA Industries", "1060.15"},
      {"ICICI", "ICICI Bank", "911.55"},
      {"JSW", "JSW Steel", "1201.25"},
      {"WIPRO", "Wipro Limited", "1194.65"},
      {"HCL", "HCL Computers", "91.10"}
   };

   [WebMethod]
   public string HelloWorld() {
      return "Hello World";
   }

   [WebMethod]
   public double GetPrice(string symbol)
   {
      //it takes the symbol as parameter and then returns price
      for (int i = 0; i < stocks.GetLength(0); i++)
      {
         if (String.Compare(symbol, stocks[i, 0], true) == 0)
         return Convert.ToDouble(stocks[i, 2]);
      }

      return 0;
   }

   [WebMethod]
   public string GetName(string symbol)
   {
      // It takes the symbol as parameter, returns name of the stock
      for (int i = 0; i < stocks.GetLength(0); i++)
      {
         if (String.Compare(symbol, stocks[i, 0], true) == 0)
         return stocks[i, 1];
      }

      return "Stock Not Found";
   }
}
Step 6: Now, run your web service application which gives a web service test page, which allows testing the service methods. Then click on that method name and check if it runs properly or not.
Consuming the Web Service
While using the web service, you need to create a website under the same solution explorer window. For this reason, A web page calls the web service which contains a label control to display the results and 2 control buttons, one for a post back and other for calling the web services. There are some steps as follows.
Step 1: You need to click on “WebServicesDemo” in the window explorer and then you need to add new asp.net web application project and give a proper name like as “CalculatorWebApplication”
Step 2: Then add a reference to web service by clicking on References folder in the CalculatorWebApplication project name and then you need to select Add Service Reference option. Now type the web service address and press the “GO” button in the Address text box of the Add Service Reference window. For this reason, In the namespace textbox type CalculatorService and click on “OK” button in solution explorer window.

Step 3: Then, click on the CalculatorWebApplication project in solution explorer window and add web form.
Step 4: Now, copy and paste the following HTML code as follows
HTML Script
<table style="font-family: Arial">
<tr>
<td>
<b>First Number</b>
</td>
<td>
<asp:TextBox ID="txtFirstNumber" runat="server"></asp:TextBox>
</td>
</tr>
<tr>
<td>
<b>Second Number</b>
</td>
<td>
<asp:TextBox ID="txtSecondNumber" runat="server"></asp:TextBox>
</td>
</tr>
<tr>
<td>
<b>Result</b>
</td>
<td>
<asp:Label ID="lblResult" runat="server"></asp:Label>
</td>
</tr>
<tr>
<td colspan="2">
<asp:Button ID="btnAdd" runat="server" Text="Add"
OnClick="btnAdd_Click" />
</td>
</tr>
</table>
Step 5: Then, Copy and paste the following code into the code-behind file
protected void btnAdd_Click(object sender, EventArgs e)
{

CalculatorService.CalculatorWebServicesSoapClient client =
new CalculatorService.CalculatorWebServicesSoapClient();

int result = client.Add(Convert.ToInt32(txtFirstNumber.Text),
Convert.ToInt32(txtSecondNumber.Text));

lblResult.Text = result.ToString();

}
The file content for the web application as follows:
<%@ Page Language="C#" AutoEventWireup="true" CodeBehind="Default.aspx.cs" Inherits="wsclient._Default" %>

<!DOCTYPE html PUBLIC "-//W3C//DTD XHTML 1.0 Transitional//EN" "http://www.w3.org/TR/xhtml1/DTD/xhtml1-transitional.dtd">

<html xmlns="http://www.w3.org/1999/xhtml" >

<head runat="server">
<title>
Untitled Page
</title>
</head>

<body>

<form id="form1" runat="server">
<asp:Label ID="lblmessage" runat="server"></asp:Label>
<asp:Button ID="btnpostback" runat="server" onclick="Button1_Click" Text="Post Back" style="width:132px" />
<asp:Button ID="btnservice" runat="server" onclick="btnservice_Click" Text="Get Stock" style="width:99px" />
</form>

</body>
</html>
The code-behind file page for the web application as follows:
using System;
using System.Collections;
using System.Configuration;
using System.Data;
using System.Linq;

using System.Web;
using System.Web.Security;
using System.Web.UI;
using System.Web.UI.HtmlControls;
using System.Web.UI.WebControls;
using System.Web.UI.WebControls.WebParts;

using System.Xml.Linq;

//this is the proxy as you can see
using localhost;

namespace wsclient
{
   public partial class _Default : System.Web.UI.Page
   {
      protected void Page_Load(object sender, EventArgs e)
      {
         if (!IsPostBack)
         {
            lblmessage.Text = "First Loading Time: " +  DateTime.Now.ToLongTimeString
         }
         else
         {
            lblmessage.Text = "PostBack at: " + DateTime.Now.ToLongTimeString();
         }
      }

      protected void btnservice_Click(object sender, EventArgs e)
      {
         StockService proxy = new StockService();
         lblmessage.Text = String.Format("Current HCLPrice:{0}",
         proxy.GetPrice("HCL").ToString());
      }
   }
}
How to Use Web service in a web application with a proxy server
There are some checkpoints for using a web service in web applications as follows.
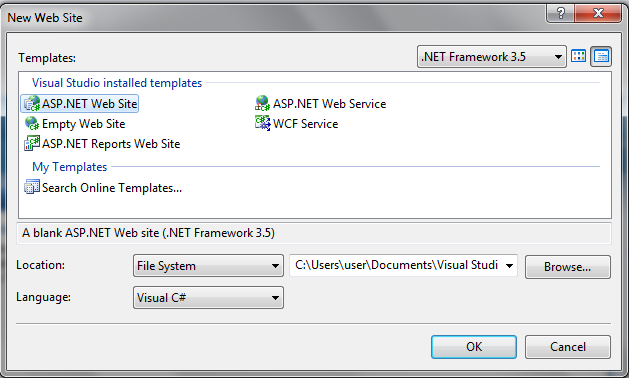
Step 1: First of all, open your visual studio and File>New> Website> ASP.NET website, then click on the “OK” button in solution explorer window.
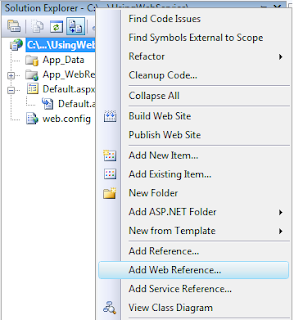
Step 2: Now right click on solution explorer and select “Add web reference”.
Step 3: Once you add “Select web reference”, a new window will pop up like this
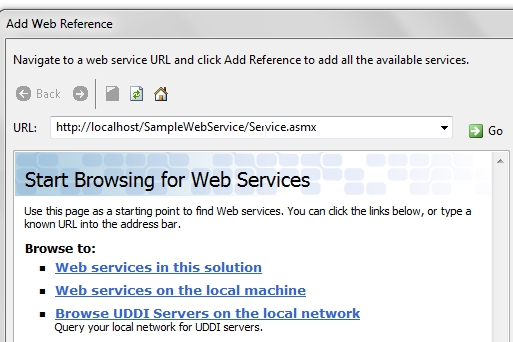
Step 4: You need to enter your locally deployed web service link and press on “Go” button after that your web service will be found and the output will look like this as follows.
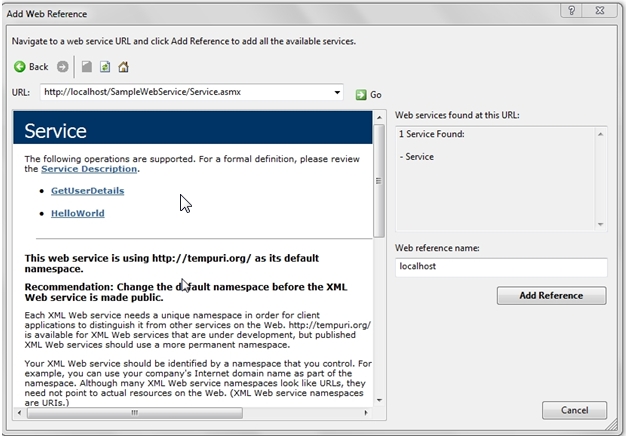
Step 5: Press a button “Add Reference” then the web service will add successfully. Open your Default.aspx page and, make your design like this as follows.
<html xmlns="http://www.zigzag.org/1999/xhtml">

<head runat="server">

<title>Getting Data from WebService</title>

</head>

<body>

<form id="form1" runat="server">

<div>

<table>

<tr>

<td>

<b>Enter UserName:</b>

</td>

<td>

<asp:TextBox ID="txtUserName" runat="server"></asp:TextBox>

</td>

<td>

<asp:Button ID="btnSubmit" runat="server" Text="Submit" onclick="btnSubmit_Click" />

</td>

</tr>

</table>

</div>

<div>

<asp:GridView ID="gvUserDetails" runat="server" EmptyDataText="No Record Found">

<RowStyle BackColor="#EFF3FB" />

<FooterStyle BackColor="#507CD1" Font-Bold="True" ForeColor="White" />

<PagerStyle BackColor="#2461BF" ForeColor="White" HorizontalAlign="Center" />

<HeaderStyle BackColor="#507CD1" Font-Bold="True" ForeColor="White" />

<AlternatingRowStyle BackColor="White" />

</asp:GridView>

</div>

</form>

</body>

</html>
For this reason, use some following namespaces in the code behind, then your final code will look like this
Script After Nameapsces
protected void Page_Load(object sender, EventArgs e)

{

if(!IsPostBack)

{

BindUserDetails("");

}

}

protected void BindUserDetails(string userName)

{

localhost.Service objUserDetails = new localhost.Service();

DataSet dsresult = new DataSet();

XmlElement exelement = objUserDetails.GetUserDetails(userName);

if(exelement!=null)

{

XmlNodeReader nodereader = new XmlNodeReader(exelement);

dsresult.ReadXml(nodereader, XmlReadMode.Auto);

gvUserDetails.DataSource = dsresult;

gvUserDetails.DataBind();

}

else

{

gvUserDetails.DataSource = null;

gvUserDetails.DataBind();

}

}

protected void btnSubmit_Click(object sender, EventArgs e)

{

BindUserDetails(txtUserName.Text);

}
Step 6: Now simply execute this code and you will get the final output.
Note: The interviewer may ask you some questions related to consuming a web service in your interview like How proxy class can be generated, What is the use of a proxy class in the web application, What happens, if a web service refers a web page. I will tell you about all of them with the proper answer.
This information can be used by the visual studio, where you can create the proxy class. Then, The client web applications call the proxy class method function. The proxy class function serializes the parameters in web service, then prepares a SOAP (Simple Object Acces Protocol) request message and sends it back to the web service.
The web service runs this method and gives a SOAP response message to the proxy as output. The proxy class then deserializes the SOAP response message and sends to the client web application. We do not need to serialize or deserialize .NET CLR (Common Language Runtime) objects from SOAP format window. As a result, the only proxy class takes care of serialization and deserialization of response messages and makes the life of a developer much easier to develop a web service with a proxy server.
How to use ASP.NET Session State in a Web Service
In this session, you will see how to use asp.net session variables in a web service. To create asp.net session object in a web service, the web service class should inherit from property System.Web.Services.WebService and EnableSession class of WebMethod attribute set to be true.
So, let’s understand how to use Session object with the Calculator Service that we already built above. So, we want to execute all the calculations that a user has performed as given below. Finally, The steps to get this.
Step 1: First of all, you need to copy and paste the following code into CalculatorWebServices.asmx file as follows
Script with namespaces
using System.Web.Services;
using System.Collections.Generic;

namespace WebServicesDemo
{
    [WebService(Namespace = "http://zigzag.com/webservices")]
    [WebServiceBinding(ConformsTo = WsiProfiles.BasicProfile1_1)]
    [System.ComponentModel.ToolboxItem(false)]
    public class CalculatorWebServices : System.Web.Services.WebService
    {
        [WebMethod(EnableSession = true)]
        public int Add(int firstNumber, int secondNumber)
        {
            List<string> calculations;

            if (Session["CALCULATIONS"] == null)
            {
                calculations = new List<string>();
            }
            else
            {
                calculations = (List<string>)Session["CALCULATIONS"];
            }

            string strTransaction = firstNumber.ToString() + " + "
                + secondNumber.ToString()
                + " = " + (firstNumber + secondNumber).ToString();
            calculations.Add(strTransaction);
            Session["CALCULATIONS"] = calculations;

            return firstNumber + secondNumber;
        }

        [WebMethod(EnableSession = true)]
        public List<string> GetCalculations()
        {
            if (Session["CALCULATIONS"] == null)
            {
                List<string> calculations = new List<string>();
                calculations.Add("You have not performed any calculations");
                return calculations;
            }
            else
            {
                return (List<string>)Session["CALCULATIONS"];
            }
        }
    }
}
Step 2: Here you need to update the proxy class in the client application CalculatorWebApplication. For this reason, you need to right click on CalculatorService in Service References folder and then select Update Service Reference option in the solution explorer.
Step 3: So, again you need to copy and paste the following HTML code in WebForm1.aspx
<table style="font-family: Arial">
<tr>
    <td>
        <b>First Number</b>
    </td>
    <td>
        <asp:TextBox ID="txtFirstNumber" runat="server"></asp:TextBox>
    </td>
</tr>
<tr>
    <td>
        <b>Second Number</b>
    </td>
    <td>
        <asp:TextBox ID="txtSecondNumber" runat="server"></asp:TextBox>
    </td>
</tr>
<tr>
    <td>
        <b>Result</b>
    </td>
    <td>
        <asp:Label ID="lblResult" runat="server"></asp:Label>
    </td>
</tr>
<tr>
    <td colspan="2">
        <asp:Button ID="btnAdd" runat="server" Text="Add"
        OnClick="btnAdd_Click" />
    </td>
</tr>
<tr>
    <td>
        <asp:GridView ID="gvCalculations" runat="server">
        </asp:GridView>
    </td>
</tr>
</table>
Step 4: Here copy and paste the following HTML code in WebForm1.aspx.cs
Script with namespaces
using System;

namespace CalculatorWebApplication
{
    public partial class WebForm1: System.Web.UI.Page
    {
        protected void Page_Load(object sender, EventArgs e)
        {
        }

        protected void btnAdd_Click(object sender, EventArgs e)
        {
            CalculatorService.CalculatorWebServicesSoapClient client =
                new CalculatorService.CalculatorWebServicesSoapClient();

            int result = client.Add(Convert.ToInt32(txtFirstNumber.Text),
                Convert.ToInt32(txtSecondNumber.Text));
            lblResult.Text = result.ToString();

            gvCalculations.DataSource = client.GetCalculations();
            gvCalculations.DataBind();

            gvCalculations.HeaderRow.Cells[0].Text = "Recent Calculations";
        }
    }
}
Step 5: In web.config file of CalculatorWebApplication, you need to set allowCookies attribute set to be true.
<basicHttpBinding>
  <binding allowCookies="true" name="CalculatorWebServicesSoap" />
</basicHttpBinding>
Once, you allow the attribute is set to true with the cookie, then the client application takes this cookie returned from the ASMX extension web service, and copy it into all coming future requests that are made in the web service. Hence, you can maintain the same session between the client and the web service.
How to Call ASP.NET web service from javascript using ajax
In this session, we will learn how to call asp.net web service method functions from JavaScript with the help of asp.net Ajax.
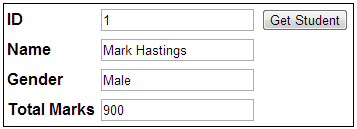
So, this we want to get as output below. When we type student ID in the textbox column and once we click “Get Student” button we want to get as follows the steps.
- First of all, call StudentWebService from javascript by using AJAX.
- The student web service must return the specific data of student from a database table.
- The data which returned that must be displayed in the textbox controls on the web form.
For this reason, we need to create a table tblStudents, here is the script for the following table.
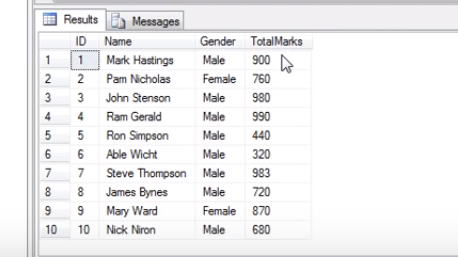
Step 1: Create a tblStudents table
Script For Table tblStudent
Create Table tblStudents
(
ID int identity primary key,
Name nvarchar(50),
Gender nvarchar(20),
TotalMarks int
)

Insert into tblStudents values('Mark Hastings','Male',900)
Insert into tblStudents values('Pam Nicholas','Female',760)
Insert into tblStudents values('John Stenson','Male',980)
Insert into tblStudents values('Ram Gerald','Male',990)
Insert into tblStudents values('Ron Simpson','Male',440)
Insert into tblStudents values('Able Wicht','Male',320)
Insert into tblStudents values('Steve Thompson','Male',983)
Insert into tblStudents values('James Bynes','Male',720)
Insert into tblStudents values('Mary Ward','Female',870)
Insert into tblStudents values('Nick Niron','Male',680)
Finally, you get the output like as
Step 2: Here. we need to create a stored procedure to get student data from tblStudents table by student ID. Here is the script for this.
Create Proc spGetStudentByID
@ID int
as
Begin
Select ID, Name, Gender, TotalMarks
from tblStudents where ID = @ID
End
Step 3: Now, you need to create a new asp.net empty web application and give an appropriate name to it i.e WebServicesDemo
Step 4: Click on WebServicesDemo project in the explorer window and then add a class file and give a proper name for it i.e Student.cs. Finally, copy and paste the following code as follows.
Script with namespaces
namespace WebServicesDemo
{
    public class Student
    {
        public int ID { get; set; }
        public string Name { get; set; }
        public string Gender { get; set; }
        public int TotalMarks { get; set; }
    }
}
Step 5: Click on WebServicesDemo project in the explorer window and then add a web service and give a proper name like StudentService.asmx.
Step 6: Now copy and paste the given code in StudentService.asmx.cs file. Just to make sure System.Web.Script.Services.ScriptService attribute is completely included. This attribute only allows a web service to be called from JavaScript with the help of asp.net Ajax. Here is the script for this as follows.
Script with namespaces
using System;
using System.Configuration;
using System.Data;
using System.Data.SqlClient;
using System.Web.Services;

namespace WebServicesDemo
{
    [WebService(Namespace = "http://zigzag.org/")]
    [WebServiceBinding(ConformsTo = WsiProfiles.BasicProfile1_1)]
    [System.ComponentModel.ToolboxItem(false)]
    [System.Web.Script.Services.ScriptService]
    public class StudentService : System.Web.Services.WebService
    {
        [WebMethod]
        public Student GetStudentByID(int ID)
        {
            Student student = new Student(); ;
            string cs = ConfigurationManager.ConnectionStrings["DBCS"].ConnectionString;
            using(SqlConnection con = new SqlConnection(cs))
            {
                SqlCommand cmd = new SqlCommand("spGetStudentByID", con);
                cmd.CommandType = CommandType.StoredProcedure;
                SqlParameter parameter = new SqlParameter("@ID", ID);
                cmd.Parameters.Add(parameter);
                con.Open();
                SqlDataReader reader = cmd.ExecuteReader();
                while (reader.Read())
                {
                    student.ID = Convert.ToInt32(reader["ID"]);
                    student.Name = reader["Name"].ToString();
                    student.Gender = reader["Gender"].ToString();
                    student.TotalMarks = Convert.ToInt32(reader["TotalMarks"]);
                }
            }
            return student;
        }
    }
}
Step 7: Click on WebServicesDemo project in the explorer window and then add a web form. This must add WebForm1.aspx.
Step 8: Now, copy and paste the following HTML code in opening and closing html tag <html></html> in WebForm1.aspx. Here is the script for the follwing code.
HTML script
<head runat="server">
    <title></title>

        function GetStudentById()
        {
            var id = document.getElementById("txtStudentId").value;
            WebServicesDemo.StudentService.GetStudentByID(id,
                GetStudentByIdSuccessCallback, GetStudentByIdFailedCallback);
        }

        function GetStudentByIdSuccessCallback(result)
        {
            document.getElementById("txtName").value = result["Name"];
            document.getElementById("txtGender").value = result["Gender"];
            document.getElementById("txtTotalMarks").value = result["TotalMarks"];
        }

        function GetStudentByIdFailedCallback(errors)
        {
            alert(errors.get_message());
        }

</head>
<body>
    <form id="form1" runat="server">
    <asp:ScriptManager ID="ScriptManager1" runat="server">
        <Services>
            <asp:ServiceReference Path="~/StudentService.asmx" />
        </Services>
    </asp:ScriptManager>
    <table style="font-family:Arial; border:1px solid black">
        <tr>
            <td><b>ID</b></td>
            <td>
                <asp:TextBox ID="txtStudentId" runat="server"></asp:TextBox>
                <input id="Button1" type="button" value="Get Student" onclick="GetStudentById()" />
            </td>
        </tr>
        <tr>
            <td><b>Name</b></td>
            <td>
                <asp:TextBox ID="txtName" runat="server"></asp:TextBox>
            </td>
        </tr>
        <tr>
            <td><b>Gender</b></td>
            <td>
                <asp:TextBox ID="txtGender" runat="server"></asp:TextBox>
            </td>
        </tr>
        <tr>
            <td><b>Total Marks</b></td>
            <td>
                <asp:TextBox ID="txtTotalMarks" runat="server"></asp:TextBox>
            </td>
        </tr>
    </table>
    <h1>
Note: The time given below does not change, once we click Get Student button as we are doing partial page postback and not a full page postback.
    </h1>
    <asp:Label ID="lblPageTime" runat="server"></asp:Label>
    </form>
</body>
Step 9: In the end, copy and paste the following given code in Page_Load() event of WebForm1.aspx.cs file.
lblPageTime.Text = DateTime.Now.ToString();
Consequently, more questions can be asked by an interviewer in your interview, these are some following questions and their related answers which will help you in your interview as follows.
Question 1: Explain about object-oriented web application such as ASP.NET web application, use of web services to get access a relational database?
In the above examples, we have discussed exactly the same concept which you need it. ASP.NET web applications call the web service, and then the web service has ado.net code to fetch data from a relational database system.
Same as with asp.net web application, a web service only works with any type of datastore (Relational databases, XML file, access, excel)
Question 2: How ADO.NET and XML web services make the effect on architecture?
Some of the real-time applications contain three or more effective layers, those are the most common layers in many of the web applications as follows
1. Presentation Layer (User Interface)- This layer maintains only the UI logic schema.
2. Business Logic Layer – This layer maintains logic to get validation in business rules.
3. Data Access Layer – This layer only performs the database CRUD operations like Create, Read, Update and Delete etc.
Question 3: How do you call a web service from the web form without getting reloaded the entire web page? or we can say, how do you call a web service without full page postback?
First of all, you need to call the web service with the help of using ASP.NET AJAX, that allows partial page postback. With partial page postback, the only specific portion of the page gets updated without getting reloaded the entire page. That’s really better for performance and ignores the screen flickers.
Conclusion
In this article, you will find the basic overview of ASP.NET web service that really helps to understand in an easy way for any fresher developer. Web services are the key elements of the so-called programmable Web.
They are very versatile software systems that really contain the potential to open up with a new era in software world like the age of interoperability. Web services can be used to set up business-to-business (B2B) transactions elements. They work great while exposing software functionality to customers.
- What Is Big Data Visualization? - January 22, 2021
- Five Benefits of Big Data Analytics for E-commerce - July 9, 2020
- Google Data Studio Vs. Tableau: Which One is More Suitable for Your Business? - June 25, 2020