In this blog, we will continue looking at more DAX “bear necessities” and, more specifically, the CALENDAR tables with DAX.
We focus on the DAX calendar functions, namely CALENDAR and CALENDARAUTO.
We will explain how these functions work and how you can use them to create date tables and, therefore, time intelligence reporting within Power BI.
Jump to Section
The Importance of DAX Date Functions
Let’s explore why date functions are important and for what we need them. We need date tables in Power BI if we want to do time intelligence reporting, where time intelligence reporting may be as follows:
- Month to date sales values
- Quarter to date sales values
- Year to date sales values, and
- If we want to compare a period of this year to the same period of last year
Rules for Working with Date Functions
The following so-called “rules” are useful to follow when working with date tables:
- All dates should be present, meaning it should be dated for which you have the data;
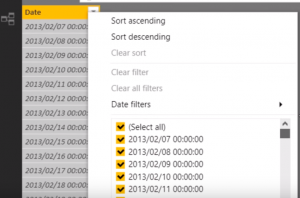
- All days should be sequential – there must not be gaps in your data, time intelligence will not work in Power BI if there are gaps;
- You can specify holidays – if you, for instance, want to calculate the number of working days in the year, then we will exclude public holidays and weekends.
DAX CALENDAR Functions
We will start by exploring the CALENDAR date function. The CALENDAR function returns a table with a single column called date, and that date column contains a continuous set of dates for the given range.
CALENDAR(<start_date>, <end_date>)
In other words, if you look at the syntax, you can see that you have to specify the start and end date, and it returns a table with one column of all dates between the specified start and end date.
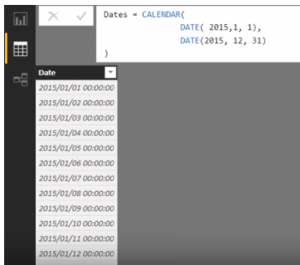
Let’s use an example to explore how this works. In the Modeling tab, we select a new table and call our function “Dates.” We select our CALENDAR function. In the CALENDAR function, we use the DATE function to specify the year. We will use the start date as the first day of the first month in 2015 and the last day of the last month in 2015 as the end date.
DAX:

Dates = CALENDAR(

DATE(2015,1,1)

,DATE(2015,12,31)

)
Let’s see the table that we have created.
Our table “Dates” returned one column with the start date the 2015/01/01, and the last value is 2015/12/31, exactly as we specified in our function. This is very useful, but we want to be able to add more information to our calendar table.
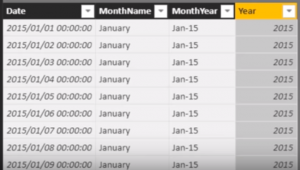
Let’s add new columns, namely “MonthName” (specifying the name of the month), “MonthYear” (specifying the month of the year), and “Year” (specifying the year).
The DAX for “MonthName”
DAX:

MonthName = FORMAT(

Dates[Date],

“mmmm”

)
Here is the DAX for “MonthYear”
DAX:

MonthYear = FORMAT(

Dates[Date],

“mmm-yy”

)
The DAX for “Year”
DAX:

MonthYear = YEAR(

Dates[Date],

)
Let’s see our table output.
Another use case is when we would like to have the date range of the minimum and maximum value of a certain table that can dynamically update. Let’s see how this can be done.
First, let’s create a new table and call it “Dates 2.” We use the CALENDAR function, but we are going to say give us the minimum value in our “Sales” table form the “DOCDATE” column and the maximum date from the “Sales” table of the “DOCDATE” column.
DAX:

Dates 2 = CALENDAR(

MIN(Sales[DOCDATE])

,MAX(Sales[DOCDATE])

)
What happened is that it has given us a result where it returned the minimum and maximum dates from the “DOCDATE” column, and it returned all the dates in between as well. That’s very useful, as it can dynamically update our calendar table as we need it.
Let’s expand on this formula to see what else we can do. In our “Sales” table, we have two date columns, namely the one we used “DOCDATE” and a “SHPDATE.” Let’s determine the minimum value across the two columns and the maximum value across the two columns.
DAX:

Dates 2 = CALENDAR(

MIN(

MIN(Sales[DOCDATE] )

,MIN(Sales[SHPDATE] )

),

MAX(

MAX(Sales[DOCDATE] )

MAX(Sales[SHPDATE] )

)

)
From the formula, it is clear that we are going to calculate and return the date. That is the minimum date of the two columns and the maximum date of the two columns.
If, for example, the shipping date column was from another table, it would also be able to assess that. So, this is useful if you want to make sure that your time intelligence function includes all the dates that are required for your calculations.
DAX CALENDARAUTO
The last function we want to look at is CALENDARAUTO. CALENDARAUTO automatically creates a date calendar table based on your data model. Or optionally, you can also specify the starting month, which is useful for fiscal years. This function uses all the data in your data model, excluding calculated columns and tables.
So, CALENDARAUTO goes and looks at every single table in your data model. It evaluates the minimum and the maximum dates, and it returns a calendar column or table with the range that includes all of those days.
Now, the problem with this is that while this is useful in certain situations, it may not be the function to use for everybody. The most common example is in the case if you had a customer’s table and you have a customer’s birthdate. And that customer was born in 1920 or 1930; then your calendar table is going to include dates from the 1930s all the way through the current date. So, just be careful when you use this function.
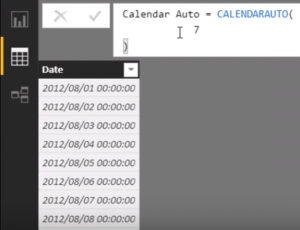
Let’s create this function and see how it works. We create a new table called “Calendar Auto.” The function CALENDARAUTO only asks for the fiscal year, end month. So, if your fiscal year ends in the 7th month, then you just type 7.
DAX:

Calendar Auto = CALENDARAUTO(

7

)
The result is a calendar starting from the eighth month (August), and it will continue to do so and retrieves all dates from the data model.
The Wrap-Up
That is it for this blog post for the CALENDAR and CALENDARAUTO function; it is beneficial but choose wisely when using these functions.
Let us know if there are any specific aspects of Power BI that you would be interested in for consultancy or project needs.
So what are you waiting for? Come and start your journey with Loginworks Softwares.
- Business Intelligence Vs Data Analytics: What’s the Difference? - December 10, 2020
- Effective Ways Data Analytics Helps Improve Business Growth - July 28, 2020
- How the Automotive Industry is Benefitting From Web Scraping - July 23, 2020


