In today’s blog, we will discuss how to install Python Flask. Python is a popular programming language that was created by Guido van Rossum (in 1991).
One of Python’s most promising advantages is that both the standard library and the interpreter are available for free, both in binary and source form.
It is used for:
- web development (server-side),
- software development,
- mathematics, and
- system scripting.
It is highly unlikely that your Windows system shipped has Python already installed. Windows systems typically do not have it installed beforehand. Fortunately, installing does not involve many efforts. It involves nothing more than downloading the Python installer from the website python.org and running it. Let’s take a look at how to install Python 3 on Windows:
Jump to Section
Step 1: Download the Python 3 Installer
- Open a browser window and navigate to the Download page for Windows at python.org.
- Underneath the heading at the top that says Python Releases for Windows, click on the link for the Latest Python 3 Release – Python 3.x.x. (As of this writing, the latest in Python 3.6.5.)
- Scroll to the bottom and select either Windows x86-64 executable installer for 64-bit or Windows x86 executable installer for 32-bit.
Step 2: Run the Installer
Once you have chosen and downloaded an installer, run it by double-clicking on the downloaded file. A dialog box should appear that looks something like this:
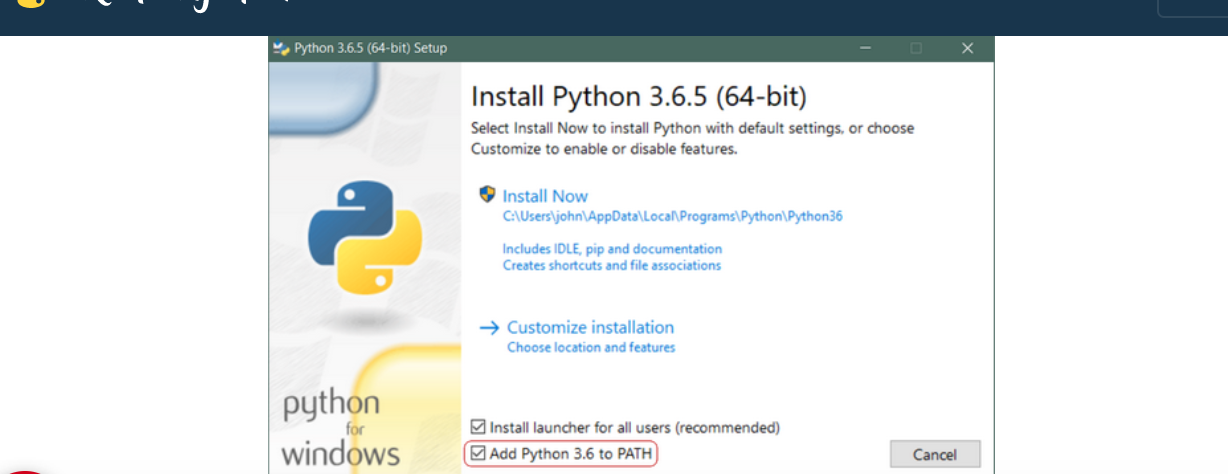
Important: You want to be sure to check the box that says Add Python 3.x to PATH as shown to ensure that the interpreter will be placed in your execution path.
Then click Install Now. A few minutes later, you should have a working Python 3 installation on your system.
Now install the flask
What Is Flask
Flask is a web-based framework. This means that flask provides tools, libraries, and technologies to help you build a web application. These web applications can be as small as some web pages, a blog, a wiki, or as big as a web-based calendar application or a commercial website.
Flask is part of the categories of the micro-framework. Micro-framework is normally a framework with little to no dependencies on external libraries. This has both advantages and disadvantages. The pros would be that the framework is light, there is a little dependency to update and watch for security bugs, and cons would be that sometimes you will have to do more work by yourself or increase yourself the list of dependencies by adding plugins.
In this blog, we are going to take you through a step by step guided tutorial on Installing Flask.
Non-Technical Requirements
- Your Time — Now you’ve landed on this page, you need some time to complete it to the end. If you don’t have the time right now, bookmark this blog, and when you have more, come back to it. Trust me, reading/scanning by will not help.
- Laptop/Computer — Coding on your phone is a complete No.
- A quiet place — Not just for this blog; learning anything needs your complete focus. So make sure you are in a place with fewer distractions.
Why Python?
Python, the most popular language among beginners, is well known for its simplicity and its descriptive and straightforward way of implementing things. Python has done enough to conquer the Web application market, despite the hype surrounding machine learning.
Also, it is one of the most preferred languages to build backend applications. Even when facing good old PHP and full-stack Javascript, Python has its place because of the ease of implementation, and a supportive community that keeps beginners hooked.
Why Flask?
Just like how people get confused with which Python version to start with, Django versus Flask is another age-old debate. Though people say Flask is simple and easy to get started with while Django is heavy for building web applications, there is another important reason why you should choose Flask over Django.
We, as developers in the era of the cloud, are moving away from monolithic applications. With microservices architecture in place, running multiple Django servers is going to make your services heavy because of all the built-in apps it comes with.
Installing flask using
pip install flask
After installing the flask, then how to print “Hello World.”
Let’s check if our setup is fine by writing a “hello world” program. Create a app.py file under your project. You can name it anything other than calling your file flask.py since it will create a conflict with the actual flask package we installed.
 todo-flask
      _ app.py
The code reads through each line as it comes with an explanation of what each line means
# app.pyfrom flask import Flask            # import flask
app = Flask(__name__)                         # create an app instance

@app.route("/")                                      # at the endpoint
def hello():                                               # call method hello
return "Hello World!"                              # which returns "hello world"
app.run()                                                 # run the flask app
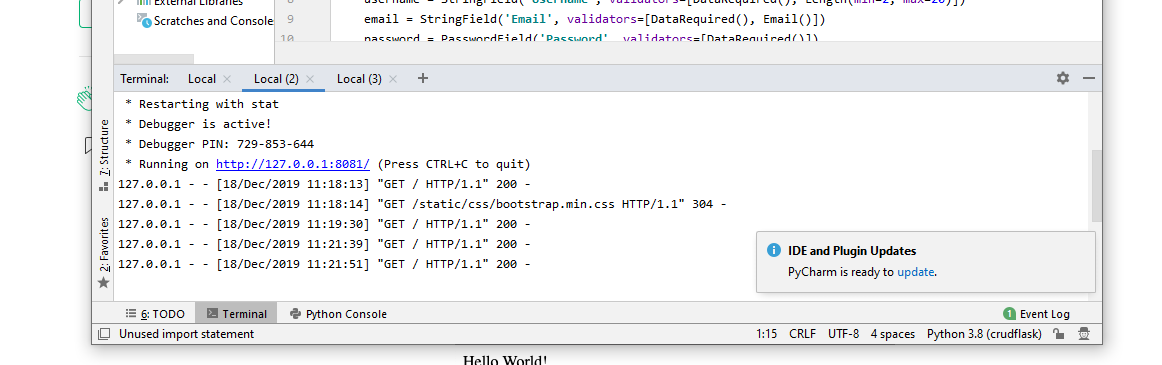
Running the Application
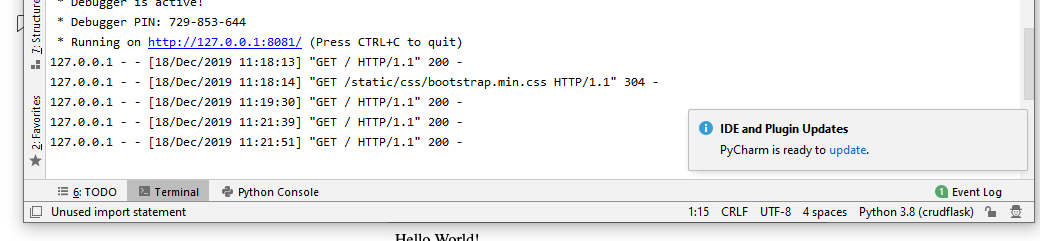
Finally, run the application by running the ‘app.py’ file. By default, the flask runs a local server at port 8081.
Run the command python app.py
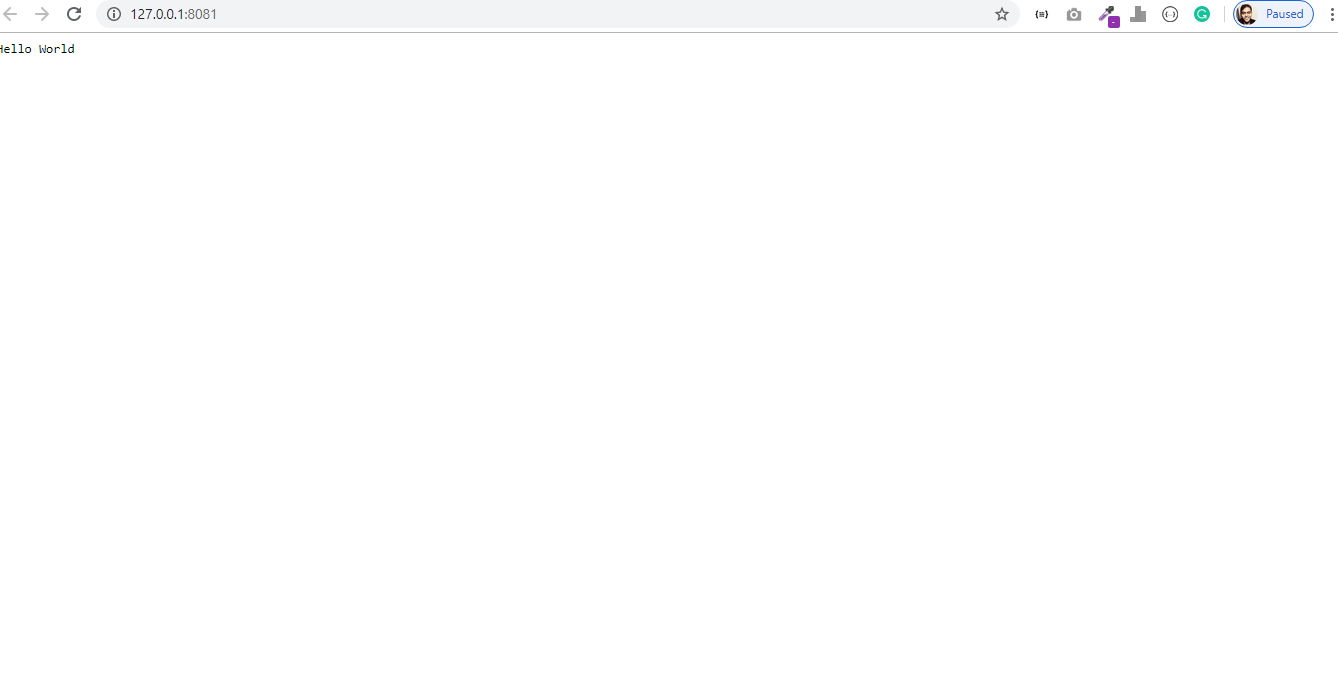
On hitting the URL, you will see your first hello world program alive.
Debug Mode
This is because we are running the server in a production mode. For development purposes, we use something called the mode. When debug=Trueis set, the server restarts as we add a new code to our Flask Application. To set the debug mode to do the following
- Modify the line
app.run()toapp.run(debug=True). - Stop the running server and restart it again.
In addition to this, you will see “debugger is active,” which means that the debug mode has taken effect. Now you can go on and edit your file as much as you want, and the server will be restarted.
Conclusion
Hope installing Python on Windows tutorial helps you in learning how to install and set up Python on your Windows machine.
Finally, this will be very handy when you are beginning to code with Python, and you are establishing all the tools and software needed for the same. Now, you should also be able to use these concepts to develop applications easily with the help of Python in Windows.
To know about our services, please visit Loginworks Softwares Inc.
I excel when it comes to making bespoke data dashboards and visualizations that users and clients absolutely love. Sharing about things I enjoy doing is my hobby, whether it's about a project, collaboration, feedback, or just simple how-to guides about visualization.
If you have something to ask or share, I'd love to hear from you!
- Business Intelligence Vs Data Analytics: What’s the Difference? - December 10, 2020
- Effective Ways Data Analytics Helps Improve Business Growth - July 28, 2020
- How the Automotive Industry is Benefitting From Web Scraping - July 23, 2020