In case, you have decided to go through this blog post, I am sure you must have performed all your manual efforts required in the software testing process. And as for now, you must be looking for an automation process that can minimize your manual effort to almost zero. Well if Yes, then this blog post assures for satisfying your quest for the same.
Mobile Automation testing is an exceptionally successful contrasting option to conventional manual testing. It diminishes the time required for a testing and accomplishes speedy outcomes. Using automation, we can re-use same tests to re-execute on different devices and different Operating System.
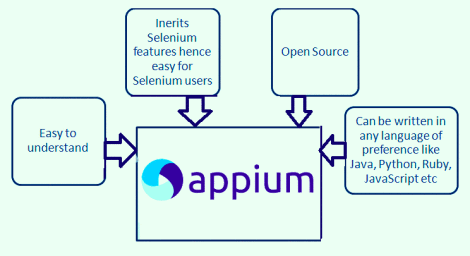
There are a number of Mobile Automation testing tools available, some of them are paid and some are open source. I have chosen Appium because of its advantages over others:
- It supports many programming languages like Java, Ruby, Python, PHP, C# etc.
- By using Appium, we can automate iOS, Android, and Firefox OS platform.
- It supports automation of Native apps, Mobile Web apps, and Hybrid Apps.
- It doesn’t require access to your source code or library. You are testing apps which are used by the real user.
- It uses Selenium webdriver.
- It is free to use.
- It supports current and future versions of Android OS.
The list down of these benefits must have encouraged you to know more about it. So, what are we waiting for? Let’s scorch more about the term ‘Appium’!
Jump to Section
What Is Appium?

Appium is an open source, cross-platform test automation tool used to automate native, hybrid and mobile web apps. We can run automation tests on actual devices, emulators, and simulators.
Native apps are built for a particular device and operating system. Native apps are installed directly on a mobile device.
Mobile web apps are web apps accessed using a mobile browser (mobile version’ of a website). They don’t have to install.
Hybrid apps have a wrapper around a “webview” — a native control that enables interaction with web content.
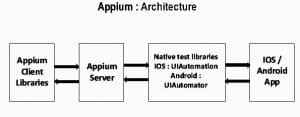
Architecture Of Appium
Appium is an HTTP server which was written in node.js, it’s architecture is as same as Selenium Webdriver Server.
*Receiving requests from the client libraries
*Executes the commands on the target devices & emulators
*Responds with an HTTP response.
Appium will support only Android and IOS but not Windows platform. And the architecture of Appium is different from Android to IOS.
Let me explain it in a simple way. Generally, when you’re downloading Appium, you are basically downloading the server. When we execute our scripts, an Http request goes in JSON format to Appium server. Then Appium server sends the command to IOS instruments which need bootstrap.js file to automate IOS apps and for Android, it sends to UIAutomator which needs bootstrap Jar.
The UIAutomator testing framework allows you to test your user interface (UI) efficiently by creating automated functional UI test cases that can be run against your app on one or more devices.
When we execute the test scripts, Appium sends the command to the UIAutomator. To listen to our commands we need a TCP server. So, here bootstrap.jar works as TCP server. And then it executes the command on the devices.
Before starting with Appium, we first need to setup environment to run scripts on Android platform using Appium.
Additionally, you also need java client.jar (latest version).
After the download and installation of all these software, you need to set up the path variables for JDK and Android SDK.
Step 1: Setting the JAVA_HOME Variable
1) Open the Control Panel -> System or Security –> System; the same thing can be done by right-clicking on ‘MyComputer’ and choosing Properties.
2) Choose ‘Advanced system settings‘.
3) Under the Advanced tab Choose the ‘Environment Variable…‘ option.
4) Select New In the System variables.
5) Define the Variable name as ‘JAVA_HOME‘ and Variable value as ‘C:\Program Files\Java\jdk1.8.0_45‘ (for this example JDK version 1.8.0 was installed in ‘C:\Program Files\Java\jdk1.8.0_45‘ folder; if needed, modify this value to reflect the real location).
Step 2: Setting the Java PATH Variable
1) Now we need to specify the location in the PATH variable. For PATH, most probably it will already exist on your machine. So just select it and choose the Edit option.
2) In the editor add the value ‘;%JAVA_HOME%\bin‘ or ‘;C:Program Files\Java\jdk1.8.0_45\bin‘.
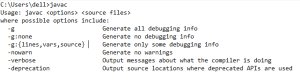
3) Now go to Start and type cmd in the Run and hit Enter. It will launch the Command Prompt. Type ‘javac ‘, it will display the following information.
Step 3: Setting the ANDROID_HOME Variable
1) Open the Control Panel -> System or Security –> System; the same thing can be done by right-clicking on ‘MyComputer’ and choosing Properties.
2) Choose ‘Advanced system settings‘.
3) Under the Advanced tab Choose the ‘Environment Variable…‘ option.
4) Select New In the System variables.
5) Define the Variable name as ‘ANDROID_HOME‘ and Variable value as ‘C:\Users\Dell\AppData\Local\Android\android-sdk‘. (AppData is a hidden folder, to make it visible you need to change the view settings)
Step 4: Setting Android PATH Variables for Android SDK
1) Now we need to specify the ‘tools‘ folder location in the PATH variable of android sdk package. For PATH, most probably it will already exist on your machine. So just select it and choose the Edit option.
2) In the editor add the value ‘;%ANDROID_HOME%\tools‘ or ‘;C:\Users\Dell\AppData\Local\Android\android-sdk\tools‘.
3) Now we need to specify the ‘platform-tools‘ folder location in the PATHvariable of android sdk package. Select the Path variable and choose the Edit option.
4) In the editor add the value ‘;%ANDROID_HOME%\platform-tools‘ or ‘;C:\Users\Dell\AppData\Local\Android\android-sdk\platform-tools‘.
SetUp First APPIUM Project in Eclipse IDE
Create a new java project and,
- Add Selenium Jars to project
- Add Java Client to project
Make a folder in your project and name it as jarfiles add these jarfiles to that folder. Now, right click on each jar file click on build path and click on add to build path.
Now create another folder inside your project to save apk file which you want to automate.
Launch Appium Server and click on Play Button to start the server.
First Test Script to Launch an Application
import java.io.File;
import java.net.MalformedURLException;
import java.net.URL;
import org.openqa.selenium.By;
import org.openqa.selenium.WebElement;
import org.openqa.selenium.remote.CapabilityType;
import org.openqa.selenium.remote.DesiredCapabilities;
import io.appium.java_client.AppiumDriver;
public class LaunchAmazon
{
private static AppiumDriver<WebElement> driver;
public static void main(String[] args) throws MalformedURLException, InterruptedException
{
// Path to Eclipse project
File classpathRoot = new File(System.getProperty(“user.dir”));
// Path to <project folder>/Apps -> Amazon
File appDir = new File(classpathRoot, “/apps/Amazon/”);
// Path to <project folder>/Apps -> Amazon/Amozon apk file
File app = new File(appDir, “in.amazon.mShop.android.shopping.apk”);
DesiredCapabilities capabilities = new DesiredCapabilities();
capabilities.setCapability(CapabilityType.BROWSER_NAME, “”);
capabilities.setCapability(“deviceName”, “Lenovo TB3-710I”);
capabilities.setCapability(“platformVersion”, “5.1”);
capabilities.setCapability(“platformName”, “Android”);
capabilities.setCapability(“app”, app.getAbsolutePath());
capabilities.setCapability(“appPackage”, “in.amazon.mShop.android.shopping”);
capabilities.setCapability(“appActivity”, “com.amazon.mShop.home.HomeActivity”);
driver=new AppiumDriver<WebElement>(new URL(“http://127.0.0.1:4723/wd/hub”), capabilities);
}
}
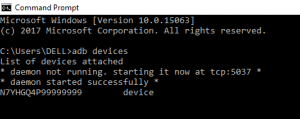
Attach an android device with the help of USB cable to your system. To check the device is attached or not, open cmd and type adb devices and press enter it will display the attached devices.
Now, Run your script as java application or by clicking on the green color play icon in Eclipse IDE. It will Launch Amazon app on your device.
The step-by-step follow-up of these simple and easy steps can easily turn your manual effort into an automated one. So, instead of taking the pain manually, I would suggest for opting of Appium Test Automation Tool!
- COVID-19: How We Are Dealing With It as a Company - March 23, 2020
- Agile Testing – The Only Way to Develop Quality Software - February 8, 2019
- How to Perform System Testing Using Various Types Techniques - May 16, 2018