In my previous blog, I have discussed that how we can create a sample camera application using the AVFoundation Framework in our iOS application.
Today, we will be going to talk about one more feature of the same library which is using the camera as a barcode reader.
To understand more about it let’s jump directly into its features:
- AVFoundation let you work on some great features of ios like record video, play video, access the camera.
- It provides the easy way to deal with the audio framework in ios with the help of AVAudioPlayer and AVAudioRecorder.
As we all know that the latest version of iOS currently is 11.2.5.
Apple provides us more and more opportunity to make use of its core features in the application so that we can provide the better and butter smooth experience to the user while using the applications.
Let us first understand the meaning of QR Code and the types of QR Code:
- A QR Code is known as Quick Response Code which contains some information about a particular product.
- It may consist of some information like a particular website link or some hidden data inside it.
- We cannot identify the information unless and until we scan it with some reader.
Jump to Section
Types of QR Codes
- There are two types of code are basically used to store information:2-Dimensional Code which consists of many vertical straight lines and form patterns together which consist of some data in it.
- 3-Dimensional Code which consist of both horizontal and vertical lines in it and inside which we encapsulate some data which can only readable by some software like QR -Code reader. it is the most secure way to store the data inside it using those patterns.
Overview of the Application
In this demo, we will be going to create a QR-Code Reader which can scan any type of barcode and will going to redirect the user to a particular website.
Remember that this will going to use the default video feature of the iPhone to scan the code and then will redirect the user to a particular URL if it contains some HTTP code inside it.
Things Required to make the App:
- Mac with the tool which is XCode where we will going to perform all the functionality.
- Some basic knowledge of programming.
- A cup of coffee or tea to make the development process faster. :p
Let’s Get Started…
Step 1
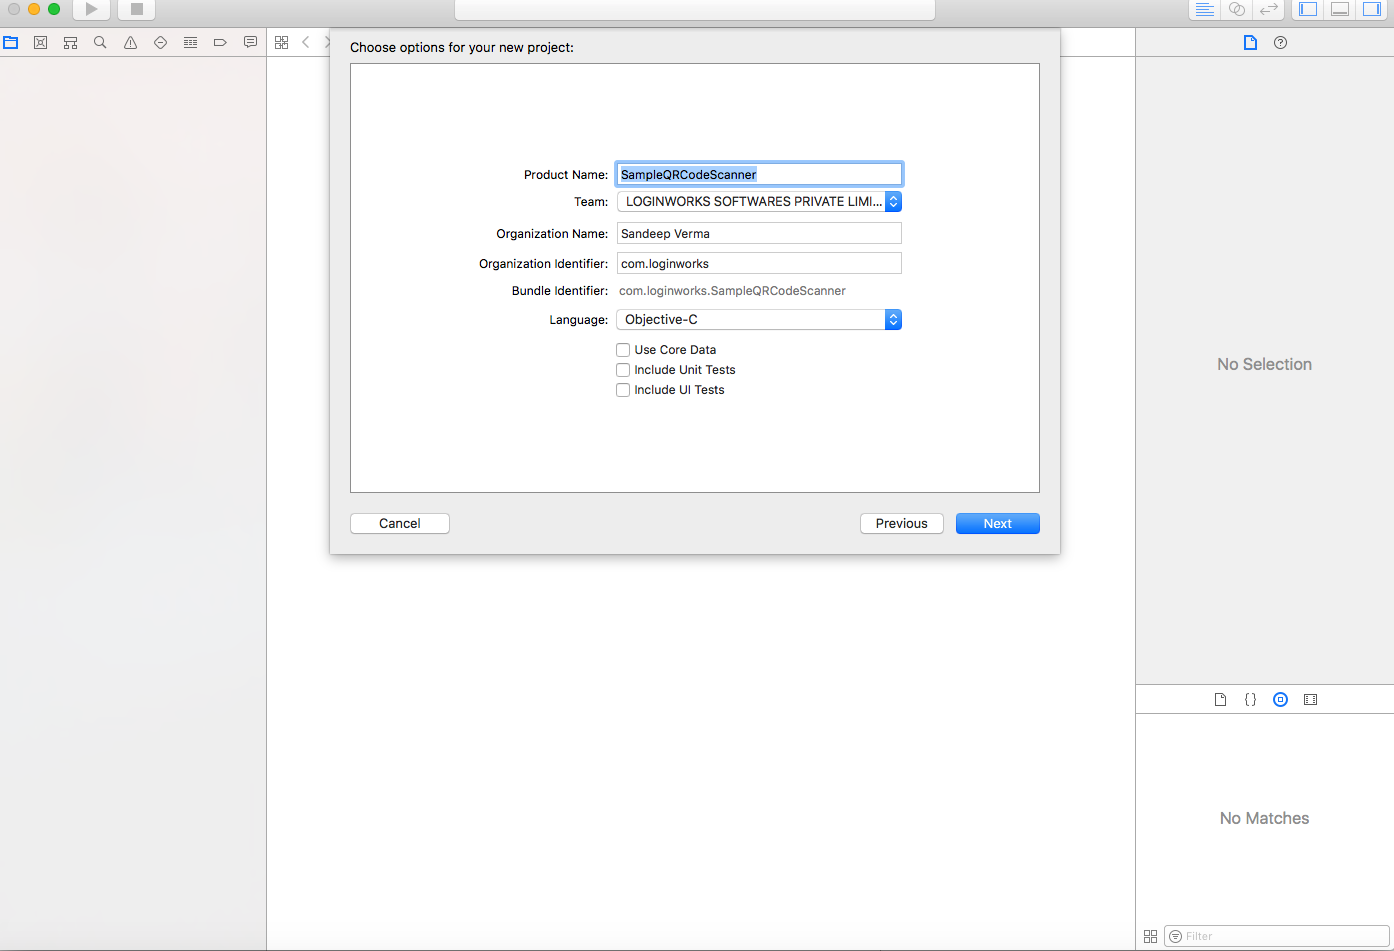
Open the Xcode and hit the create a new project and inside it select single view application and name it according to you as shown below.
Step 2
Now jump into the section on the top left corner and enter into the general tab. Select the linked framework section and add the framework AVFoundation into it as shown below.
Step 3
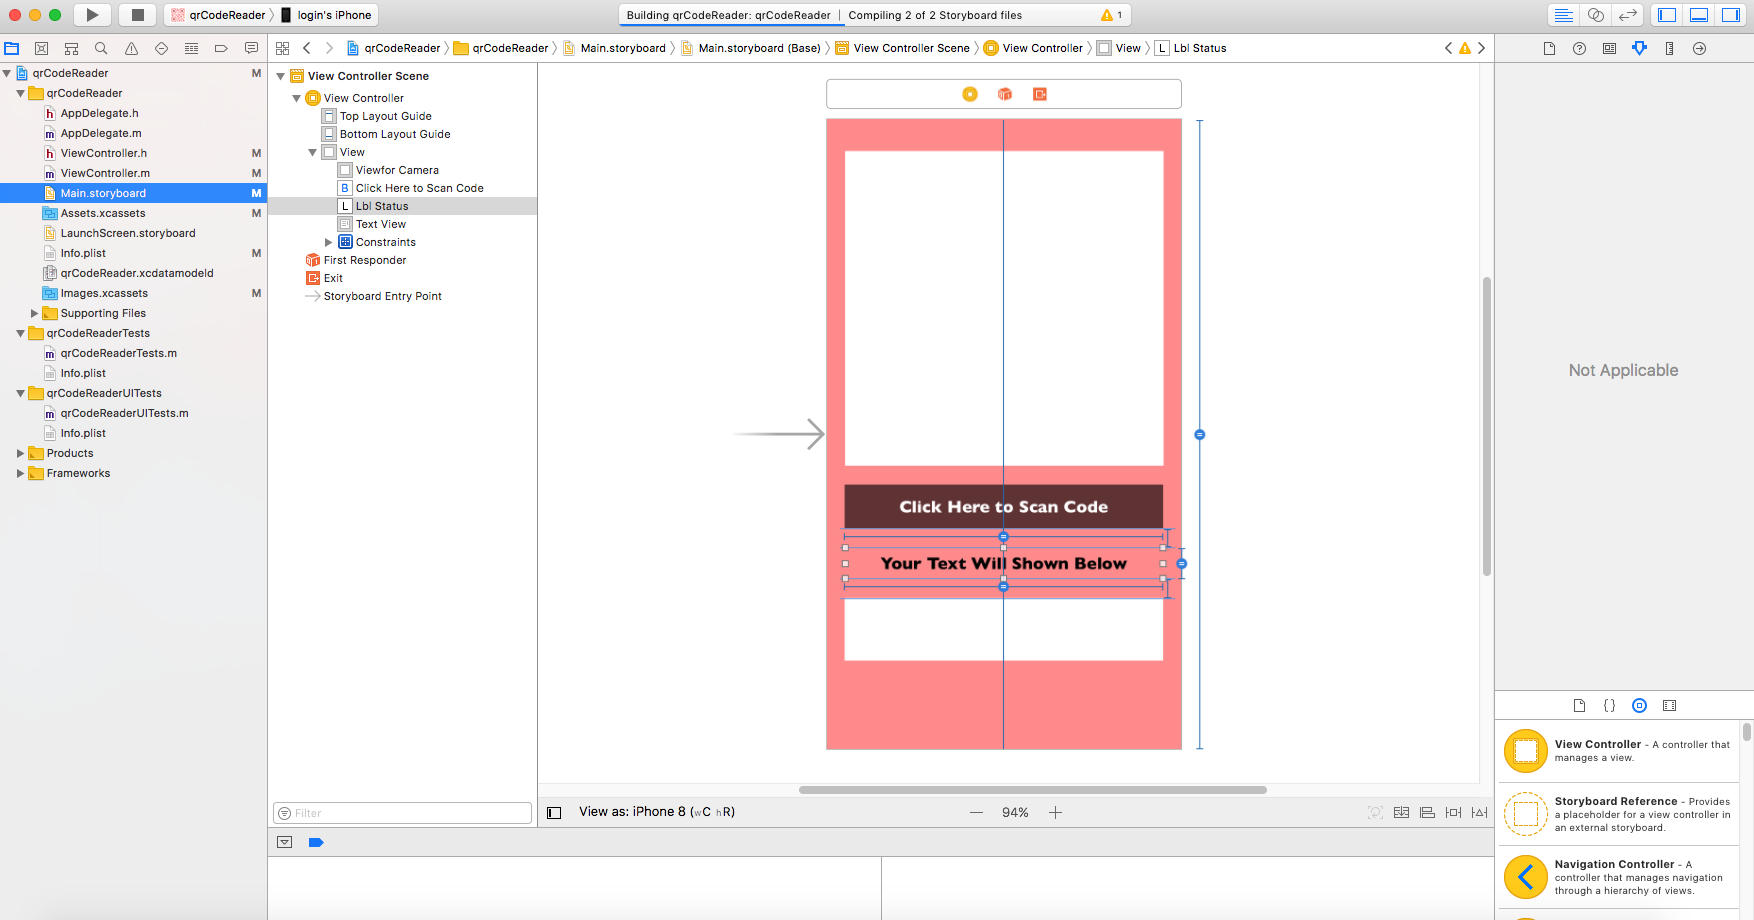
After adding the framework to the project we will be going to create the UI of the application by using the storyboard.
To do this just head into the Main.Storyboard section and drag and drop these into it:
- A UIView on which we will go to open the camera.
- UIButton through which we will going to turn on the camera to scan code.
- UILabel through which we will going to show the current status of the application
- UITextView in which we will going to show the data present inside the QR-Code.
After doing this your design of the application will look similar to it.
Step 4
Now select your view controller.h file and import the AVFoundation Framework into it.
#import <AVFoundation/AVFoundation.h>
Step 5
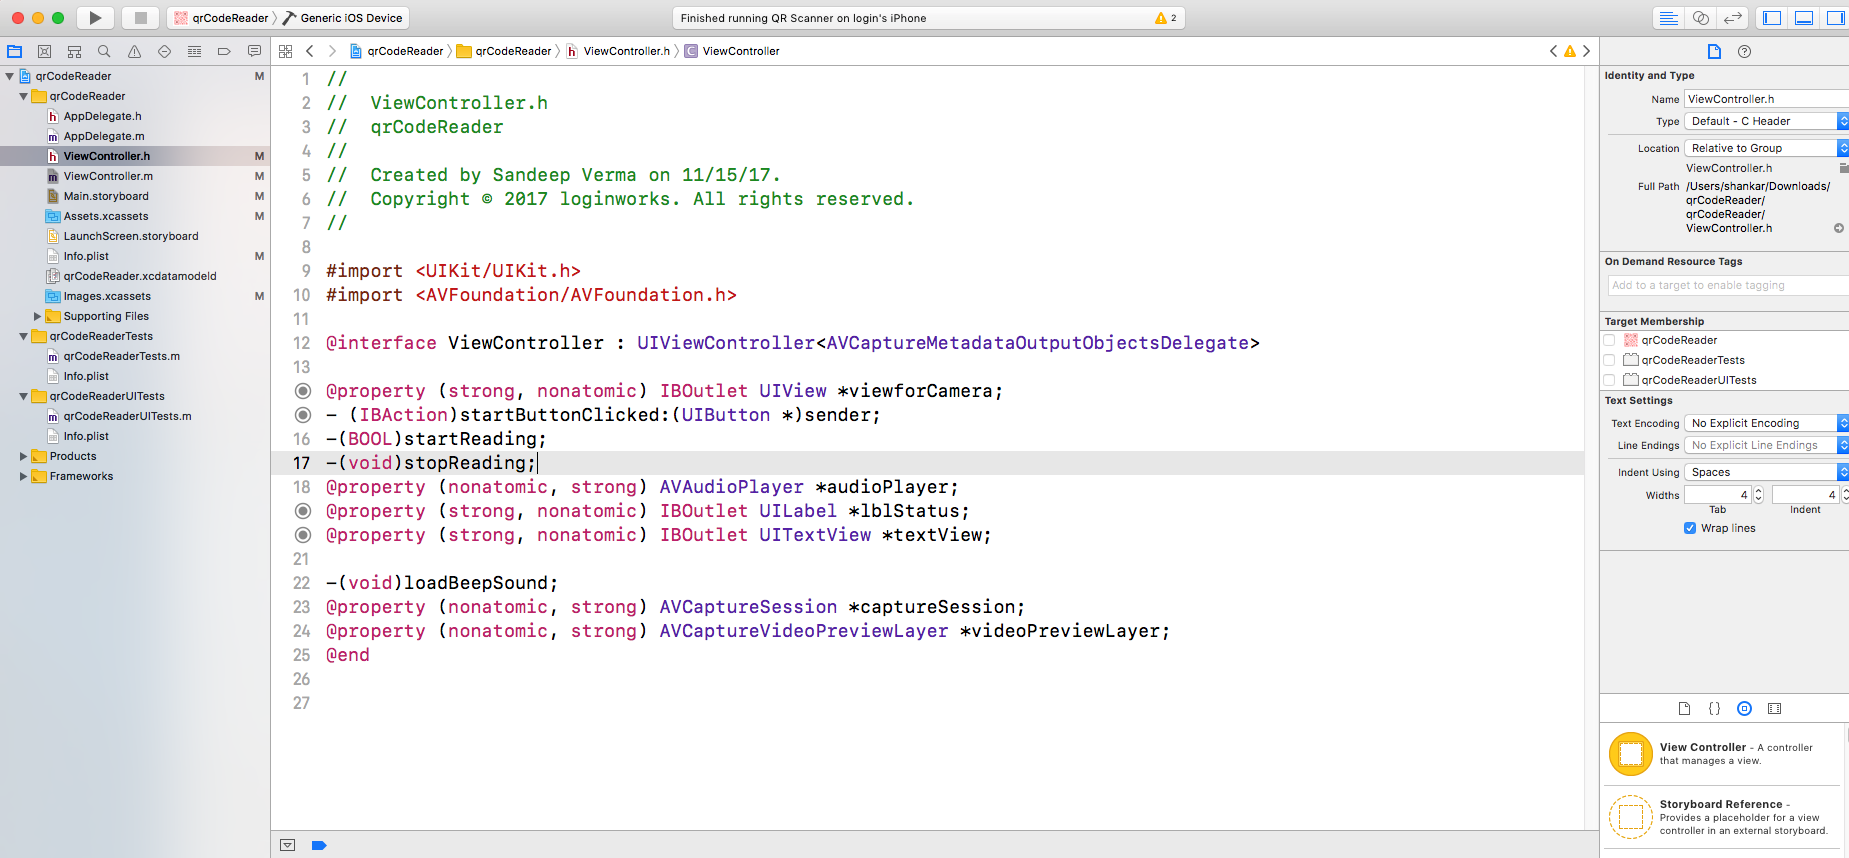
Within the same view controller.h file add the following code to it by copying it from below:
@interface ViewController : UIViewController<AVCaptureMetadataOutputObjectsDelegate> @property (strong, nonatomic) IBOutlet UIView *viewforCamera;

 - (IBAction)startButtonClicked:(UIButton *)sender;

 -(BOOL)startReading;

 -(void)stopReading;

 @property (nonatomic, strong) AVAudioPlayer *audioPlayer;

 @property (strong, nonatomic) IBOutlet UILabel *lblStatus;

 @property (strong, nonatomic) IBOutlet UITextView *textView;

 -(void)loadBeepSound;

 @property (nonatomic, strong) AVCaptureSession *captureSession;

 @property (nonatomic, strong) AVCaptureVideoPreviewLayer *videoPreviewLayer;

 @end
Here you are wondering what is the use of the property AVCaptureSession and AVCaptureVideoPreviewLayer. These will be going to capture the image of a QR Code and then will call the method.
It will be used in future to show the hidden data which is encrypted inside the QR Code.
Step 6
Now connect each object to its property one by one.
- Connect the first view which is viewforCamera to the first square view.
- Now attach startButtonClicked action to the button which is below to view.
- Connect to the label with the lblStatus which is below the button.
- Last but not least connect the textView with the textView which is below the label so that we can see the hidden data present in our QR Code.
Step 7
Now head to the view controller.m file of your project so that we can add the functionality to each object which we have added previously.
In this file, the first thing you need to do is to declare a property which is ‘boolisReading’. Now, this will be going to store the status of your code whether it is in off state or in a state.
After this enter into the viewdidload method and enter the following code into it as mentioned below:
_captureSession = nil;

   _isReading = NO;

        _lblStatus.text = @"Your Text Will Shown Below.";

   [self loadBeepSound];
Now it will be going to show an error that loadBeepSound is not declared.Don’t panic as we will going to add it soon which will handle the sound feature while scanning the code.
Step 8
Now add the following code into you startReading method which will call when the camera will run initially:
 NSError *error;


   AVCaptureDevice *captureDevice = [AVCaptureDevice defaultDeviceWithMediaType:AVMediaTypeVideo];


   if (captureDevice.position == AVCaptureDevicePositionBack) {

       NSLog(@"back camera");


   }else if (captureDevice.position == AVCaptureDevicePositionFront){

       NSLog(@"Front Camera");


   }else{

       NSLog(@"Unspecified");

   }


   AVCaptureDeviceInput *input = [AVCaptureDeviceInput deviceInputWithDevice:captureDevice error:&error];

   if (!input)

{

       NSLog(@"%@", [error localizedDescription]);

       return NO;

   }

   _captureSession = [[AVCaptureSession alloc] init];

   [_captureSession addInput:input];


   AVCaptureMetadataOutput *captureMetadataOutput = [[AVCaptureMetadataOutput alloc] init];

   [_captureSession addOutput:captureMetadataOutput];


   dispatch_queue_t dispatchQueue;

   dispatchQueue = dispatch_queue_create("myQueue", NULL);

   [captureMetadataOutput setMetadataObjectsDelegate:self queue:dispatchQueue];

   [captureMetadataOutput setMetadataObjectTypes:[NSArray arrayWithObject:AVMetadataObjectTypeQRCode]];


   _videoPreviewLayer = [[AVCaptureVideoPreviewLayer alloc] initWithSession:_captureSession];

   [_videoPreviewLayer setVideoGravity:AVLayerVideoGravityResizeAspectFill];

   [_videoPreviewLayer setFrame:_viewforCamera.layer.bounds];

   [_viewforCamera.layer addSublayer:_videoPreviewLayer];

   [_captureSession startRunning];

 return YES;

}
Here, this will call the video capture feature by using the AVFoundation core features and will going to start the code scanning process.
With the help of capture device object you can change the position of the camera to either front or back but according to me, you should go with the back camera as we can scan the code easily with this.
Then we need to add the default camera layer to our custom view which is viewForCamera and for this, you can use addsublayer code which is mentioned in the code for your understanding.
After finishing with this copy the code from below and paste it next to the startReading method.
-(void)stopReading{

   [_captureSession stopRunning];

   _captureSession = nil;

   [_videoPreviewLayer removeFromSuperlayer];

}
Here, you can stop the reading process when the scanning has been completed.
Step 9
Now we need to call both the methods we have declared earlier. It will be called through the button we have declared in our viewcontroller.h. Within the action, button adds the following code inside it.
if (!_isReading)

{

       if ([self startReading])

{

           [_lblStatus setText:@"Scanning for QR Code..."];

       }

   }

   else

{

       [self stopReading];

   }


   _isReading = !_isReading;
This action will be going to call the startreading method when we press the button.
It will scan the QRCode and also will going to change the status of the label below to Scanning for QR Code.
Step 10
Now we only have to handle the output of the captured video of QRCode and to do this paste the following code into your view controller.m file.
-(void)captureOutput:(AVCaptureOutput *)captureOutput didOutputMetadataObjects:(NSArray *)metadataObjects fromConnection:(AVCaptureConnection *)connection{

   if (metadataObjects != nil && [metadataObjects count] > 0) {

       AVMetadataMachineReadableCodeObject *metadataObj = [metadataObjects objectAtIndex:0];

       if ([[metadataObj type] isEqualToString:AVMetadataObjectTypeQRCode]) {

           [_textView performSelectorOnMainThread:@selector(setText:) withObject:[metadataObj stringValue] waitUntilDone:NO];

           if ([_textView.text containsString:@"http"]) {

               NSString* text = _textView.text;

               NSURL *url  = [[NSURL alloc] initWithString:text];


               UIAlertController *alert = [UIAlertController alertControllerWithTitle:@"Alert" message:@"This code have a http link.Do you want to open it.?" preferredStyle:UIAlertControllerStyleAlert];

               UIAlertAction *okAction = [UIAlertAction actionWithTitle:@"Ok" style:UIAlertActionStyleDefault handler:^(UIAlertAction * action)

{

                   [[UIApplication sharedApplication] openURL:url];

               }];

               UIAlertAction *cancel = [UIAlertAction actionWithTitle:@"Cancel" style:UIAlertActionStyleDefault handler:^(UIAlertAction * action)

{

                   _lblStatus.text = @"Your Text Will Shown Below.";

               }];

               [alert addAction:cancel];

               [alert addAction:okAction];

               [self presentViewController:alert animated:YES completion:nil];


           }

           else

{

              //you can show your custom alert like - there is no HTTP link present in the QR Code. //

           }

           [self performSelectorOnMainThread:@selector(stopReading) withObject:nil waitUntilDone:NO];

          // [_bbitemStart performSelectorOnMainThread:@selector(setTitle:) withObject:@"Start!" waitUntilDone:NO];

           _isReading = NO;


           if (_audioPlayer)

{

               [_audioPlayer play];

           }


       }

   }

}
This will call the default output method of the AVLibrary and then will going to show the given data into the text view in it.
Also, you can see that it consist of an object known as AVMetadataObjectType.
This will define the type of object we are scanning and if it is QRCode type then it will call AVMetadataObjectTypeQRCode, which will further go to check whether the QR code contains a string in the form of HTTP. If it gets matched then it will show an alert to redirect you to the particular URL.
Step 11
Time to make a sound when it starts to scan the code.
-(void)loadBeepSound

{

   NSString *beepFilePath = [[NSBundle mainBundle] pathForResource:@"beep" ofType:@"mp3"];

   NSURL *beepURL = [NSURL URLWithString:beepFilePath];

   NSError *error;


   _audioPlayer = [[AVAudioPlayer alloc] initWithContentsOfURL:beepURL error:&error];

   if (error)

{

       NSLog(@"Could not play beep file.");

       NSLog(@"%@", [error localizedDescription]);

   }

   else

{

       [_audioPlayer prepareToPlay];

   }

}
This will be going to make a default sound from your iPhone when the QRCode will going to scanned. It is your choice whether you want to use this feature or not.
Now if we run the build then your application will be going to get crashed!!
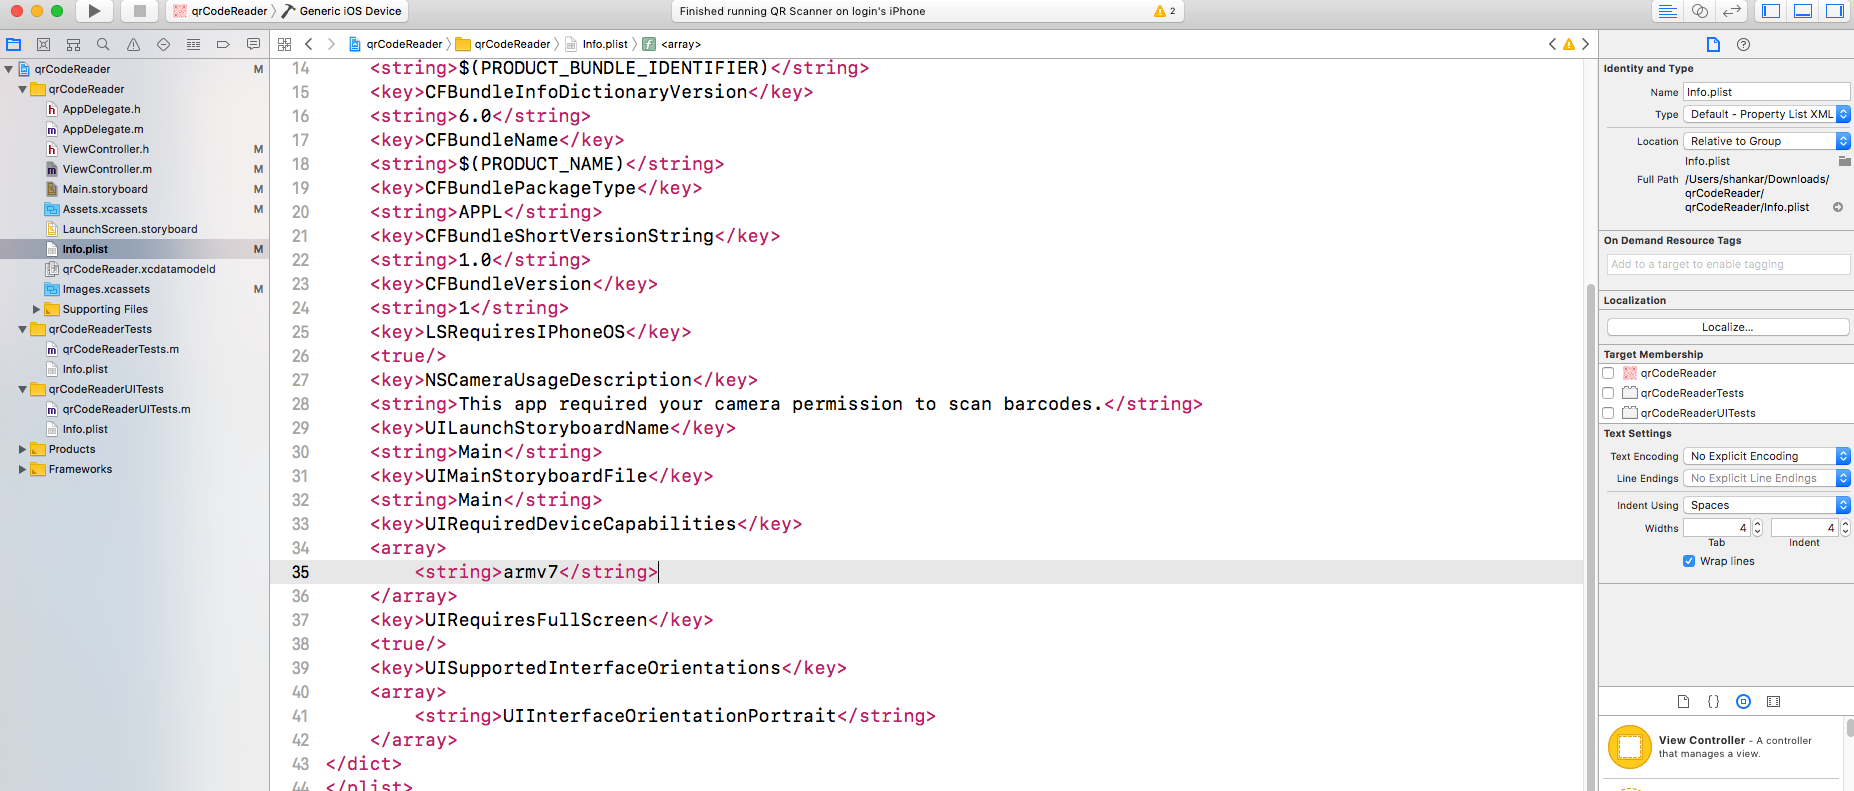
Yes, we still need to ask the user for the permission to access its camera.
To fix this problem we need to use the info.plist camerausagepermission feature to ask the user to access its camera.
Now head into your info.plist file and right click on it and select open as Source Code and enter the following code into it.
<key>NSCameraUsageDescription</key>

<string>This app required your camera permission to scan barcodes.</string>
Compile and Run the Final Build:
Now if you will run the build then it will be going to show the screen without a single crash in it.
At this point, all you need is a QRCode to test your application.
I am going to add a sample QR Code so that you can use your application to test whether it is working correctly or not.
You can find the QR Code below.
Source – http://www.qr-code-generator.com/
You can make your own QR Code and can use them to test your app.
Summary
In this tutorial, we have learned the uses of the AVFoundation library to scan and read the QR Codes.I know it takes some time and efforts to make the application like this but believe me, if you follow all the steps as mentioned earlier then you will end up with a beautiful and functional QR Scanner Application.
Remember this is the smallest part of the library which we have used in this project.This library provides the endless possibility to use it to make more useful applications and in the coming future, we will use it for sure.
If you have any queries or suggestions regarding the application then let me know in the comments section below. Till then happy QR Coding!
- LinkedIn Scraper | LinkedIn Data Extractor Software Tool - February 22, 2021
- Is Web Scraping Legal? - February 15, 2021
- What Is Data Scraping? - February 10, 2021



I’m getting this error, please help
*** Terminating app due to uncaught exception ‘NSInvalidArgumentException’, reason: ‘*** -[AVCaptureMetadataOutput setMetadataObjectTypes:] Unsupported type found – use -availableMetadataObjectTypes’