In this article, I am going to explain to you that how to set up an elastic search within c# and NoSQL database in the sample application. To read data from data source and render that data to the window application. The code is in C# use under WinForm. This article is particularly focusing on newcomers and anyone new wants to learn or thinking of using Elasticsearch in their .NET program. This sample application gets the user data from Elasticsearch in our app.
Jump to Section
What is Elasticsearch?
Elasticsearch is a Restful and NoSQL database or search engine, which means that this database is designed to store document base instead of using tables. We use or create more than a document in elastic search.
Elasticsearch is a document based database or search engine design to store, retrieve, and manage document data. when we use elastic search, we store data in JSON format. Then, you query them for retrieval. It is a schema-less database, by the use of defaults to index the data until you provide mapping for your data as per your needs.it uses Lucene Standard analyzer for indexing for automatic type guessing and for high precision.
Features of Elasticsearch
1. Distributed and Highly Available Search Engine
(i) Each index is fully sharded with a configurable number of shards.
(ii) In elasticsearch, each shard can have one or more replicas.
(iii) In elasticsearch, read/search operations performed on either one of the replica shards.
2. Multi-Tenant with Multi Types
(i) Elasticsearch support for more than one index.
(ii) Support for more than one type per index.
(iii) Index level configuration (number of shards, index storage, …).
3.Various established APIs
(i) HTTP RESTful API
(ii) Native Java API.
(iii) In elasticsearch, all APIs works automatic node operation rerouting.
4. Document-oriented
(i) No need for upfront schema definition
(ii) In elasticsearch, the schema can be described per type for customization of the indexing process.
5. Real-Time Search
6. Elasticsearch is scalable up to petabytes of structured and unstructured data.
7. Elasticsearch is open source and available under the Apache license version 2.0.
8. in elasticsearch, each shard is a fully functional Lucene index.
9. In elasticsearch, single document level operations are atomic and durable.
Let’s start with the creation of a sample application
Before creating a sample application, we need to configure it on our machine. Please follow the below steps:
Note
You can check the minimum version of your java in installing to your computer and it should be Java 7 or more updated version. You can check by doing the following
In Windows Operating System (OS) (using command prompt) write the below command
java -version
If java does not install your machine please follow the below step.
-
- Java runtime environment(http://www.oracle.com/technetwork/java/javase/downloads/index.html)
- After installing Java, do yourself a favor and set the JAVA_HOME environment variable
(i) MyComputer > Properties > Advance system setting > click on Environment variables button
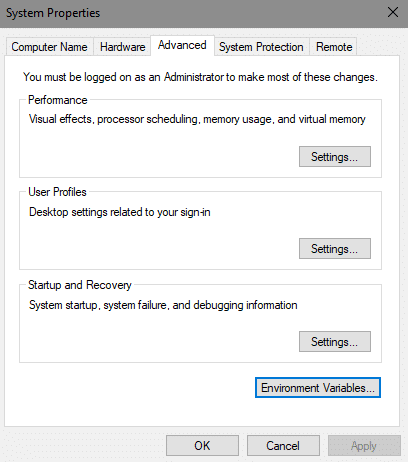
(ii) Under system, variable click on new button
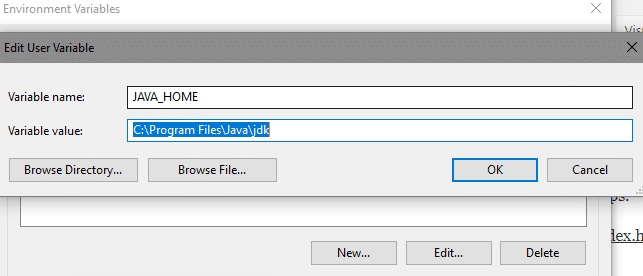
(iii) Name: JAVA_HOME
(iv) Path:C:\program Files\Java\jdk
(v) suppose Java JRE is installed at C:\Program Files\Java\jre
or watch this video how to install java and how to set JAVA_HOME environment variable (https://youtu.be/Wp6uS7CmivE)
3. You can download the Elasticsearch from the Elasticsearch website and follow the step by step instruction (https://www.elastic.co/downloads/elasticsearch)
(i) Unzip the zip package and the Elasticsearch is installed.
(ii) Go to the Elasticsearch home directory and inside the bin folder and copy the full path.
For example, in Windows,
(a) C:\elasticsearch-6.1.2\bin // at this point, my unzip folder resides in the c directory.
(b) elasticsearch
(iii) On the other hand, open cmd(command prompt) as run at the administrator and write the above all command
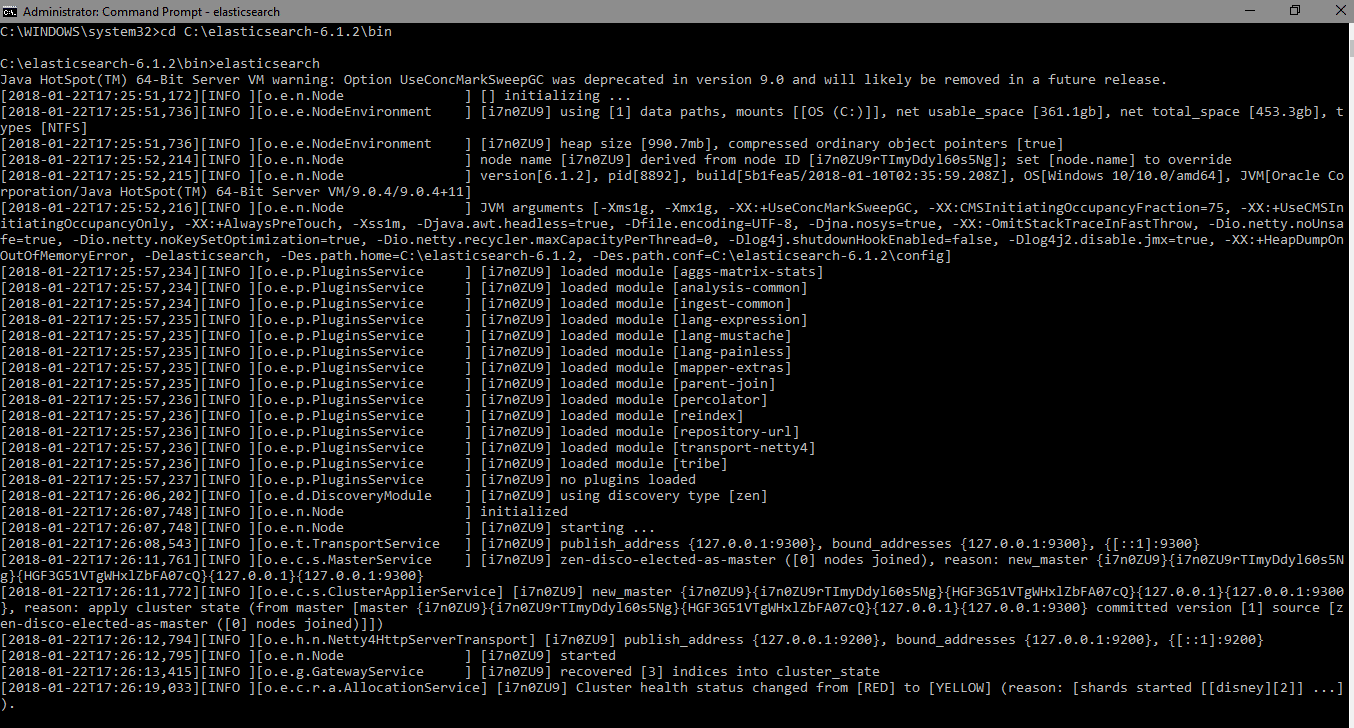
if you might get the error stating JAVA_HOME is not set, please set it in environment variables to “C:\Program Files\Java\jre1.8.0_31” or the location where you installed java.
Note
Port 9200 is by default for Elasticsearch web application or we can also customize it by changing HTTP.port under elasticsearch.yml and this file is available in the bin directory. If you want to check it then open the link http://localhost:9200 on your browser and this will give a JSON object having some information about the installed Elasticsearch −
For Example:-
{
"name" : "i7n0ZU9",
"cluster_name" : "elasticsearch",
"cluster_uuid" : "zWI-pNDRSk-qnuGusfsy7Q",
"version" : {
"number" : "6.1.2",
"build_hash" : "5b1fea5",
"build_date" : "2018-01-10T02:35:59.208Z",
"build_snapshot" : false,
"lucene_version" : "7.1.0",
"minimum_wire_compatibility_version" : "5.6.0",
"minimum_index_compatibility_version" : "5.0.0"
},
"tagline" : "You Know, for Search"
}
Download postman and install it.
Define URL
http://localhost:9200/employee/doc/1 //Index name and doc must be lower case
Note
In above URL, http://localhost:9200/ is a server name and employee is an index instead of a table and doc is a document type 1 is to identify the record id.
Add a record in elasticsearch using postman tool record must be JSON format

Get all data from elasticsearch you can write this query and change the id to search if you do not change the id is create the document.
For Example:-
http://localhost:9200/employee/doc/_search
For Example:-
Query: {{ “query”:{ “match_all”:{} }}
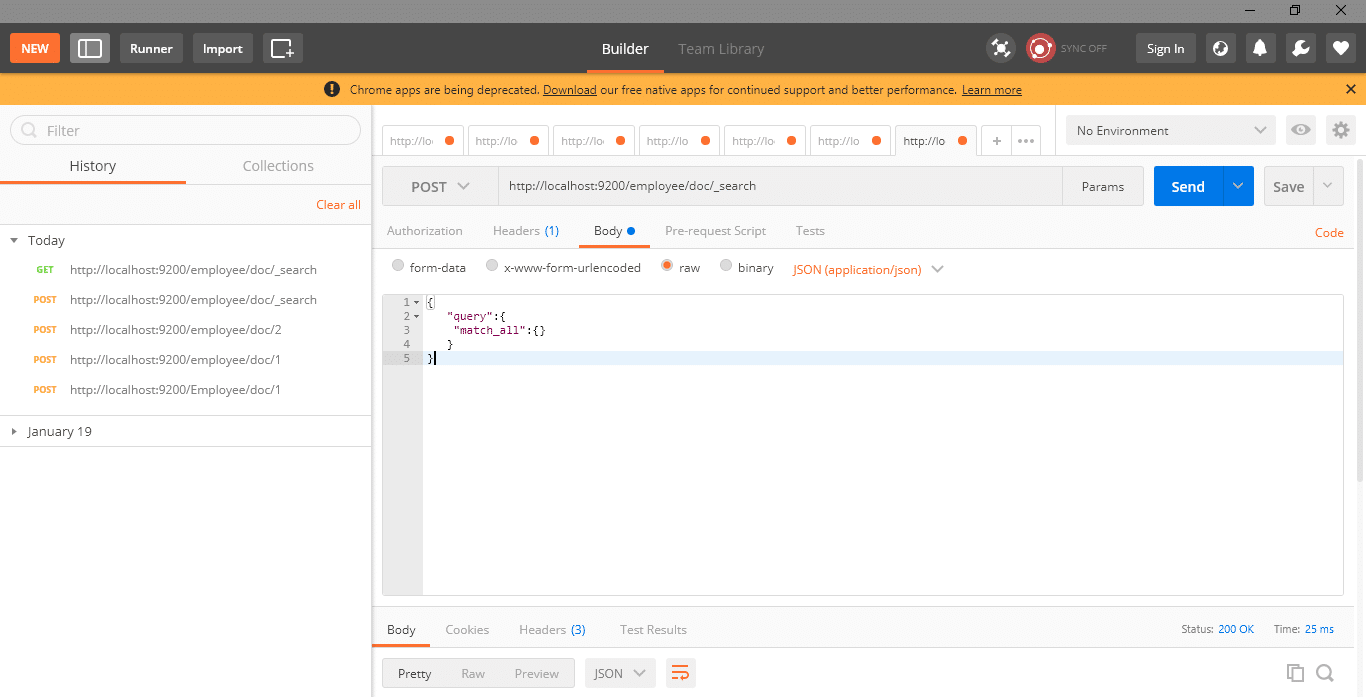
Click on the send button it creates the get request.
hit URL http://localhost:9200/employee/doc/_search on the browser you can see all record or you can use postman get method and click on send button.
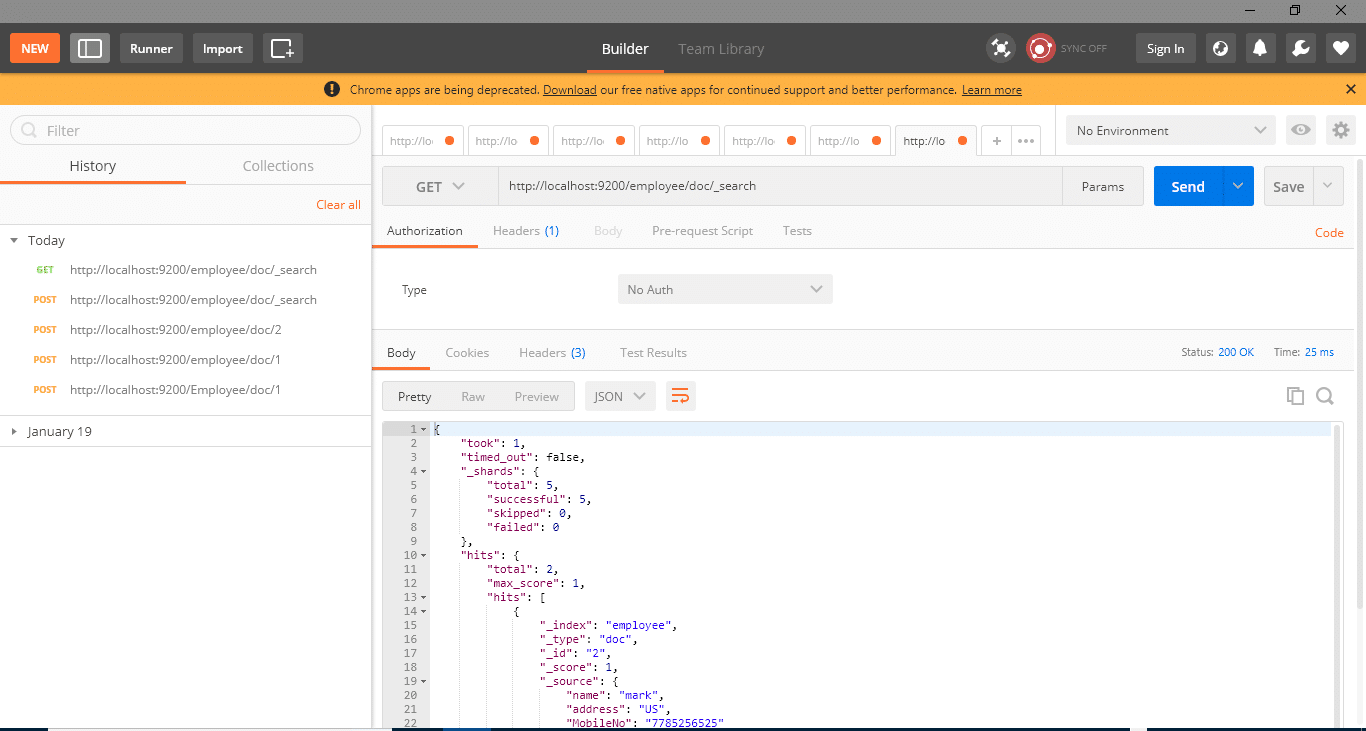
Elasticsearch integrate with c#
Setting application to connect to the elasticsearch
1. We need to install NEST in our application
from the package manager console
PM> Install-Package NEST
2. We need to install Elasticsearch.net in our application.
from the package manager console inside visual studio
PM> Install-Package Elasticsearch.Net
3. We need to add Newtonsoft.json dll on our application install from NuGet package manager
Here I am going to create a project in c#.
Open visual studio as well as click on file menu goto new and click on the project.
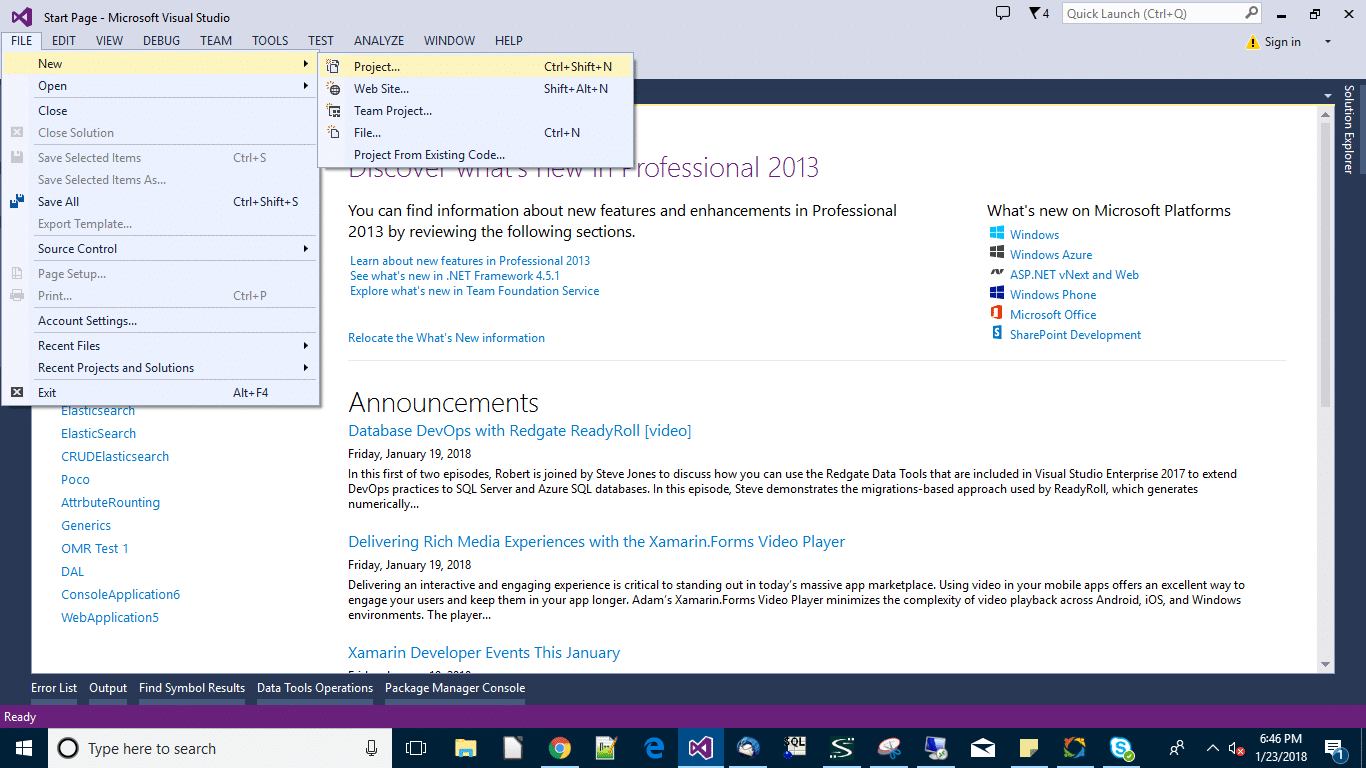
Click on project menu then a popup will open now select visual c# tab and select the windows forms application.
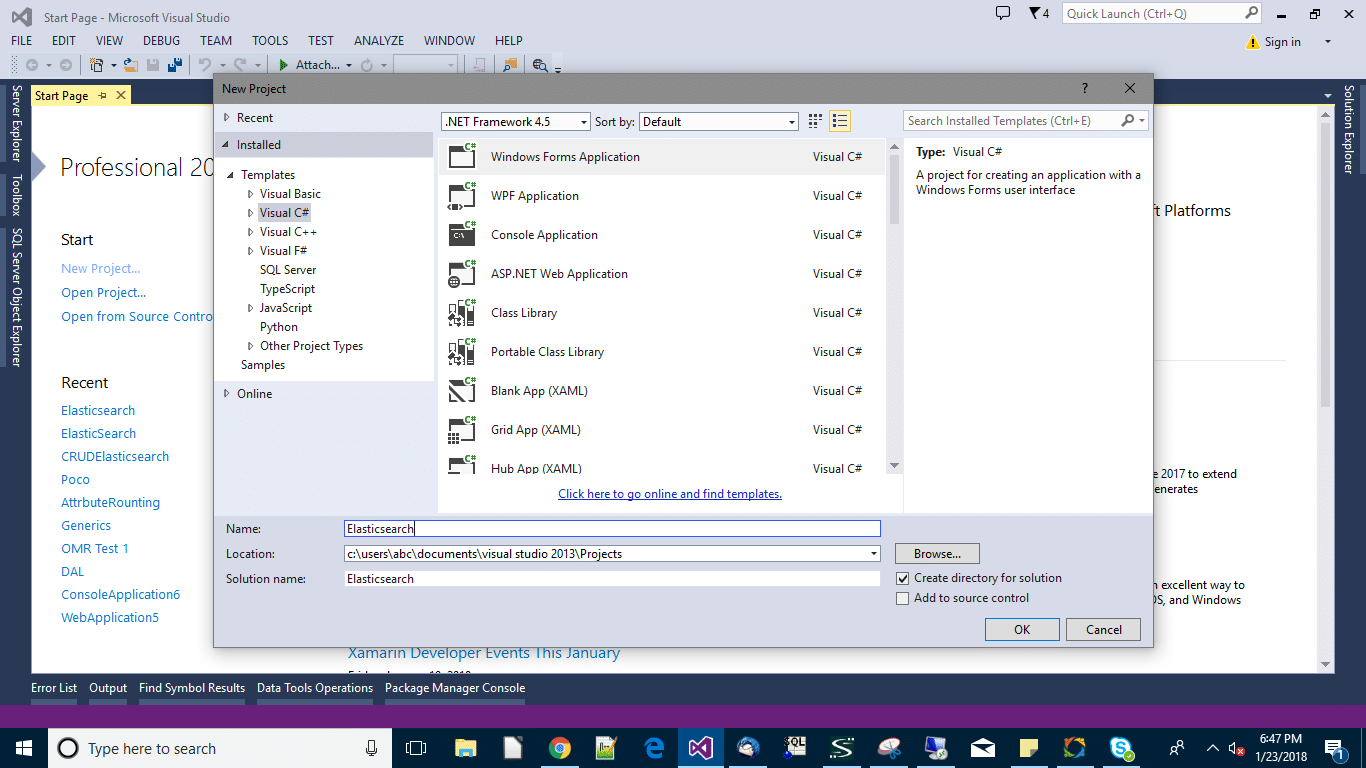
Write the project name as per your choice then right-click on the project on solution explorer and add a class as well as write the class name ConnectionToES.

In ConnectionToES class to create the connection of elasticsearch as well as write the below code to ConnectionToES class.
class ConnectionToES
{

public static ElasticClient EsClient()
{
ConnectionSettings connectionSettings;
ElasticClient elasticClient;
connectionSettings = new ConnectionSettings(new Uri("http://localhost:9200/"));
elasticClient = new ElasticClient(connectionSettings);
return elasticClient;
}

}
Right-click on the project from solution explorer as well as add one more class and provide the class name GetEmployee and write the below code.
public class GetEmployee
{
public static DataTable getAllDocument()
{
DataTable dataTable = new DataTable("Employee");
dataTable.Columns.Add("ID", typeof(string));
dataTable.Columns.Add("Name", typeof(string));
dataTable.Columns.Add("address", typeof(string));
dataTable.Columns.Add("MobileNo", typeof(string));

var res = ConnectionToES.EsClient().Search<Employee>(s => s
.Index("employee")
.Type("doc")
.From(0)
.Size(1000)
.Query(q => q.MatchAll()));

foreach (var hit in res.Hits)
{
dataTable.Rows.Add(hit.Id.ToString(), hit.Source.name.ToString(), hit.Source.address.ToString(), hit.Source.MobileNo.ToString());
}

return dataTable;
}
}
Right-click on the project from solution explorer as well as add one more class and provide the class name Employee and write the below code.
class Employee
{
public string name { get; set; }
public string address { get; set; }
public string MobileNo { get; set; }

}
In from1.cs we will add one dataGridView and one button. double click on button control write the following below code.
private void button1_Click(object sender, EventArgs e)
{
dataGridView1.Rows.Clear();
DataTable dt = GetEmployee.getAllDocument();
dataGridView1.DataSource = dt;
}
I hope, you enjoyed reading this article, On the other hand, your valuable feedback and questions or comments for this article are always welcome!
- Business Intelligence Vs Data Analytics: What’s the Difference? - December 10, 2020
- Effective Ways Data Analytics Helps Improve Business Growth - July 28, 2020
- How the Automotive Industry is Benefitting From Web Scraping - July 23, 2020

