
I am assuming that you are the Tableau Desktop user who wants to know details about tableau server. Well, if it’s a YES, then I will make you walk through the fundamental things you need to know about Tableau Server –from the viewpoint of Tableau Desktop!
This blog post will make you deal with why and how to:
- Share a workbook
- Share a data source
- Schedule extract refreshes
- Connect to published data sources
- Use user filters
Jump to Section
Sharing Workbooks
You have created the most amazing workbook of the world, full of new insights and paradigm-shifting information. How do you show it to other people? You can create a “packaged workbook” and email it to them, but the problem is that the data gets stale and on another hand, they must have Tableau Desktop or Reader installed.
You could also walk over to their desk and show them on your handy dandy laptop. But realistically, you’d like to let them go look at it anytime they’d like. You’d like the data to be fresh and up-to-date on .Cue Tableau Server.
Sharing a workbook is very straightforward in Tableau. You need these things:
- The workbook in question
- The URL to your Tableau Server
- Your username and password
Here are the steps:
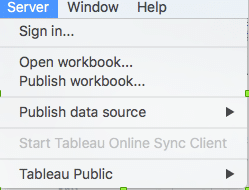
Step 1: First, click the Server, then select option “Publish Workbook”.
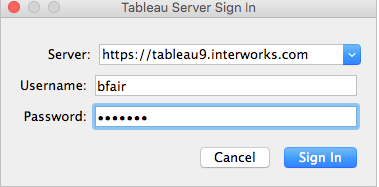
Step 2: Click that, and you’ll be prompted for your server name.
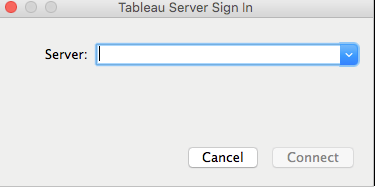
Step 3: Once you enter your server name, it will ask you for your username and password.
Step 4: Select the project in which you’d like to publish.
Step 5: Name the workbook.
Step 6: Select which sheets or dashboards you’d like to publish.

Step 7: Click Publish!
In general, these are the directions to sharing workbooks.
Sharing Data Sources
This is one of my favorite bits of Tableau Server. Imagine, if you will, that you have a team of analysts. Each analyst is working on a few projects at a time, but all of them are working off of the same (or very similar) data.
All too frequently, analysts try to create their own data source. They connect, specify joins, and filter out old/unnecessary data. They go set default number formats, default colors and default shapes. All in all, creating a nice solid data source can take hours. It’d be nice if you could just do that work once and let the rest of the team benefit from it. Well, of course, you can!
Sharing a data source is very similar to how we share a workbook. I recommend having a workbook dedicated solely to original data sources. This workbook may have several data sources, but it should not have any visualizations. That will help keep these different efforts separated.
Here are the steps:
- Connect to your database or file to Tableau Desktop,
- Filter out any unnecessary (old) information (for example, you are not concerned with unnecessary data).
- Hide any fields that are not necessary. Examples might be duplicate fields, join keys or fields that you will not be using in your analyses.
- Create any calculations you might need.
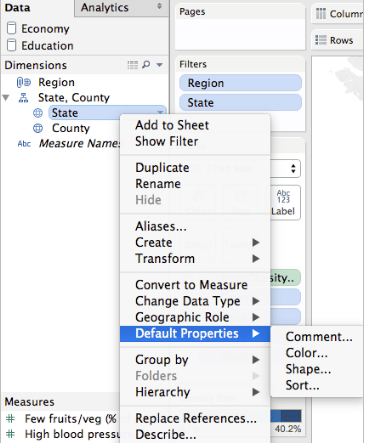
- Set default number formats, aggregations, colors, shapes, sort orders, etc.
- Describe each field, if you’re so inclined. This allows users to explore a field’s data without having to query for it.
- Add comments, especially if particular pieces of data aren’t straightforward.
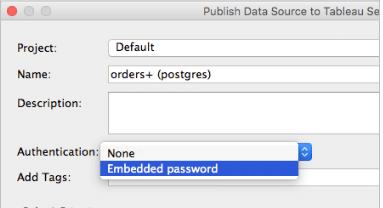
- Click the Server menu at the top of the screen, then navigate down to Publish Data Source.
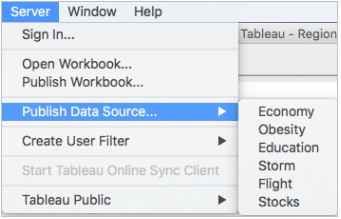
- Select the data source you’d like to publish. You’ll be prompted for your server name.
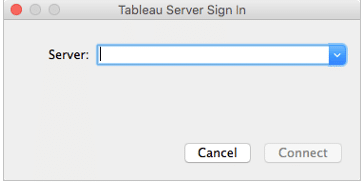
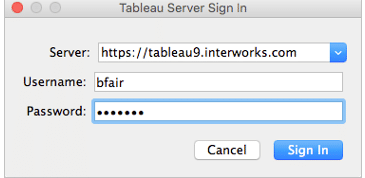
- Once you enter your server name, it will ask you for your username and password.
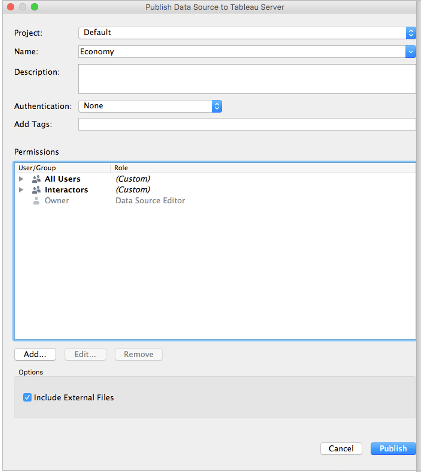
- Select the project in which you’d like to publish.
- Name the data source.
- Click Publish.
Now each analyst (or perhaps just you) can connect to that published data source and build your visualizations from there.
Scheduling Extract Refreshes
If you happened to take an extract for either of the past two items, you have one more thing you need to be concerned about during publishing – that is, scheduling your extract to refresh! You definitely don’t want to have to manually refresh and republish every day.
You might have noticed an extra “Scheduling and Authentication” button, or perhaps a couple extra drop-downs during your publishing attempt. These settings are self-explanatory, but I will give you some pointers here:
- Make sure you select the right authentication mechanism. Somehow we need to be login tableau into the database, so create your own credential and then use the Server Run-As account or use one of the other options. Do not prompt the user for their credentials. Since we are trying to automate this task, there’s no actual user to be prompted, so the extract would simply fail to refresh.
- Schedule a full refresh because there are many companies load their data on daily basis, so you might schedule a full refresh at the same interval. Just make sure the data is ready to be extracted by the time the schedule runs.

- Optionally, schedule an incremental refresh. If your data does not change much like in few edits or updates and mostly inserts, then you can set Tableau to get only the new records.

If you’ve not configured the extract for incremental refreshes, follow these steps:
- Right-click on your data source name
- Go to Extract Data.
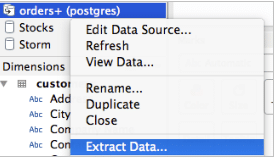
- Select the Incremental refresh box.
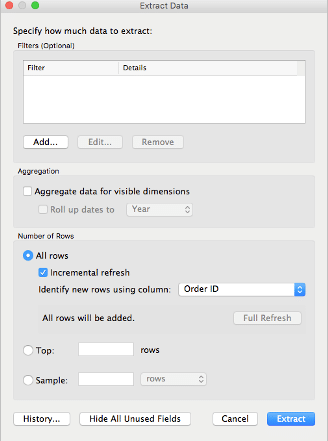
- Pick which column indicates new information (normally an ID or date)
- Extract again!
- Publish your workbook or data source when you have selected the right schedules for your use case.
Connecting to a Published Data Source
Now that it is published, you’ll need to connect to it in order to create your awesome visualizations. This is not all that different than connecting to a database or file:
In the Connect to Data popup, just click Tableau Server.

- Enter your server name.
Enter your username/password.
Find the data source you’d like to connect to and click it:
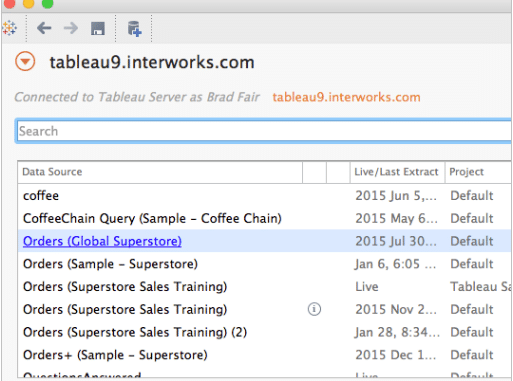
NOTE: There may be a download button too, but just click the name of the data source.
From here, you can create your workbook the same way you normally would. A word of caution, multitaskers: If you created the data source, keep in mind that many versions of Tableau do not automatically connect you to the published data source.
When your data source has been published, you will need to connect to it. If your data source does not have the Tableau icon next to it, it’s not that you are looking for. That is why if we having a separate workbook to manage all of your data sources then it prevents any confusion on the subject.
Using User Filters
User filters give you the ability to restrict what data each of your consumers can see. For example, if you are building an explanation for a team, you might only want to show each team manager their own data and not their peers’ data.
Creating a user filter is pretty simple. Follow these steps:
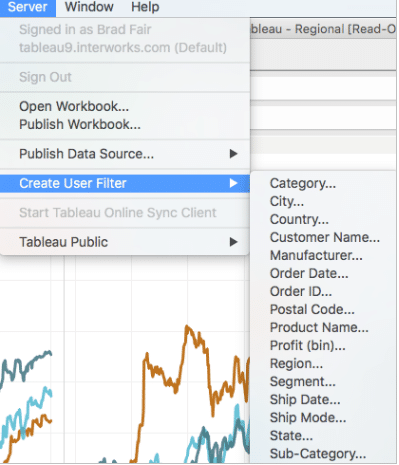
- Click on Server, then navigate down to Create User Filter.
Pick the dimension that you’d like to restrict. For example, if I know the sales managers are divided by region, I’d select Region from the list.
- Select each user or group that you care about, and pick which members of the dimension they can see (for example, East/West/South).
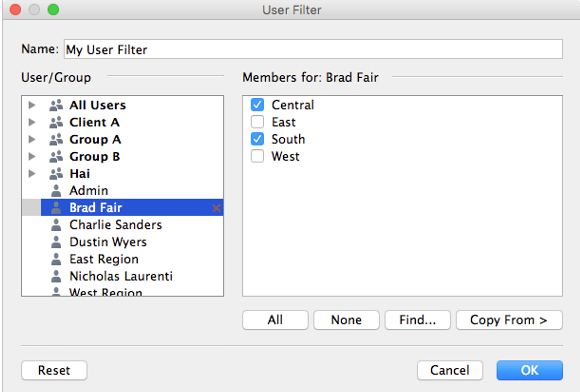
- Hit OK.
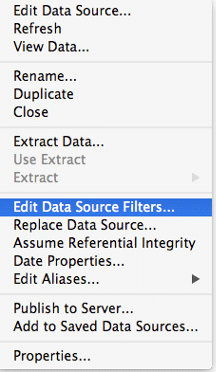
- Right-click the data source in question and select Edit Data Source Filters.
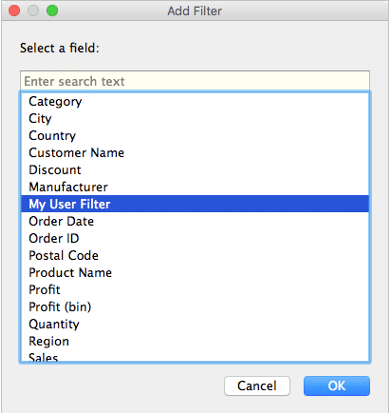
- Add a filter, then select the user filter that you just created.
These last two steps may be a bit different, depending on what you would like to do. Please remember that as long as a filter is on the Filters shelf then it can be removed by people which have the ability to edit/web edit. That’s why I use data source filters because it will protect the data.
This method works on Published Data Sources as well as workbooks, so be sure to use it where needed!
Sometime user filters may slow things down a little but generally, it is not noticeable.
So, this the simple guide to tableau server! By the use of tableau server, we can easily share workbooks, Data source and using filter we can protect our data in a better way. Furthermore, if you want to have more information regarding Data Services like Web Scrapping, Data Mining, Data Mining, etc. you can simply visit https://www.loginworks.com/
I excel when it comes to making bespoke data dashboards and visualizations that users and clients absolutely love. Sharing about things I enjoy doing is my hobby, whether it's about a project, collaboration, feedback, or just simple how-to guides about visualization.
If you have something to ask or share, I'd love to hear from you!
- Business Intelligence Vs Data Analytics: What’s the Difference? - December 10, 2020
- Effective Ways Data Analytics Helps Improve Business Growth - July 28, 2020
- How the Automotive Industry is Benefitting From Web Scraping - July 23, 2020