A dynamic master page only provides the common placeholder content as well as its layout to multiple pages. A single layout where header and footer exists is the master page which you can call it by the extension (.master) and other content comes from the content page with extension (.aspx page). A dynamic master allows creating a consistent layout for the whole website in your application which helps in look and feel that you want for all of the pages or a group of pages in your application.
In this article, we will discuss, how to assign the dynamic master page and its web form applications.
Jump to Section
How to assign Dynamic Master Page in asp.net?
In this session, you see how to assign a dynamic master page at runtime. So, let’s understand with an example.
This is what we want to achieve…
1. We contain two master pages in the application.
2. Put a drop-down list for both the master pages. The drop-down list must display both the master pages in the meantime.
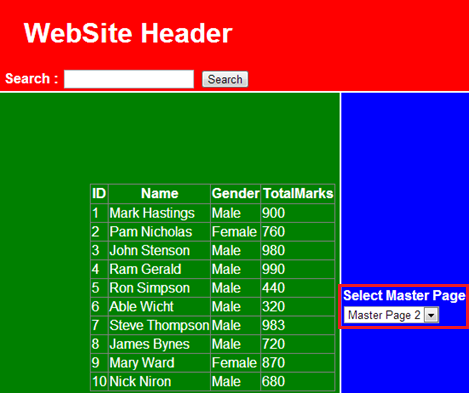
3. Select a master page in the dropdown list, then you get the selected master page to be dynamically set as the master page.
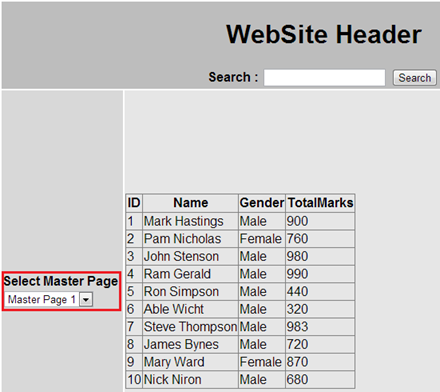
When you select the master page, then you get a header page from the master page in the main window (Refer to the image below).
Before going ahead, we need to create table tblStudens and a stored procedure for the desired results. We are using table tblStudents. So, here is the SQL Script to create this table with a sample data:
Create Table tblStudents

(

ID int Identity Primary Key,

Name nvarchar(50),

Gender nvarchar(20),

TotalMarks int,

)

Insert into tblStudents values ('Mark Hastings','Male',900)

Insert into tblStudents values ('Pam Nicholas','Female',760)

Insert into tblStudents values ('John Stenson','Male',980)

Insert into tblStudents values ('Ram Gerald','Male',990)

Insert into tblStudents values ('Ron Simpson','Male',440)

Insert into tblStudents values ('Able Wicht','Male',320)

Insert into tblStudents values ('Steve Thompson','Male',983)

Insert into tblStudents values ('James Bynes','Male',720)

Insert into tblStudents values ('Mary Ward','Female',870)

Insert into tblStudents values ('Nick Niron','Male',680)
The time to create stored procedure is given below which returns all students whose name contains the @SearchTerm parameter.
Create Proc spSearch

@SearchTerm nvarchar(50)

as

Begin

Select * from tblStudents where Name like '%' + @SearchTerm + '%'

End

Add a content page, and include a GridView control to display the students.

<asp:GridView ID="GridView1" runat="server">

</asp:GridView>
Include the following Master Type directive on the content page.
<%@ MasterType VirtualPath="~/Site.Master" %>
Finally, you need to copy and paste the following code in the code-behind file of the page.
protected void Page_Init(object sender, EventArgs e)

{

Master.SearchButton.Click += new EventHandler(SearchButton_Click);

}

protected void Page_Load(object sender, EventArgs e)

{

GetData(null);

}

protected void SearchButton_Click(object sender, EventArgs e)

{

GetData(Master.SearchTerm);

}

private void GetData(string searchTerm)

{

string cs = ConfigurationManager.ConnectionStrings["DBCS"].ConnectionString;

using (SqlConnection con = new SqlConnection(cs))

{

SqlCommand cmd = new SqlCommand("spSearch", con);

cmd.CommandType = CommandType.StoredProcedure;

SqlParameter searchParameter = new SqlParameter("@SearchTerm", searchTerm ?? string.Empty);

cmd.Parameters.Add(searchParameter);

con.Open();

GridView1.DataSource = cmd.ExecuteReader();

GridView1.DataBind();

}

}
As you can see, we have our table and assigned dynamic page now. For achieving the complete result, we need to create web form applications. So here are the steps as follows:
Steps to Create Webform Application
Step 1: First of all, create a new asp.net web forms application and give an appropriate name for it WebFormsDemo.
Step 2. Now, you need to add a class file to the project and give an appropriate name for it as “BaseMaterPage.cs” .cs is the extension name. Then, copy and paste the code. Remember that the BaseMaterPagev (dynamic page) class inherits from System.Web.UI.MasterPage class object. So, this BaseMaterPage class will become the base class for the two master pages that we will be created later in this session.
using System.Web.UI.WebControls;
namespace WebFormsDemo
{
public abstract class BaseMaterPage : System.Web.UI.MasterPage
{
public abstract Panel SearchPanel { get; }

public abstract string SearchTerm { get; }

public abstract Button SearchButton { get; }
}
}
Step 3. Here, you need to add a master page and give a name as per choice as Site.Master. Now copy and paste the following HTML code. Here is the script for the following code:
<table style="font-family: Arial">
<tr>
<td colspan="2" style="width: 800px; height: 80px; text-align:
center; background-color: #BDBDBD;">
<h1>WebSite Header</h1>
<asp:Panel ID="panelSearch" runat="server">
<b>Search : </b>
<asp:TextBox ID="txtSerach" runat="server"></asp:TextBox>
<asp:Button ID="btnSearch" runat="server" Text="Search" />
</asp:Panel>
</td>
</tr>
<tr>
<td style="height: 500px; background-color: #D8D8D8; width: 150px">
<b>Select Master Page</b>
<asp:DropDownList ID="DropDownList1" runat="server"
AutoPostBack="true"
OnSelectedIndexChanged="DropDownList1_SelectedIndexChanged">
<asp:ListItem Text="Master Page 1" Value="~/Site.Master">
</asp:ListItem>
<asp:ListItem Text="Master Page 2" Value="~/Site2.Master">
</asp:ListItem>
</asp:DropDownList>
</td>
<td style="height: 500px; background-color: #E6E6E6; width: 650px">
<asp:ContentPlaceHolder ID="MainContent" runat="server">
<h1>
Section that changes on a page by page basis</h1>
</asp:ContentPlaceHolder>
</td>
</tr>
<tr>
<td colspan="2" style="background-color: #BDBDBD; text-align: center">
<b>Website Footer</b>
</td>
</tr>
</table>
Step 4. Note that the Site master page class inherits from the BaseMaterPage class that we generated in Step 1. Here is the public class site name as follows:
public partial class Site: BaseMaterPage
{
protected void Page_Load(object sender, EventArgs e)
{
}

public override Panel SearchPanel
{
get
{
return panelSearch;
}
}

public override string SearchTerm
{
get
{
return txtSerach.Text;
}
}

public override Button SearchButton
{
get
{
return btnSearch;
}
}

protected void DropDownList1_SelectedIndexChanged
(object sender, EventArgs e)
{
Session["SELECTED_MASTERPAGE"] = DropDownList1.SelectedValue;
Response.Redirect(Request.Url.AbsoluteUri);
}

protected void Page_PreRender(object sender, EventArgs e)
{
if (Session["SELECTED_MASTERPAGE"] != null)
{
DropDownList1.SelectedValue =
Session["SELECTED_MASTERPAGE"].ToString();
}
}
}
Step 5. Now, you need to add another master page and give an appropriate name for it Site2.Master. Do the same copy and paste the following HTML code and here the is coding as follows:
<table style="font-family: Arial; color:White">
<tr>
<td colspan="2" style="width: 800px; height: 80px;
text-align: center; background-color:Red;">
<h1>WebSite Header</h1>
<asp:Panel ID="panelSearch" runat="server">
<b>Search : </b>
<asp:TextBox ID="txtSerach" runat="server"></asp:TextBox>
<asp:Button ID="btnSearch" runat="server" Text="Search"/>
</asp:Panel>
</td>
</tr>
<tr>
<td style="height: 500px; background-color:Green; width: 650px">
<asp:ContentPlaceHolder ID="MainContent" runat="server">
<h1>Section that changes on a page by page basis</h1>
</asp:ContentPlaceHolder>
</td>
<td style="height: 500px; background-color:Blue; width: 150px">
<b>Select Master Page</b>
<asp:DropDownList ID="DropDownList1" runat="server"
AutoPostBack="true"
OnSelectedIndexChanged="DropDownList1_SelectedIndexChanged">
<asp:ListItem Text="Master Page 1" Value="~/Site.Master">
</asp:ListItem>
<asp:ListItem Text="Master Page 2" Value="~/Site2.Master">
</asp:ListItem>
</asp:DropDownList>
</td>
</tr>
<tr>
<td colspan="2" style="background-color:Red; text-align: center">
<b>Website Footer</b>
</td>
</tr>
</table>
Step 6. Again, copy and paste the following HTML code in the code behind file. Remember that the Site2 master page class inherits from the BaseMaterPage class that we generated in Step 1.
public partial class Site2 : BaseMaterPage
{
protected void Page_Load(object sender, EventArgs e)
{
}

public override Panel SearchPanel
{
get
{
return panelSearch;
}
}

public override string SearchTerm
{
get
{
return txtSerach.Text;
}
}

public override Button SearchButton
{
get
{
return btnSearch;
}
}

protected void DropDownList1_SelectedIndexChanged
(object sender, EventArgs e)
{
Session["SELECTED_MASTERPAGE"] = DropDownList1.SelectedValue;
Response.Redirect(Request.Url.AbsoluteUri);
}

protected void Page_PreRender(object sender, EventArgs e)
{
if (Session["SELECTED_MASTERPAGE"] != null)
{
DropDownList1.SelectedValue =
Session["SELECTED_MASTERPAGE"].ToString();
}
}
}
Step 7. You get a class file, add this class file and give a proper name to it BasePage.cs. Here note that the BasePage class inherits from System.Web.UI.Page. This BasePage class will become the base class for all the content pages in the application. Here is the coding behind the page:
using System;
namespace WebFormsDemo
{
public class BasePage : System.Web.UI.Page
{
protected override void OnPreInit(EventArgs e)
{
if (Session["SELECTED_MASTERPAGE"] != null)
{
this.MasterPageFile = Session["SELECTED_MASTERPAGE"].ToString();
}
}
}
}
Step 8. Then, click on Site.Master page and select Add Content Page. Note that we have set MasterType to BaseMaterPage class.
<%@ Page Title="" Language="C#" MasterPageFile="~/Site.Master" AutoEventWireup="true"
CodeBehind="WebForm1.aspx.cs" Inherits="WebFormsDemo.WebForm1" %>
<%@ MasterType TypeName="WebFormsDemo.BaseMaterPage" %>
<asp:Content ID="Content1" ContentPlaceHolderID="MainContent" runat="server">
<asp:GridView ID="GridView1" runat="server">
</asp:GridView>
</asp:Content>
Step 9. Now, get the code-behind file of the page, then copy and paste the following HTML code as follows:
public partial class WebForm1: BasePage
{
protected void Page_Init(object sender, EventArgs e)
{
Master.SearchButton.Click += new
EventHandler(SearchButton_Click);
}

protected void Page_Load(object sender, EventArgs e)
{
if (!IsPostBack)
{
GetData(null);
}
}

protected void SearchButton_Click(object sender, EventArgs e)
{
GetData(Master.SearchTerm);
}

private void GetData(string searchTerm)
{
string cs = ConfigurationManager.ConnectionStrings["DBCS"]
.ConnectionString;
using (SqlConnection con = new SqlConnection(cs))
{
SqlCommand cmd = new SqlCommand("spSearch", con);
cmd.CommandType = CommandType.StoredProcedure;

SqlParameter searchParameter = new SqlParameter
("@SearchTerm", searchTerm ?? string.Empty);
cmd.Parameters.Add(searchParameter);
con.Open();
GridView1.DataSource = cmd.ExecuteReader();
GridView1.DataBind();
}
}
}
Now, execute all together and you will see your new dynamically layout master pages.
Note: Please include these namespaces while declarations like using System.Data, using System.Data.SqlClient and
using System.Configuration.
Default content in the content placeholder of a Dynamic master page
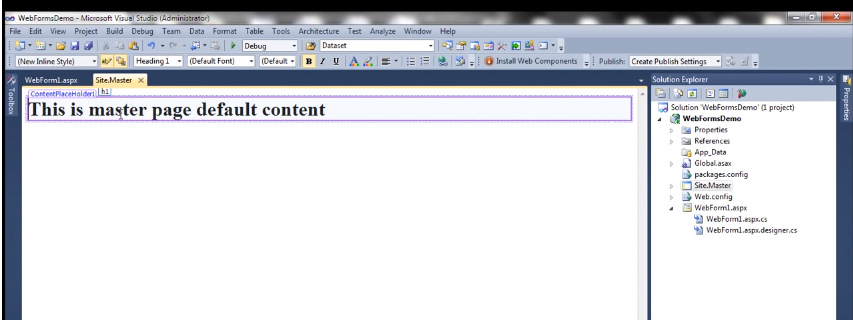
A ContentPlaceHolder contains default content in a dynamic master page. So, let’s understand with an example. The given ContentPlaceHolder has some default content on the master page like as <h1> tag. So, here is the script as follows:
<asp:ContentPlaceHolder ID="ContentPlaceHolder1" runat="server">

<h1>This is master page default content</h1>

</asp:ContentPlaceHolder>
When you run this on the localhost server, then it will look like this as follows:
After that press the right-click on the master page and then select “Add Content Page”. A new content page will be added and you will able to see the HTML on the content page as follows:
<%@ Page Title="" Language="C#" MasterPageFile="~/Site2.Master"AutoEventWireup="true" CodeBehind="WebForm5.aspx.cs"Inherits="WebFormsDemo.WebForm5" %>

<asp:Content ID="Content1" ContentPlaceHolderID="ContentPlaceHolder1"runat="server">

</asp:Content>
Note: We are containing content control in the content page in your application window explorer. Generally, we place the asp.net control content and some other text inside the content control page. Although, if we want the content page to default page in the ContentPlaceHolder of the master page. Then you need to follow these checkpoint as follows:
1. First of all, flip your content page to the design mode in the application window.
2. Then, click on the control button “ContentPlaceHolder” and then select “Default to Master’s content”
3. After that, you will get a confirmation dialog box like as “If you default to the Master Page content, everything in this region will be removed from the page. Do you want to continue?”
4. Finally, Click Yes!!!
Note: The default content to the master page “ContentPlaceHolder” is now displayed. So, flip the content page to Source mode and remember that here the content control has been removed. So, if you want a content page to default to the master page, then you need to remove the content control from the content page.
How Dynamic Master and Content page user control life cycle in asp.net?
In this session, we will learn the order of execution events, while containing a content page with a master page and a user control page. Here, the steps are as follows:
1. For this reason, you need to create a new asp.net web form application and you can give it a name as per your choice like as WebFormsDemo.
2. Now, you add a User Control with an appropriate name=”TestUserControl.ascx”. Then after, copy and paste the following code. It is a very simple user control, with the <h1> tag with static text.
<%@ Control Language="C#" AutoEventWireup="true" CodeBehind="TestUserControl.ascx.cs"
Inherits="WebFormsDemo.TestUserControl" %>
<h1>This is a Test User Control</h1>
3. Add a Master Page and give a name like as Site.Master. Then, paste the following HTML code in the code-behind page.
public partial class Site : System.Web.UI.MasterPage
{
protected void Page_Init(object sender, EventArgs e)
{
Response.Write("Master Page Init Event<br/>");
}

protected void Page_Load(object sender, EventArgs e)
{
Response.Write("Master Page Load Event<br/>");
}

protected void Page_PreRender(object sender, EventArgs e)
{
Response.Write("Master Page PreRender Event<br/>");
}
}
4. Click on the MasterPage and then select Add Content Page. This must be added as “WebForm1.aspx” with a content control. Then, drag this web form WebForm1.aspx to design mode.
After this, drag and drop a textbox control page and TestUserControl to the content page.
Inbuilt event handler methods function for OnLoad, OnInit, and OnPreRender events for the textbox and the control page. So, the following HTML code should look as given below.
<%@ Page Title="" Language="C#" MasterPageFile="~/Site.Master"
AutoEventWireup="true" CodeBehind="WebForm1.aspx.cs"
Inherits="WebFormsDemo.WebForm1" %>
<%@ Register src="TestUserControl.ascx"
tagname="TestUserControl" tagprefix="uc1" %>
<asp:Content ID="Content1" ContentPlaceHolderID="ContentPlaceHolder1"
runat="server">
<asp:TextBox ID="TextBox1" runat="server"
OnInit="TextBox1_Init" OnLoad="TextBox1_Load"
OnPreRender="TextBox1_PreRender">
</asp:TextBox>
<br />
<uc1:TestUserControl ID="TestUserControl1" runat="server"
OnInit="TestUC1_Init" OnLoad="TestUC1_Load"
OnPreRender="TestUC1_PreRender"/>
</asp:Content>
5. In the end, copy and paste the HTML code in the code-behind page file of WebForm1.
public partial class WebForm1 : System.Web.UI.Page
{
protected void Page_Init(object sender, EventArgs e)
{
Response.Write("Content Page Init Event<br/>");
}
protected void Page_Load(object sender, EventArgs e)
{
Response.Write("Content Page Load Event<br/>");
}
protected void Page_PreRender(object sender, EventArgs e)
{
Response.Write("Content Page PreRender Event<br/>");
}
protected void TextBox1_Init(object sender, EventArgs e)
{
Response.Write("TextBox Init Event<br/>");
}
protected void TextBox1_Load(object sender, EventArgs e)
{
Response.Write("TextBox Load Event<br/>");
}
protected void TextBox1_PreRender(object sender, EventArgs e)
{
Response.Write("TextBox PreRender Event<br/>");
}
protected void TestUC1_Init(object sender, EventArgs e)
{
Response.Write("UserControl Init Event<br/>");
}
protected void TestUC1_Load(object sender, EventArgs e)
{
Response.Write("UserControl Load Event<br/>");
}
protected void TestUC1_PreRender(object sender, EventArgs e)
{
Response.Write("UserControl PreRender Event<br/>");
}
}
Then, execute your application and remember that the events only execute in the following sequential order as follows:
- TextBox Init Event
- UserControl Init Event
- Master Page Init Event
- Content Page Init Event
- Content Page Load Event
- Master Page Load Event
- TextBox Load Event
- UserControl Load Event
- Content Page PreRender Event
- Master Page PreRender Event
- TextBox PreRender Event
- UserControl PreRender Event
So, these events are only raised from the innermost page control to the outermost page control, and all other events are raised from the outermost control to the innermost.
Remember that the master page is now merged with the content page and work as a control in the content page. This master page is merged into the content page while initializing the stage of page processing system.
Here, the big question arises when we have a master page, user control and a content page with some events like Master init & master load, Content init & Content load, and User control init & User control load.
When we execute the page containing above things, events get fired only in the sequence as follows:
- User control init
- Master init
- Content Init
- Content load
- Master load
- UserControl Load
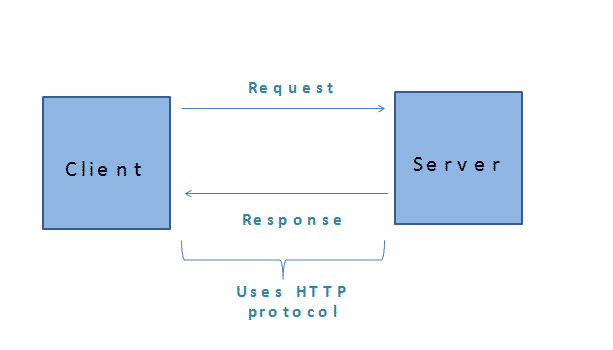
What are HTTP and its Methods?
HTTP stands for HyperText Transfer Protocol, which usually defines the request methods to show the desired action to be performed for a source code or we can say given resource. HTTP defines the actual communication between the clients and servers. This can be used in any programming language or with a database while making the web applications.
You can follow these 8 HTTP methods as follows:
- Get Method
- Head Method
- Post Method
- Put Method
- Delete Method
- Connect Method
- Option Method
- Trace Method
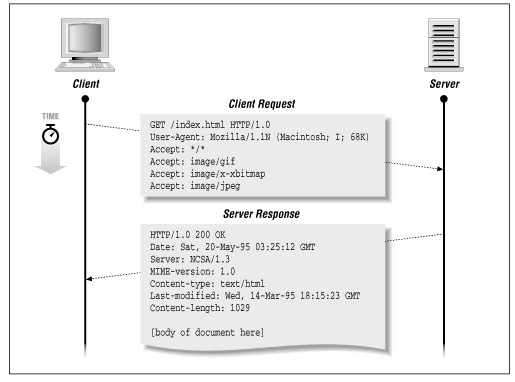
Get Method
This method only retrieves information (Data) from the specified resources from the given server by using a URL.
Note: A single query string (name or value pairs) is sent to the URL of a GET request as follows:
/test/demo_form.php?name1=value1&name2=value2
Get request can be cached and bookmarked in the browser history. Get method contains its length restriction while dealing with sensitive data.
So, let’s understand with an example – A web browser submits a single HTTP request to host server. Later, the server returns a response to the host web browser. This response maintains the useful information about the request. So, let’s take another real example with hell.html as follows:
GET /hello.htm HTTP/1.1
User-Agent: Mozilla/4.0 (compatible; MSIE5.01; Windows NT)
Host: www.ora.com
Accept-Language: en-us
Accept-Encoding: gzip, deflate
Connection: Keep-Alive
The server response to the GET request will be as follows:
HTTP/1.1 200 OK
Date: Mon, 27 Jul 2009 12:28:53 GMT
Server: Apache/2.2.14 (Win32)
Last-Modified: Wed, 22 Jul 2009 19:15:56 GMT
ETag: "34aa387-d-1568eb00"
Vary: Authorization,Accept
Accept-Ranges: bytes
Content-Length: 88
Content-Type: text/html
Connection: Closed
Here is the final script for hell world as follows
<html>
<body>
<h1>Hello, World!</h1>
</body>
</html>
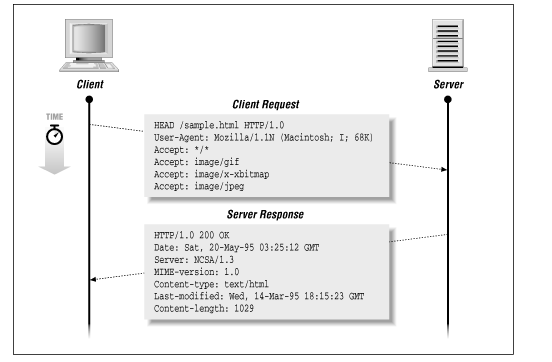
Head Method
It gives the same output as GET method but it returns to HTTP headers also does not contain document body. So, let’s take an example which makes use of the HEAD method to retrieve header information about hello.htm as follows:
HEAD /hello.htm HTTP/1.1
User-Agent: Mozilla/4.0 (compatible; MSIE5.01; Windows NT)
Host: www.zigzag.com
Accept-Language: en-us
Accept-Encoding: gzip, deflate
Connection: Keep-Alive
The server response to the GET request will be as follows:
HTTP/1.1 200 OK
Date: Mon, 27 Jul 2009 12:28:53 GMT
Server: Apache/2.2.14 (Win32)
Last-Modified: Wed, 22 Jul 2009 19:15:56 GMT
ETag: "34aa387-d-1568eb00"
Vary: Authorization,Accept
Accept-Ranges: bytes
Content-Length: 88
Content-Type: text/html
Connection: Closed
As a result, note that here the server will not send any data after the header.
Post Method
A POST method only used to send data to the server with full of information like as customer information and file upload etc. A Post method cannot be cached and bookmarked. Also, it does not contain any restrictions in the browser history.
So, let’s understand with a real example, which makes use of its method which sends a form data to the server end, and which would be processed by a process.cgi and finally, you will get a response in output.

POST /cgi-bin/process.cgi HTTP/1.1
User-Agent: Mozilla/4.0 (compatible; MSIE5.01; Windows NT)
Host: www.zigzag.com
Content-Type: text/xml; charset=utf-8
Content-Length: 88
Accept-Language: en-us
Accept-Encoding: gzip, deflate
Connection: Keep-Alive
<?xml version="1.0" encoding="utf-8"?>
<string xmlns="http://clearforest.com/">string</string>
The server-side process.cgi pass the data and sends the response in return:
HTTP/1.1 200 OK
Date: Mon, 27 Jul 2009 12:28:53 GMT
Server: Apache/2.2.14 (Win32)
Last-Modified: Wed, 22 Jul 2009 19:15:56 GMT
ETag: "34aa387-d-1568eb00"
Vary: Authorization,Accept
Accept-Ranges: bytes
Content-Length: 88
Content-Type: text/html
Connection: Closed
Script for successful message.
<html>
<body>
<h1>Request Processed Successfully</h1>
</body>
</html>
PUT Method
A PUT method requests the enclosed entity to stored data under specified URI. So, let’s understand with an example as requests the server to save the given entity-body in hello.htm at the root server:
PUT /hello.htm HTTP/1.1
User-Agent: Mozilla/4.0 (compatible; MSIE5.01; Windows NT)
Host: www.zigzag.com
Accept-Language: en-us
Connection: Keep-Alive
Content-type: text/html
Content-Length: 182
<html>
<body>
<h1>Hello, World!</h1>
</body>
</html>
The server will be stored in the given entity-body in the hello.htm file and send back the response to the client as follows:
HTTP/1.1 201 Created
Date: Mon, 27 Jul 2009 12:28:53 GMT
Server: Apache/2.2.14 (Win32)
Content-type: text/html
Content-length: 30
Connection: Closed
<html>
<body>
<h1>The file was created.</h1>
</body>
</html>
Delete Method
The DELETE method requests the origin server, which deletes the resource specified by the Request-URI. So, let’s have a look at an example which requests the server to delete the given file hello.htm at the root server:
DELETE /hello.htm HTTP/1.1
User-Agent: Mozilla/4.0 (compatible; MSIE5.01; Windows NT)
Host: www.zigzag.com
Accept-Language: en-us
Connection: Keep-Alive
So, the server will delete the given file hello.htm and send back the response to the client as follows:
HTTP/1.1 200 OK
Date: Mon, 27 Jul 2009 12:28:53 GMT
Server: Apache/2.2.14 (Win32)
Content-type: text/html
Content-length: 30
Connection: Closed
<html>
<body>
<h1>URL deleted.</h1>
</body>
</html>
Connect Method
A CONNECT method only converts the request’s connection to a transparent TCP/IP tunnel (SSL Tunnel). On another hand, this method uses to develop a connection to the web server by the client over HTTP.
So, let’s understand with an example which requests a connection with a web server running on the host zigzag.com as follows:
CONNECT www.zigzag.com HTTP/1.1
User-Agent: Mozilla/4.0 (compatible; MSIE5.01; Windows NT)
You can develop this connection only with the server and the sent the response back to the client as follows:
HTTP/1.1 200 Connection established
Date: Mon, 27 Jul 2009 12:28:53 GMT
Server: Apache/2.2.14 (Win32)
Options Method
The OPTIONS method define a request for information that returns the HTTP methods which the server supports parallelly. This method finds HTTP options supported by a web server. Therefore, the only client can specify a unique URL for this method and (*) refer to the server side.
So, let’s understand with an example that requests a list of methods which supported by a web server running on zigzag.com as follows:
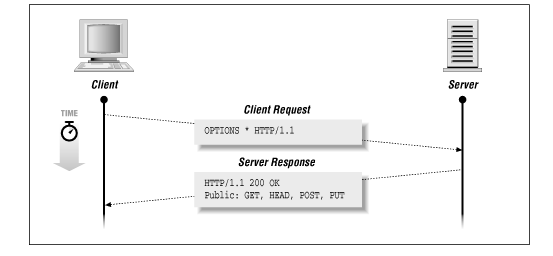
OPTIONS * HTTP/1.1
User-Agent: Mozilla/4.0 (compatible; MSIE5.01; Windows NT)
The server will send an information which is totally based on the current configuration of the server as follows:
HTTP/1.1 200 OK
Date: Mon, 27 Jul 2009 12:28:53 GMT
Server: Apache/2.2.14 (Win32)
Allow: GET,HEAD,POST,OPTIONS,TRACE
Content-Type: httpd/unix-directory
Trace Method
A TRACE method only retrieves a remote, application-layer loop-back of the request message. Let’s understand this with an example:

TRACE / HTTP/1.1
Host: www.ora.com
User-Agent: Mozilla/4.0 (compatible; MSIE5.01; Windows NT)
Then, the server will return the message in response to the request information as follows:
HTTP/1.1 200 OK
Date: Mon, 27 Jul 2009 12:28:53 GMT
Server: Apache/2.2.14 (Win32)
Connection: close
Content-Type: message/http
Content-Length: 39

TRACE / HTTP/1.1
Host: www.ora.com
User-Agent: Mozilla/4.0 (compatible; MSIE5.01; Windows NT)
Concluding Words
A dynamic master page is a creation of HOME page where you can give a style for layout and you may design it very well. You may take HTTP requests methods and these methods are used on a common basis.
I excel when it comes to making bespoke data dashboards and visualizations that users and clients absolutely love. Sharing about things I enjoy doing is my hobby, whether it's about a project, collaboration, feedback, or just simple how-to guides about visualization.
If you have something to ask or share, I'd love to hear from you!
- Business Intelligence Vs Data Analytics: What’s the Difference? - December 10, 2020
- Effective Ways Data Analytics Helps Improve Business Growth - July 28, 2020
- How the Automotive Industry is Benefitting From Web Scraping - July 23, 2020