By now, I hope that you are already aware of how to write and execute test scripts in Appium. But the question that arises here is:
Are you executing a single class at a time, and what if you need to execute multiple classes at the same time?
Now, this is something tricky, but every problem comes with a solution!
To achieve this, you need to execute your test scripts with the help of TestNG. In this post, I am going to explain how you can implement TestNG and how you can achieve multiple class execution at the same time.
First, we need to figure out what is TestNG and what are the benefits to use it in your automation scripts. So, let’s get started…
Jump to Section
TestNG – A Brief
TestNG is basically a testing framework that is inspired by JUnit and NUnit, but it has some new features which make it more powerful and easy to use.
TestNG is an open-source unit testing framework where NG in TestNG denotes Next Generation.
Benefits of TestNG
Below are a few of the benefits or advantages of TestNG:
- We can run our test scripts in the order which we provide.
- It is possible to run classes without a main method with the help of TestNG.
- It provides an HTML report after the execution of test scripts.
- We can achieve grouping and parameterization of test cases more easily.
- Implementation of logging can be achieved by using TestNG Listeners.
- Parallel execution is possible with the help of TestNG.
Annotations used in TestNG
- @BeforeSuite: The method annotated as @BeforeSuite is going to run before all the tests in a test suite.
- @AfterSuite: The annotated method will be run after all tests in a test suite.
- @BeforeTest: The annotated method is going to run before any test method belonging to the classes inside the tag is run.
- @AfterTest: The method which is annotated as @AfterTest will be run after all the test methods belonging to the classes inside the tag have run.
- @BeforeClass: The annotated method will be run before the first test method in the current class is going to run.
- @AfterClass: The annotated method will be run after all the test methods in the current class have been run.
- @BeforeMethod: The annotated method will be run before each test method.
- @AfterMethod: The annotated method will be run after each test method.
- @Test: The annotated method is a part of a test case.
Benefits of using Annotations
- TestNG helps with the identification of methods. It is revolving around simply looking up the annotations. This further enables us to make the method names free from any kind of restrictions related to any format or pattern.
- We can pass some additional parameters to annotations.
- Annotations are strongly typed, so the compiler will highlight any mistakes right away.
Steps to Install TestNG in Eclipse
Now, coming to the installation part of TestNG in eclipse, it is a very simple process as there is a plugin for the Eclipse IDE. But before going to install TestNG, you need to keep in mind that your Internet connection should be up & running during the installation of this plugin and Eclipse IDE should be installed on your computer.
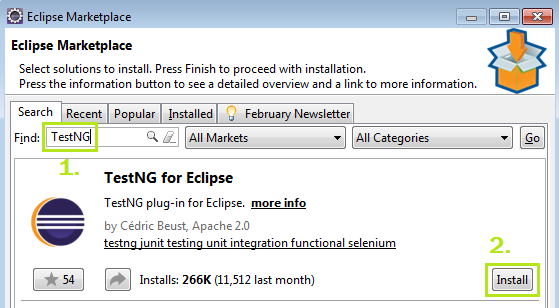
- Launch Eclipse and click on Help, and click on Eclipse Marketplace.
- A new window will open, enter TestNG in the search box and press enter. It will show the result for TestNG after that you need to click on install in order to install TestNG in your Eclipse IDE.
- This process will take some time and after completion, it will ask you to restart Eclipse, once you restart it the changes will take effect.
After installation, if you want to verify that TestNG has been installed successfully, you need to go to Window>>Show View>>Other and click on other.
After clicking on other a new window will appear, in that window click on java, and there you find TestNG which means TestNG has been successfully installed.
Now, create a new Java project in Eclipse IDE. Once you have created it, add the TestNG library to your project for that you need to right-click on your project go to Build Path>>Cofigure Build Path, click on it.
In the next window go to libraries tab and click on Add Library in order to add the TestNG library to your project.
A new window will appear after clicking on Add Library there you need to select TestNG and click next and then click Finish.
In the libraries tab, the TestNG library will get displayed. Click on OK. It means now you can write your test scripts by using TestNG.
Now, let’s take a simple example to take a quick reference that how to create test scripts using TestNG and how to execute them using the TestNG suite file. Below is the example code using TestNG annotations to launch Amazon app.
import java.io.File;

import java.io.File;

import java.io.IOException;

import java.net.URL;
import io.appium.java_client.AppiumDriver;
import org.openqa.selenium.WebElement;

import org.openqa.selenium.remote.DesiredCapabilities;

import org.testng.annotations.AfterTest;

import org.testng.annotations.BeforeTest;

import org.testng.annotations.Test;

public class Amazon

{

public static AppiumDriver<WebElement> driver;

@BeforeTest

public void launch() throws IOException

{

File classpathRoot = new File(System.getProperty("user.dir"));

File appDir = new File(classpathRoot, "/apps/Becketts/");

File app = new File(appDir, "app-debug.apk");

DesiredCapabilities capabilities = new DesiredCapabilities();

capabilities.setCapability("BROWSER_NAME", "Android");

capabilities.setCapability("VERSION", "5.1");

capabilities.setCapability("deviceName","Android");

capabilities.setCapability("platformName","Android");

capabilities.setCapability("app", app.getAbsolutePath());

capabilities.setCapability("appPackage", "in.amazon.mShop.android.shopping"); capabilities.setCapability("appActivity","com.amazon.mShop.home.HomeActivity");

driver = new AppiumDriver<WebElement>(new URL("https://127.0.0.1:4723/wd/hub"), capabilities);

}

@Test

public void print()

{

System.out.println("Application Started");

}

@AfterTest

public void close() throws IOException

{
driver.quit();

}

}
After this, right-click on your project go to TestNG and click on Convert to TestNG in order to generate a TestNG XML file.
After clicking on this, you will get a new window in which all the details related to your TestNG suite file displayed as shown below.
In the Location field, the name of the TestNG XML file is testng.xml. If you want, you can change the name into whatever you want, but the extension of the file will remain the same (.xml.) In the preview field, the XML code is given, including your Suite name, Test name, and Class name. As you can observe a dot (.) is given before the class name Amazon, remove this dot and click on finish. TestNG XML file will be added to your project, open this file by double click on it.
Now there are two ways to run this XML file, first one is to open this XML file and simply click on the green play button and run it, as you run your classes normally.
Second, right-click on the XML file, click Run As, and then, click on TestNG Suite.
If you want to run more than one class at the same time then you just need to add the class name in the classes tag like,
<?xml version="1.0" encoding="UTF-8"?>

<!DOCTYPE suite SYSTEM "http://testng.org/testng-1.0.dtd">

<suite name="Suite">

<test name="Test">

<classes>

<class name="Class1"/>

<class name="Class2"/>

<class name="Class3"/>

</classes>

</test> <!-- Test -->

</suite> <!-- Suite -->
You need to make sure that every class has at least one @Test annotation as I have used in the above-mentioned code.
You just need to follow these simple steps and you can minimize your efforts of executing multiple classes one by one, execute only one TestNG Suite file by adding all the classes as shown in the above example and you can see that all your classes will execute by a single Suite file.
Isn’t it simple? I am sure it is now! Anyway, for further queries, please use the comments section below…
- COVID-19: How We Are Dealing With It as a Company - March 23, 2020
- Agile Testing – The Only Way to Develop Quality Software - February 8, 2019
- How to Perform System Testing Using Various Types Techniques - May 16, 2018


Very helpful!Well explained
Thank you very much Shubhangi
Nice Blog…Keep It up .Keep writing….
Thanks Sir