Django is the most famous Python structure, intended to give Rails-like convenience. We should perceive how rapidly we can set up a basic API utilizing Django and a library called Django Rest Framework.
For those of you who read the Node/PHP API instructional exercise, we’re currently going to endeavor to do a similar thing with Django. We’ll likewise rapidly perceive how Django makes a few things harder, and a few things a whole lot less demanding.
Who This Tutorial Is For: You should have an essential comprehension of REST APIs and CRUD activities. Python information is an or more yet a bit much. You’ll lift it up.
We’ll be building an API for a Google Keep-esque note-taking web application. We need to manufacture a REST-ful API with the CRUD endpoints, to make, read, refresh, and erase notes. Fortunately, as opposed to approach these endpoints individually, Django lets us pretty much make them across the board singular motion.
Jump to Section
Setting Up Our Project:
Django isolates your work into apps and applications/projects. project contain apps, however, the app doesn’t really have a place with a certain project — the thought is to make them reusable crosswise over the project.
We’ll just be making one application inside one project, yet the record structure may appear somewhat odd on the off chance that you don’t remember this.
Introduce Python in the event that you haven’t done as such, how about we introduce Django and make our project:
pip install Django
django-admin startproject python-rest-api-djago-rest-framework-master
cd python-rest-api-djago-rest-framework-master
Next, we’ll install Django-rest-framework, which will supply us with a REST framework.
pip install djangorestframework
pip install markdown       # Markdown support for the browsable API.
pip install django-filter  # Filtering support
Or directly clone from GitHub
git clone https://github.com/encode/django-rest-frameworkFinally, we can start our app within our project:
python manage.py startapp note
Inside your python-rest-API-Django-rest-framework-master catalog, you should now have two subfolders: one likewise called note, and another named programming interface (just as manage.py document).
The distinction between the two can be thought of like this: the sample note contains the settings for the setup of the undertaking, just as uncovering URLs. The programming interface organizer handles the genuine API enchantment.
Before we go on, we need to introduce our application inside our project, inside sample note/settings-py:
# samplenote/settings.py
INSTALLED_APPS = [
    'django.contrib.admin',
    'django.contrib.auth',
    'django.contrib.contenttypes',
    'django.contrib.sessions',
    'django.contrib.messages',
    'django.contrib.staticfiles',
    #app
    'note',
    #rest_framework
    'rest_framework',
]
Once more, our project can have various applications installed — and those applications aren’t really attached to that project. Our task here is python-rest-api-djago-rest-framework-master, and our application is called programming interface.
With that done, we’re prepared to begin building.
Model:
The principal thing we have to make is a Note model to cooperate with. For those new to models, this depiction from the Django docs is tantamount to any:
A model is the single, authoritative wellspring of data about your information. It contains the basic fields and practices of the information you’re putting away.For the most part, each model maps to a single database table.
Django is one of a kind (contrasted with a system like Ruby on Rails) in that your relocations pursue how you characterize your models, as opposed to being independently characterized.
We will make our Note model, and after that run our relocations, which will set up our database with a notes table (with all the fitting fields).
from django.db import models
from django.utils import timezone
from django.core.validators import MaxValueValidator, MinValueValidator
# Create your models here.

class Note(models.Model):

title = models.CharField(max_length=100)
description = models.CharField(max_length=400)
created_at = models.DateTimeField(default=timezone.now)
created_by = models.CharField(max_length=50, blank=True, null=True)
priority = models.IntegerField(validators=[MinValueValidator(1),
MaxValueValidator(5)])
Okay, our model is all set up. Now you can run our migrations, that will set up our database.
python manage.py makemigrations
python manage.py migrate
API Explanation:
Alright, so our model and database are on the whole prepared to go. Presently to open a few endpoints to the more extensive world, so we can communicate with our information.
One of the essentials of RESTful APIs is the possibility of assets. The term is somewhat conceptual, yet in this setting, it alludes to a class that sits between our URLs and our models.
A client will make a demand for an endpoint. Contingent upon the URL, the client will be diverted to a specific asset, which will at that point play out the proper CRUD activity on the model.
Once more, this is an improved clarification of a complex topic — let’s thumbs up and see it by and by:
In your Note folder, create a new file called note_api.py
from rest_framework import serializers
from .models import Note
from rest_framework import viewsets

class NoteSerialiser(serializers.HyperlinkedModelSerializer):

class Meta:
model = Note
fields = ('id', 'title', 'description', 'created_at', 'created_by', 'priority')


class NoteViewSet(viewsets.ModelViewSet):

queryset = Note.objects.all()
serializer_class = NoteSerialiser
let’s set those up in our samplenote/urls.py file:
from django.conf.urls import url, include
from django.contrib import admin
from rest_framework import routers
from note.note_api import NoteViewSet

# Routers provide an easy way of automatically determining the URL conf.
router = routers.DefaultRouter()
router.register(r'notes', NoteViewSet)

urlpatterns = [
url(r'^admin/', admin.site.urls),
url(r'^', include('note.urls')),
url(r'^api-auth/', include('rest_framework.urls', namespace='rest_framework')),
url(r'^api/', include(router.urls)),
]
We import our NoteResource, instantiate it, and then say that we want all URLs that start with api/ to redirect to the resource. (Don’t forget to import include from django.conf.urls).
Test APIs:
python manage.py runserver
Now it will open browser: http://127.0.0.1:8000/api/
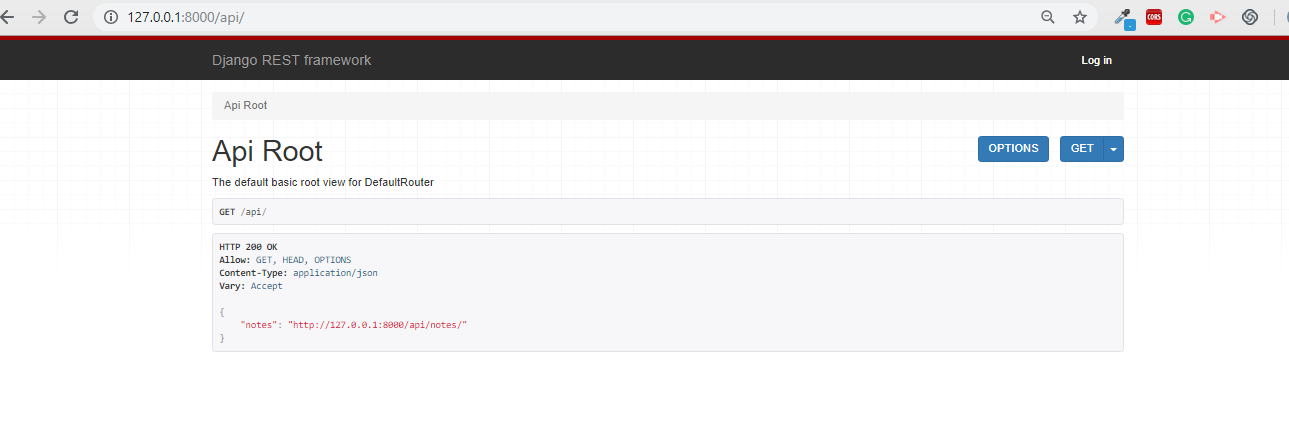
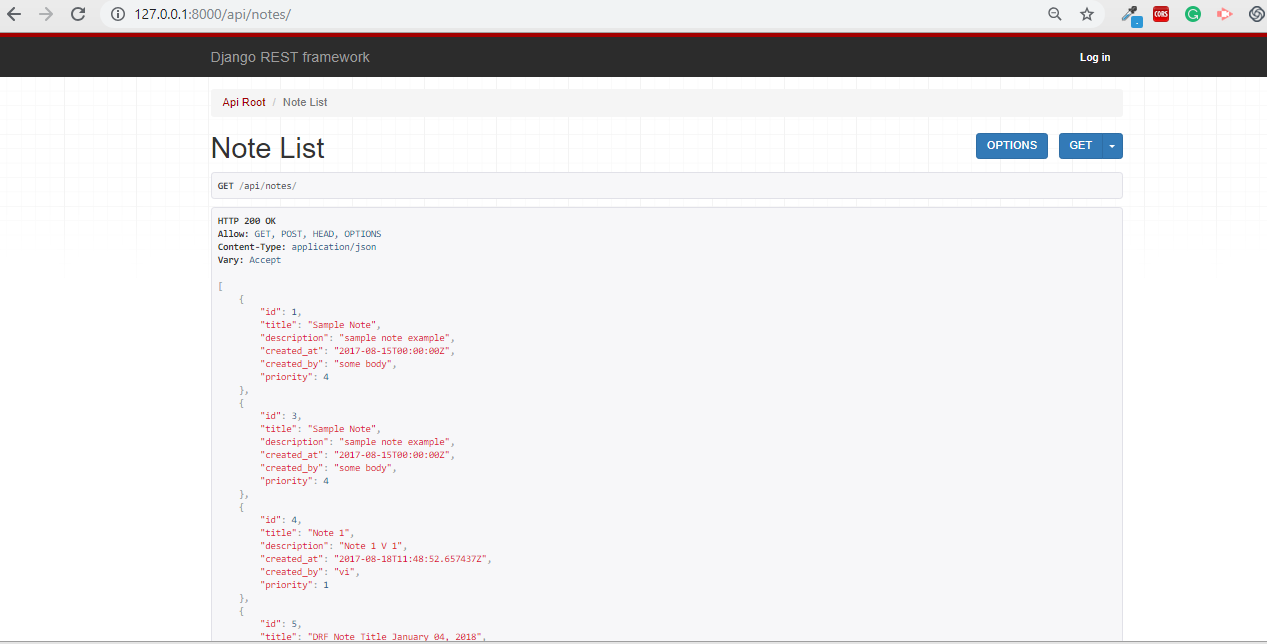
To get all the notes we need to hit the given link : http://127.0.0.1:8000/api/notes/.
If you want to download source code then you can download from my git repo https://github.com/vijaykumar91/django-restapi-app if you having any problem then leave a message.
You can check live demo from clicking on below link.
API List: https://django-restapi-app.herokuapp.com/api/
All notes: https://django-restapi-app.herokuapp.com/api/notes/
All the best!
- What Products Should You Sell on Amazon? - November 18, 2020
- 10 Reasons Why You Should Start Selling on Amazon - October 22, 2020
- Comparative Study of Top 6 Web Scraping Tools - September 3, 2020