Hey everyone, as you know that before ios 7 get introduced things were quite different. Let’s take an example of data sharing before ios 7 if you wanted to share some data then you would share it with some third party applications which were quite annoying and time-consuming task.
Later when Apple launched iOS 7, it introduced an amazing feature which is known as AirDrop for all its iPhone series and iPad too which can share the data easily and quite fast as compared to those third-party applications or tools which we have used earlier.
UIActivityViewController allows us to share the data between two iOS Devices easily either it is text, photo, video or any other media. This SDK makes it simple for all the developers out there who want to integrate the airdrop feature into their applications.
Jump to Section
What is AirDrop
Let us first understand the use of airdrop feature and how it shares the data between two devices. Suppose, you have two iOS devices i.e Device A and Device B. To enable this feature on your device, you first need to turn on your device’s Bluetooth then later you can set the visibility of airdrop from setting to either contact or everyone.
If, you choose the setting as contacts only then all those devices will be visible to your iPhone which have connected to your device previously and if you choose everyone then it simply means that the visibility will be shown to all the iOS Devices which are nearby to your phone.
Initial Launch
Let’s move ahead now and launch our application which is XCode through which we will be going to start the application development. Here, select ‘create a new application’ and then ‘Single view application’ as shown below.

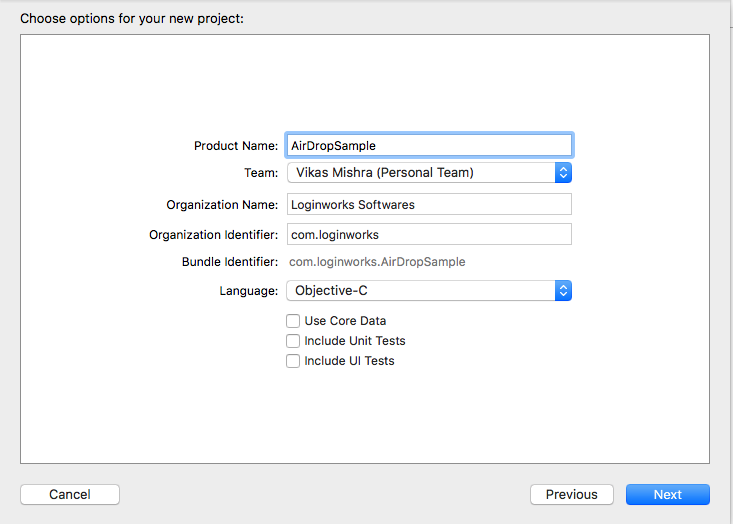
Then, in the next step after clicking on the next button below enter a new name for your application so that we can access and use it later in future. For my application, I am going to use the name “AirDropSample” as shown below.
Things Required in the Application
Now, there are few things which I am going to use in the application that is mentioned below:
- Table View – Through which we will be going to show the list of data we can use to share through airdrop.
- Image View – With the help of this, we will show the image which can be shared with another device.
- Bar Button – This is an object with which we will be going to open the airdrop sharing window so that later we can share that data easily.
Adding the Table View
Now it’s time where we are going to add a custom table view and a table view cell in the application. So before we start we need to add two new files in the application from new file section.
Go to file -> new file -> create a new UIViewController class file and name it as ImageViewController and hit next.
Later after doing this, we need one more class file which is UITableViewCell class and name it as ImageTableViewCell and hit next.
Designing the Interface
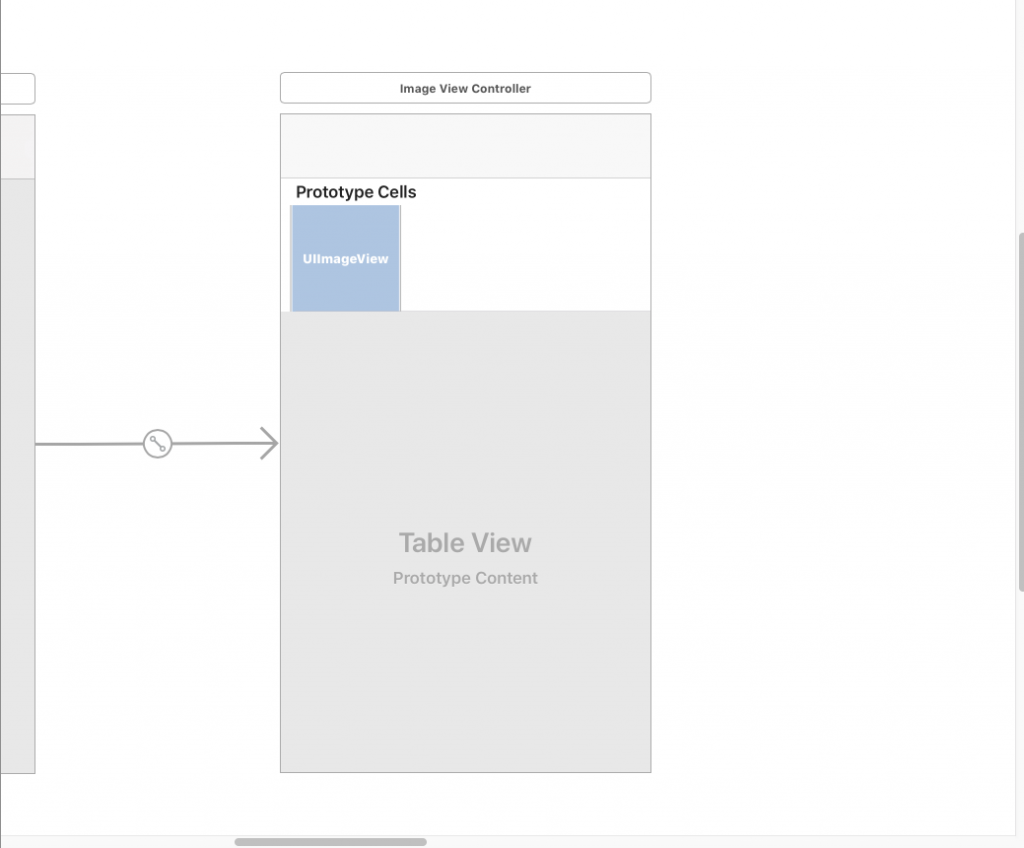
We are now going to design our user interface. So for this, we need to head to main.storyboard section and then select the view controller file and add a table view from tools section and drop it in the view controller. Now, drag a table view cell from the interface tool and drop it inside the table view which we have added earlier as shown.
After doing this, assign the file ImageViewController to the view on which we have added our custom table view and inside the table view, assign the file ImageTableViewCell to that particular cell which we have added in the table view.
Now add another view controller and in that file add a bar button item and below that add an image view as shown in the snapshot below.
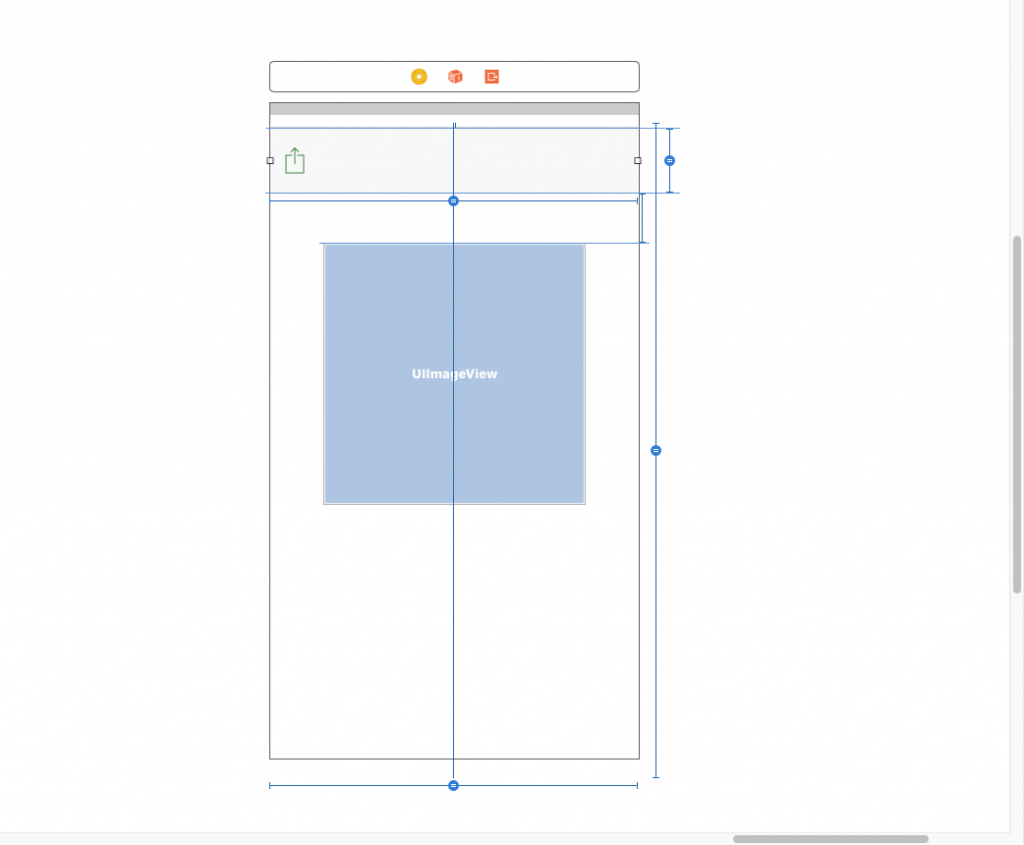
With the help of this bar button, we will be going to open the airdrop screen through which we can share our data to other nearby devices and with that image view, we will be going to show the image which the user has selected using the table view list.
Connecting the Objects and Outlets
Now, we are going in a good direction but if we want our code to work properly then we need to connect our objects to the view controller file which we have created in order to make them work.
Head to the view controller.h file now and drag and drop the image view object to your view controller and name it as per your choice.
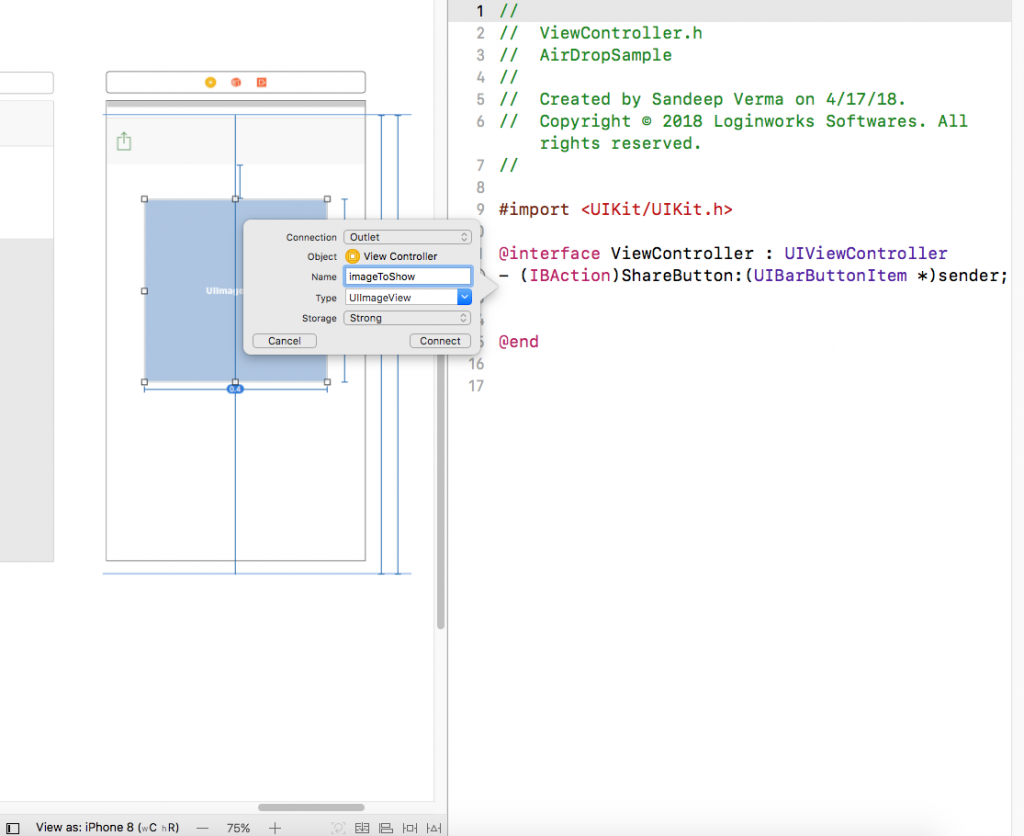
Similarly, create the action for the bar button item so that we can use it to perform some action as required by the application.
Time for Some Coding
Now, as we know that we have two view controller files with us. One is for our table view, through which we will show the list of objects we can share with another system, the second file is for our sharing screen which will react on the basis of the selection of an object from the table view.
Head to ImageViewController.h file, add the delegate and data source for table view as shown below.
@interface ImageViewController : UIViewController<UITableViewDelegate,UITableViewDataSource>
Now, go to the ImageViewController.m file and add the required delegate and data source methods inside the file.
- (NSInteger)tableView:(UITableView *)tableView numberOfRowsInSection:(NSInteger)section{

}

- (UITableViewCell *)tableView:(UITableView *)tableView cellForRowAtIndexPath:(NSIndexPath *)indexPath{

}

- (NSInteger)numberOfSectionsInTableView:(UITableView *)tableView{

}

- (CGFloat)tableView:(UITableView *)tableView heightForRowAtIndexPath:(NSIndexPath *)indexPath

{

}

- (void)tableView:(UITableView *)tableView didSelectRowAtIndexPath:(NSIndexPath *)indexPath{

}
We will be going to use these methods in the application and now create two NSArray objects and also one user-defaults object to save the data for further use in the same file.
@implementation ImageViewController{

    NSArray *imageArray;

    NSUserDefaults *defaults;

    NSArray *imageName;

}
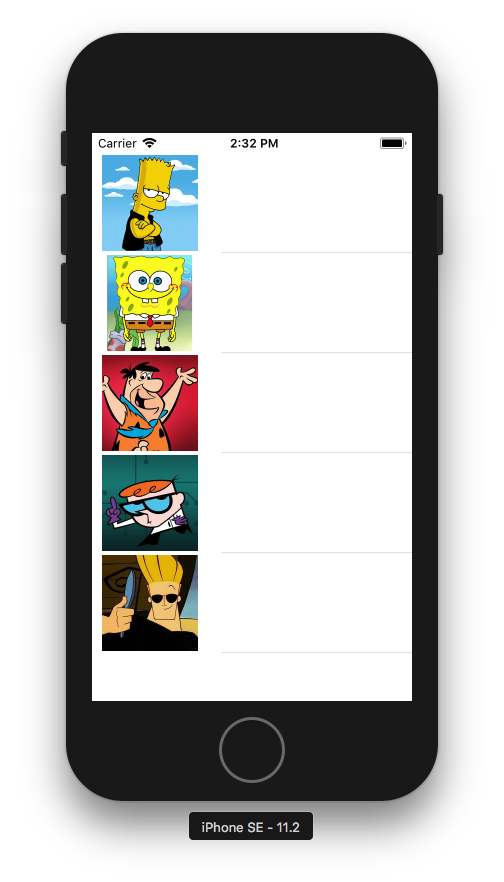
Now, add 5 images into your asset folder so that you can use them to show it in the table view and later user can share it.
Remember, you can add either image, video, pdf or any file you want for this application. I am going to use images to make this tutorial simple to understand.
Initialize the Array and Other Objects
Now, we need to initialize the NSObjects which we have created in the ImageViewController.m file. So, head into the viewDidLoad method and add the following code to it.
- (void)viewDidLoad {

    [super viewDidLoad];

    // Do any additional setup after loading the view.

    defaults = [NSUserDefaults standardUserDefaults];

    imageArray = [[NSArray alloc]initWithObjects:[UIImage imageNamed:@"s1.png"],[UIImage imageNamed:@"s2.png"],[UIImage imageNamed:@"s3.png"],[UIImage imageNamed:@"s4.png"],[UIImage imageNamed:@"s5.png"], nil];

        imageName = [[NSArray alloc]initWithObjects:@"s1.png",@"s2.png",@"s3.png",@"s4.png",@"s5.png", nil];

    }
Here, as you can see the defaults object is NSUserDefaults library which can save the data inside it. There are two arrays, one of them is to show the images into the table view and another is to get the image name from the selected index.
Now, import the ImageTableViewCell file into your ImageViewController file and add the important functionality for cellForRowAtIndexPath method as shown:
- (UITableViewCell *)tableView:(UITableView *)tableView cellForRowAtIndexPath:(NSIndexPath *)indexPath{

    static NSString *identifier = @"imageIdentifier";

    ImagesTableViewCell *cell = [tableView dequeueReusableCellWithIdentifier:identifier];

        cell.imageView.image = [imageArray objectAtIndex:indexPath.row];

        return cell;

}
Add the numberOfSection required into your table view.
- (NSInteger)numberOfSectionsInTableView:(UITableView *)tableView{

    return 1;

}
Add the numberOfRow required in your table view.
- (NSInteger)tableView:(UITableView *)tableView numberOfRowsInSection:(NSInteger)section{

    return imageArray.count;

}
Give the height for a row as 100 as we are going to use an image to row into the table view.
- (CGFloat)tableView:(UITableView *)tableView heightForRowAtIndexPath:(NSIndexPath *)indexPath

{

    return 100;

}
Finally, add the code where we will handle the row selection in the didSelectRowAtIndexPath method as shown
- (void)tableView:(UITableView *)tableView didSelectRowAtIndexPath:(NSIndexPath *)indexPath{

      ViewController *myVC = [[UIStoryboard storyboardWithName:@"Main" bundle:nil]instantiateViewControllerWithIdentifier:@"ViewController"];

    NSString *imagepath = [imageName objectAtIndex:indexPath.row];

        NSLog(@"%@",imagepath);

        [defaults setObject:imagepath forKey:@"path"];

     [self.navigationController pushViewController:myVC animated:YES];

}
As shown in the above code, I am calling the second viewcontroller when the user will select a particular image from the list of image available and then later I am saving the name of the image at the particular index inside the user defaults so that we can share the date to another view controller file and can show it to the user.
Initial Launch
Launch the application once and you will be going to see the set of images available in the table view as expected by us. If the crash happens then take a look at the delegate and data source objects. Set it to self inside the viewDidLoad method and re-run the application and this time it will run as expected.
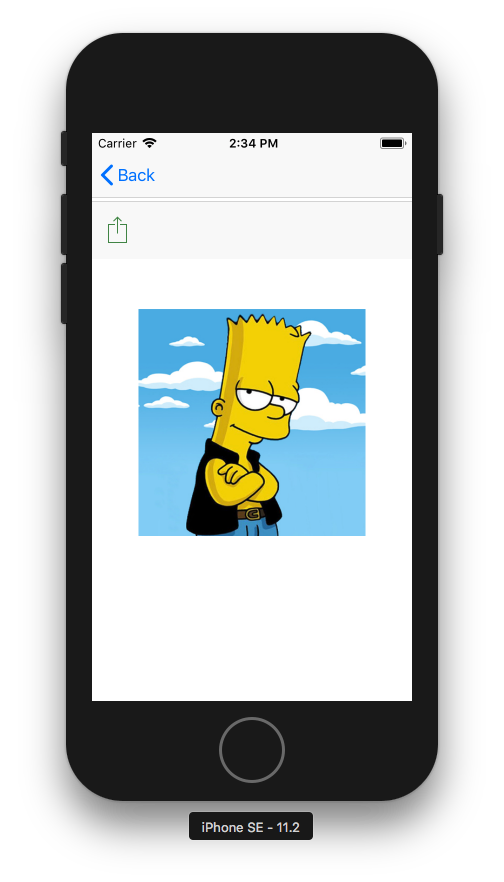
Now if you select a file then it will redirect you to the second screen.
But hey, we haven’t added the code to show the image on the second screen. Head into the viewcontroller.m file and inside the viewDidLoad method add the following code to set the image into the image view as shown below
- (void)viewDidLoad {

    [super viewDidLoad];

    defaults = [NSUserDefaults standardUserDefaults];

    NSString *imageName = [defaults objectForKey:@"path"];

      _imageToShow.image = [UIImage imageNamed:imageName];

   }
Now, run the application and after you select the image from the list, it will show that selected image on the next screen as shown.
Adding ActivityViewController Code
Now, at last, we need to open the ActivityViewController which will be going to show the options to the user through which the data can be sent easily through airdrop feature. And to handle this, we will be going to add the required functionality inside our bar button action which we have added earlier in our viewcontroller.h file.
- (IBAction)ShareButton:(UIBarButtonItem *)sender {

    NSString *imageName = [defaults objectForKey:@"path"];

      UIImage* image = [UIImage imageNamed:imageName];

    UIActivityViewController* activityView = [[UIActivityViewController alloc] initWithActivityItems:@[image] applicationActivities:nil];

    NSArray *excludedActivities = @[UIActivityTypePostToTwitter, UIActivityTypePostToFacebook,

                                        UIActivityTypePostToWeibo,

                                        UIActivityTypeMessage, UIActivityTypeMail,

                                        UIActivityTypePrint, UIActivityTypeCopyToPasteboard,

                                        UIActivityTypeAssignToContact, UIActivityTypeSaveToCameraRoll,

                                        UIActivityTypeAddToReadingList, UIActivityTypePostToFlickr,

                                        UIActivityTypePostToVimeo, UIActivityTypePostToTencentWeibo];

     activityView.excludedActivityTypes = excludedActivities;

    [self presentViewController:activityView animated:YES completion:nil];

}
Here, you go as you can see that I have excluded all other things like – twitter share button, facebook share button, email and other available media from the popup window because we don’t want them to appear for now.
But you can change it later if you want to use them by removing the required fields from the code above. Rest will be handled by the ActivityViewController itself.
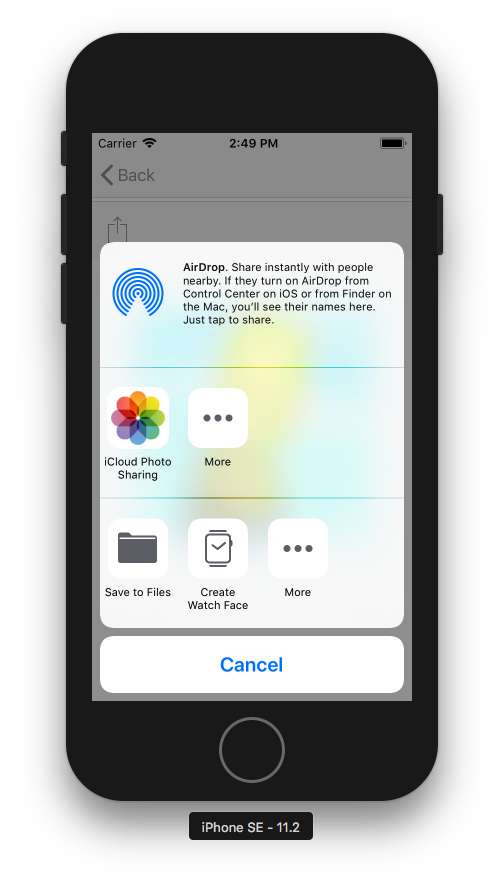
Click to See the Magic
Now, all you need to do is to click on the bar button item icon and later you will see the popup coming on the screen with an option to share your data to other iOS devices nearby to you.
Make sure that you have Bluetooth enabled and changed the visibility of airdrop to everyone for the first time so that you can add the devices to it.
Summing Up
I hope you will find this tutorial useful for your application and it will give you a good idea about using the airdrop feature into your iOS application. In the near future, we will be going to work on more different libraries provided by Apple in the applications so stay connected. Thank You!!
- LinkedIn Scraper | LinkedIn Data Extractor Software Tool - February 22, 2021
- Is Web Scraping Legal? - February 15, 2021
- What Is Data Scraping? - February 10, 2021