
Hello everyone, today I am going to introduce you to one of the essential topics in Andriod i.e, Services. So in this blog, our agenda is how to work with services in Android.
Let me describe the role of Services in the Android applications. As indicated by the Android documentation, Service is one of the application component of Android that can be utilized to play out the long-running and repetitive operations in the background and it doesn’t have any UI.
Jump to Section
Why Should We use Services?
- The UI thread in the android takes the responsibility to start the application and executes the user operations performed on the screen by the user.
- If you want to do long running tasks or operations in your app that which takes more than 5 seconds to complete the task then you cannot run those tasks on UI thread.
- So, if you are doing that long time execution tasks on the UI thread then it will be busy to perform those operations and not be able to respond to the user given input on the screen.
- If the application cannot respond to the client input within the period of 5 seconds then consequently the android system will produce the Application Not Responding (ANR) dialog.
- By using Services you can come out of the ANR problem because it creates a separate thread to run those long-running operations on the background.
Confusion over AsyncTask and Service
- I have seen that many of them having disarray about AsyncTask and Service and I will try to haul out off you from this confusion.
- AsyncTask performs background operations and updates the results in UI thread directly.
- Here the AsyncTask and Services will execute the tasks in the background on a separate thread. But the difference is AsyncTask is tightly bound to the particular Activity yet Service is not. If the activity is terminated, then automatically AsyncTask also destroy and not able to finish the task.
- So, we should use the AsyncTask for the short period operations like network requests to get the data and update in UI.
- The Service which is independent of the activity so without any hesitation we can do the long-running and repetitive operations in the background.
Service Lifecycle
Services are having its own lifecycle so these are not bound to the lifecycle of an Activity. Services do their operations in the background even though the application is destroyed.
Some of the operations where we use Services are File Downloading, Play music and interact with a content provider etc.
We have two different kinds of Services in Android Application.
1. Started Service
Here the service is run by any one of the application components such as Activities, Content Providers etc. by calling the startService() function. It runs even the user moves to another application and there is no interaction with the UI here and even though the Activity is destroyed, the service will keep running.
2. Bound Service
It is a sort of Service in Android app. The service is bound when an application component is tied to it by simply calling the function bindService(). The lifetime of the bound service relies upon the lifetime of the application component which began this service.
Service Lifecycle
In Android, Services have their own lifecycle which is similar to the lifecycle of activity. Let’s see all the lifecycle callback functions of services to monitor the changes in each state.
The Lifecycle makes you understand the changes that occur in between the service creation to service destruction i.e, in between onCreate() to OnDestroy() callback functions.

1) onCreate(): The Android framework invokes this function for the first time when the service is created. If the service is already in running state it won’t be called once more.
2) onStartCommand(): It is invoked when another android component calls startService() function.
This method returns an int which defines the restart behavior of the Service if the service ended by the system itself and we have the options like:
a) START_STICKY: It is used to restart the service if in case the system terminates the service and the intent returns as null.
b) START_NOT_STICKY: It is not restarted again once the system is terminated.
c) REDELIVER_INTENT: In case it is ended by the system then it will restart and deliver the same intent to the onStartCommand().
3) onBind(): This method is executed by the system when the other component in the android wants to bind the service by calling bindService().
4) onUnbind(): When you want to unbind the service just call this method.
5) onRebind(): It is executed when the other new clients are connected to the service.
6) onDestroy(): It’s the final method in the lifecycle so it is called when the service is no longer used and is being terminated. The Android System also terminates the service when the memory assets are very low.
Intent Service
1) It is a base class of Service, it provides a separate background thread for executing the tasks.
2) This runs on outside the application in a background process, so this runs even the application is closed.
3) Service class runs in the main thread of the application, not on a separate thread but Intent Service runs on a separate thread called worker thread.
4) Intent Service stops naturally after the task is done.
Declared in the Manifest
1. Need to declare every service in the Manifest file that we create in the app.
2. Use <service> tag to include a service as a child of the <application> element.
3. Specify the class name of the service within the attribute android:name
4. The attribute exported defines whether it should allow other applications to start our app service.
5. Always let it be android:exported=”false” for security reasons.
The following content shows the code of the service declaration in the manifest file.
<?xml version="1.0" encoding="utf-8"?>
<manifest xmlns:android="http://schemas.android.com/apk/res/android"
    package="com.example.ashokkumar.servicedemo">
    <application
        android:allowBackup="true"
        android:icon="@mipmap/ic_launcher"
        android:label="@string/app_name"
        android:roundIcon="@mipmap/ic_launcher_round"
        android:supportsRtl="true"
        android:theme="@style/AppTheme">
        <activity android:name=".MainActivity">
            <intent-filter>
                <action android:name="android.intent.action.MAIN" />
                <category android:name="android.intent.category.LAUNCHER" />
            </intent-filter>
        </activity>
        <service
            android:name=".ServiceDemo"
            android:exported="false"/>
     </application>
 </manifest>
Started Service
1. To understand the service performance and working in detail by creating a demo app so let’s start the demo.
2. Create a java class called ServiceDemo which extends from the Service class and implement the Override methods.
ServiceDemo.java
package com.example.ashokkumar.servicedemo;

import android.app.Service;
import android.content.Intent;
import android.content.ServiceConnection;
import android.os.IBinder;
import android.support.annotation.IntDef;
import android.support.annotation.Nullable;
import android.util.Log;

/**
 * Created by Ashok Kumar on 4/17/2018.
 */

public class ServiceDemo extends Service {

    private static final String TAG="SERVICEDEMO";

    @Nullable
    @Override
    public IBinder onBind(Intent intent) {
        Log.d(TAG, "onBind called");
        return null;
    }

    @Override
    public int onStartCommand(Intent intent, int flags, int startId) {
         Log.d(TAG, "onStartCommand");
             // for loop
           for(int i=0; i<=1000; i++){
             Log.d(TAG, "count "+i);
          SystemClock.sleep(2000);
          }
  return super.onStartCommand(intent, flags, startId);  }
 @Override
 public void onCreate()
 {
     super.onCreate();
      Log.d(TAG, "onCreate called");
   }
  @Override
   public void unbindService(ServiceConnection conn) {
      super.unbindService(conn);
      Log.d(TAG, "unbindService called");
    }
    @Override
   public void onRebind(Intent intent) {
     super.onRebind(intent);
      Log.d(TAG, "onRebind called");  }
      @Override
    public void onDestroy() {
      super.onDestroy();
    Log.d(TAG, "onDestroy called");
    }
 }
Start a Service
1. Create An application component i.e, ServiceActivity to start and stop the service.
2. Here we created two buttons in the layout file, one is for Starting the Service and another is for Stopping the service.
activity_serviceactivity.xml
Use the below content to create the UI in the layout.
<?xml version="1.0" encoding="utf-8"?>
<LinearLayout xmlns:android="http://schemas.android.com/apk/res/android"
    xmlns:app="http://schemas.android.com/apk/res-auto"
    xmlns:tools="http://schemas.android.com/tools"
    android:layout_width="match_parent"
    android:layout_height="match_parent"
    android:orientation="vertical"
    tools:context="com.example.ashokkumar.servicedemo.MainActivity">
<EditText
    android:id="@+id/ed_txt"
    android:layout_width="match_parent"
    android:layout_height="wrap_content"
    android:hint="Enter text..."
    />
<Button
    android:id="@+id/start_btn"
    android:layout_width="match_parent"
    android:layout_height="wrap_content"
    android:text="Start Service"
    android:onClick="start"/>

  <Button android:id="@+id/stop_btn"
      android:layout_width="match_parent"
      android:layout_height="wrap_content"
      android:text="Stop Service"
      android:onClick="stop"/>
 </LinearLayout>
3. Call startService() method by passing the intent to the ServiceDemo Class.
public void start(View view){
    Intent serviceIntent = new Intent(this, ServiceDemo.class);
    startService(serviceIntent);
}
4. When we start the Service, the system invokes the onCreate() and onStartCommand().
5. when we again call startService() method without stopping the Service, the system will execute only onStartCommand().
6. For stopping the service, call the function stopService() and pass the ServiceDemo class intent as a parameter and the system calls onDestroy() method. A Service can also terminate by itself by calling stopSelf () function when the service finishes its task.
public void stop(View view){
    Intent serviceIntent = new Intent(this, ServiceDemo.class);
    stopService(serviceIntent);
}
ServiceActivity.java
Here is the complete code of the ServiceActivity.java
package com.example.ashokkumar.servicedemo;

import android.content.Intent;
import android.support.v7.app.AppCompatActivity;
import android.os.Bundle;
import android.view.View;
import android.widget.Button;
import android.widget.EditText;

public class ServiceActivity extends AppCompatActivity {

    Private static final String TAG = "SERVICEACTIVITY";
    Button start_btn, stop_btn;
    EditText ed_txt,


    @Override
    protected void onCreate(Bundle savedInstanceState) {
        super.onCreate(savedInstanceState);
        setContentView(R.layout.activity_main);
        start_btn = (Button) findViewById(R.id.start_btn);
        stop_btn = (Button) findViewById(R.id.stop_btn);
        ed_txt= (EditText) findViewById(R.id.ed_txt);

    }
     //start the service
    public void start(View view){
          // create Intent
        Intent serviceIntent = new Intent(this,ServiceDemo.class);
        startService(serviceIntent);
    }

     // stop the service
    public void stop(View view){
        Intent serviceIntent = new Intent(this, ServiceDemo.class);
        stopService(serviceIntent);
    }
}
7. Here, the above service is running in the same UI thread. So, there is the problem of ANR if the UI thread spends more than 5 seconds to complete the task.
8. We need to create the separate thread here to finish the long-running task.
9. Use Intent Service class to resolve the above issue.
Test the Service
1. For testing the service behavior, Run the app using Run button in Android Studio.

2. Hit the button Start Service to start the service.
3. Once, the service starts the task, it runs on UI thread. It means UI thread is busy in doing the task.
4. At the same time when we try to enter the text, the UI thread will not respond within 5 seconds then automatically the Android system will generate the dialog box saying the app isn’t responding.
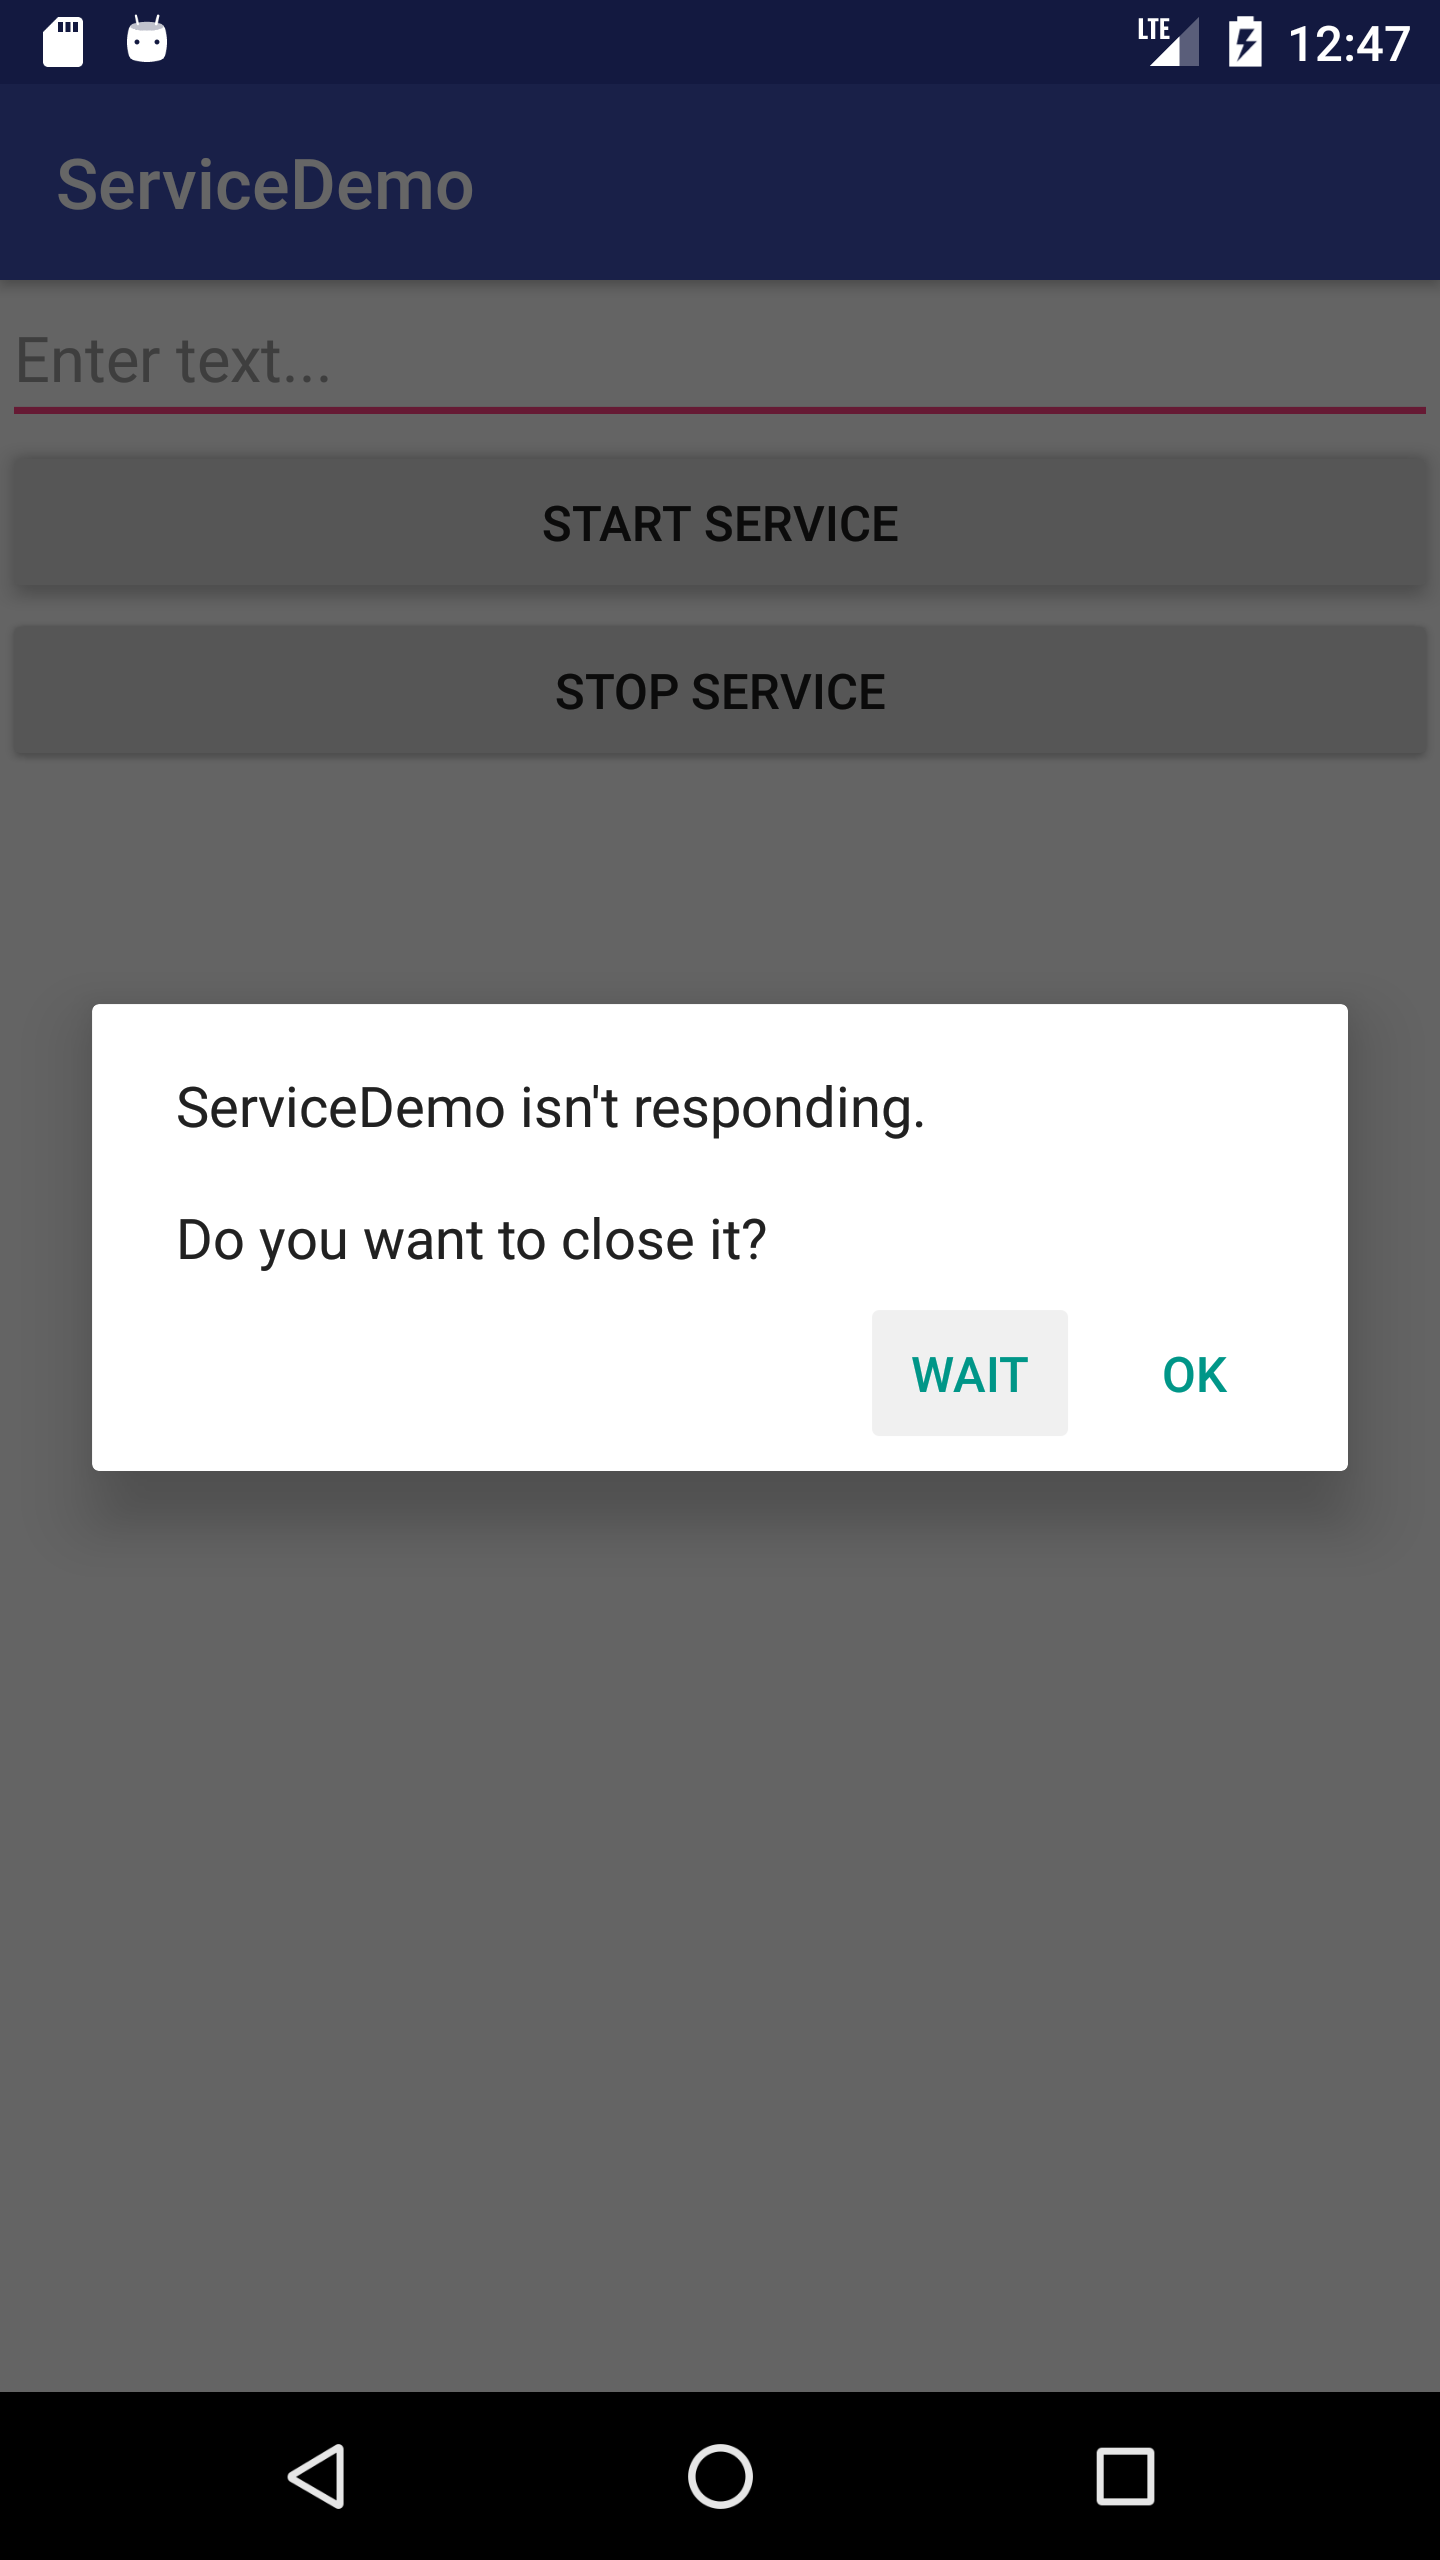
5. Though we have created a service, we are facing the issue of Application Not responding (ANR) because here the system will not create the separate thread. We need to create the Separate thread to run those long operations or we can use Intent Service to avoid the issue.
Implementing Intent Service
1. In this service Separate thread is created by the system only when we start the Service. So we are free from creating a new thread.
2. Create a java class IntentServiceDemo that should extend from the class Intent Service and implement the callback functions.
IntentServiceDemo.java
1. The following shows the content of the IntentServiceDemo.
package com.example.ashokkumar.servicedemo;

import android.app.IntentService;
import android.content.Intent;
import android.os.SystemClock;
import android.support.annotation.Nullable;
import android.util.Log;

/**
 * Created by Ashok Kumar on 4/18/2018.
 */

public class IntentServiceDemo extends IntentService {

     Private static final String TAG = "INTENTSERVICEDEMO";

       //no-arg constructor
    public IntentServiceDemo() {
        super("IntenServiceDemo Started");
    }

    @Override
    protected void onHandleIntent(@Nullable Intent intent) {

        for(int i=0; i<=10; i++){
       Toast.makeText(this,"Intent Service Running",Toast.LENGTH_SHORT).show();
       Log.d("IntentServiceDemo","count "+i);
         // time in ms
         SystemClock.sleep(3000);
                 }
            }
         }
2. Don’t forget to register the service in a manifest file, for that just add the below code.
<service android:name=".IntentServiceDemo"
    android:exported="false"/>
3. To run the Intent Service, call the method startService() from any Android application component.
4. Here, I created an activity called MainActivity to start the service.
MainActivity.java
The content of the MainActivity.java.
package com.example.ashokkumar.servicedemo;

import android.app.ActivityManager;
import android.content.Context;
import android.content.Intent;
import android.support.v7.app.AppCompatActivity;
import android.os.Bundle;
import android.util.Log;
import android.view.View;
import android.widget.Button;
import android.widget.EditText;

public class MainActivity extends AppCompatActivity {

    private static final String TAG="MAINACTIVITY"
    Button start_service_btn, stop_service_btn;
    EditText ed_txt;

    @Override
    protected void onCreate(Bundle savedInstanceState) {
        super.onCreate(savedInstanceState);
        setContentView(R.layout.activity_main);
        start_service_btn = (Button) findViewById(R.id.start_btn);
        stop_service_btn = (Button) findViewById(R.id.stop_btn);
        ed_txt = (EditText) findViewById(R.id.ed_txt);

    }

    public void startIntentService(View view){
        Intent serviceIntent = new Intent(this,IntentServiceDemo.class);
        startService(serviceIntent);
        Log.d(TAG, "Service Started"):
    }

    public void stopIntentService(View view){
        Intent serviceIntent = new Intent(this,IntentServiceDemo.class);
        stopService(serviceIntent);
       Log.d(TAG, "Service Stopped"):
    }

} //class
5. After the completion of the task, the android system automatically terminates the service by calling stopSelf() function.
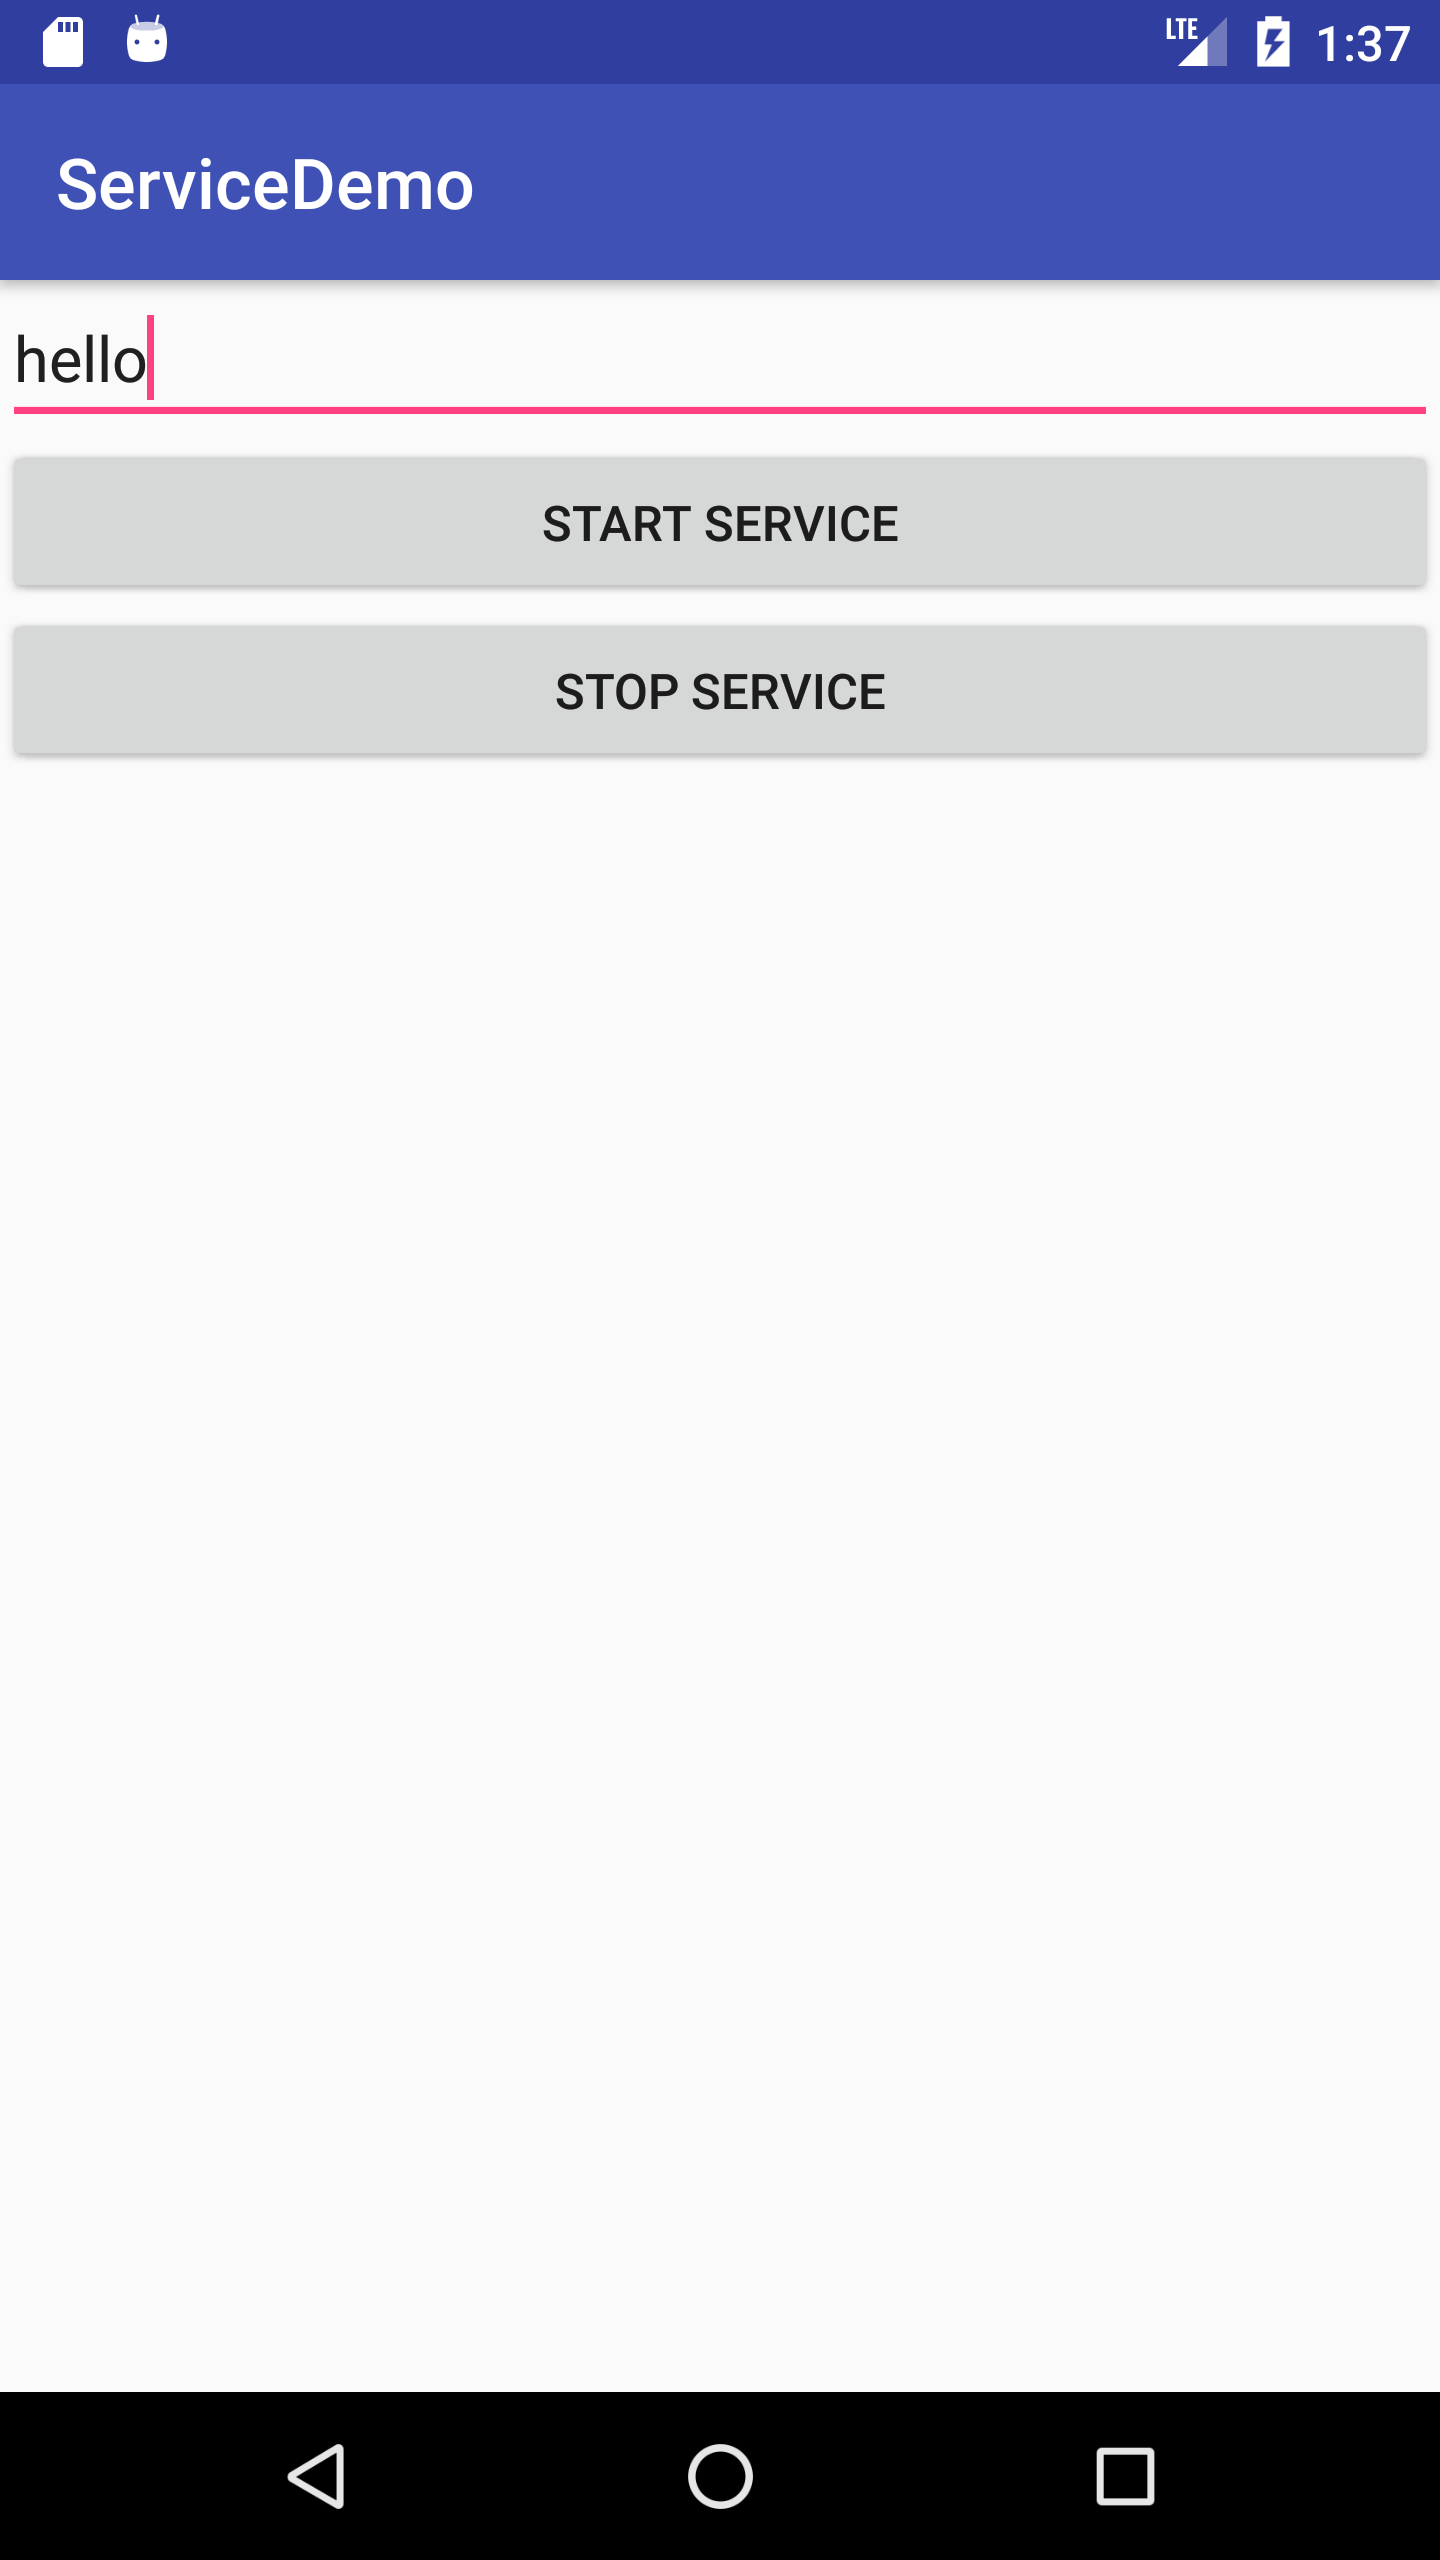
6. Now, I am able to enter the text when the service is running in the background without any hesitation.
Wrap Up
Now it’s time to wrap up the things on how to work with Services in Android. Hope that you got some obscure things about services in Android. If you have questions or suggestions please share with us in the comment box underneath and let us know for more updates till then fare thee well.
- LinkedIn Scraper | LinkedIn Data Extractor Software Tool - February 22, 2021
- Is Web Scraping Legal? - February 15, 2021
- What Is Data Scraping? - February 10, 2021