
In Android development, whenever we want to show a vertical list of scrollable items we switch to the use of ListView, but let me inform you that ListView doesn’t contain any data in it. For this, we have to use Adapter in a ListView!
Are you Confused? Don’t worry! Let me figure it out this in simple terms…
Jump to Section
What Is Adapter?
Before taking a dive into the deep meaning, let’s first start with the basics!
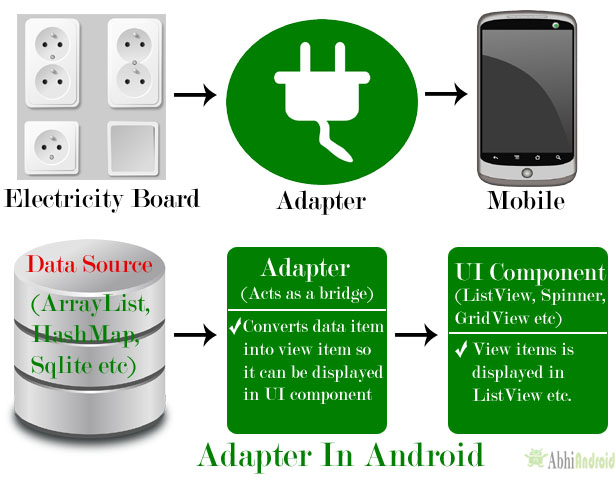
In Android, Adapter is a link between the UI component and data source that helps us to fill data in UI component. It holds the data and sends the info to an Adapter view, then the view can take the data from the adapter view and shows the info on different views like as ListView, GridView, Spinners etc. Here data source is the source from where we get the info and UI components are list or grid items in which we want to display that data.
Internal Working Of An Android Adapter
Here, Adapters initiate the call as getView() method, which returns a view for each item within the adapter view. The layout format and the corresponding data for an element within the adapter view is set in the getView() method.
Creating a new view is quite expensive in Android as one needs to loop through the view position and then inflate the view to finally display it on the screen. So, what Android does is that it convert the views and repeat the view that goes out of focus.
Visual Representation Of This Recycling Process

In the above figure, let’s suppose that we are showing the months in a year in a ListView. To begin with, the months January till May are shown on the screen. When you schedule the view, the month January goes out of the display area of the mobile screen. As and when the January view goes out of the screen, the Adapter View (ListView in this case) assigns the view to something called a recycler. So when you schedule up, the getView () method is called to get the next view (which is June).
This method getView() has a parameter called Convertview which points to the new view in the recycler. Over the Convertview, the Adapter tries to get hold of the new view and reuse it to display the new view (which is June in this case).
Types Of Adapters For Android
There are some frequently used Adapters in Android which are used to fill data in the UI segments. Wanna know them all? Here you go…
- BaseAdapter – It is a parent adapter for all other adapters.
- ArrayAdapter– It is used whenever we have a list of single items which is backed by an array.
- Custom ArrayAdapter– It is used in need to display a custom list.
- SimpleAdapter – It is referred as an easy adapter used to map static data to views defined in your XML file.
- Custom SimpleAdapter– It is used whenever we need to display a customized list and needed to access the child items of the list or grid.
Now let me provide a spotlight to each and every Adapter so that you can understand them all in detail.
1. BaseAdapter In Android
BaseAdapter is a familiar base class of a generic utilization of an Adapter that can be used in ListView, GridView, Spinner etc. We create our own adapter and extend base adapter in that, whenever we need a custom list in a ListView or customized grids in a GridView.
Base Adapter can be extended to create a custom Adapter to illustrate a custom list item.
Here is the code of Custom Adapter when we extend the BaseAdapter in that:
public class CustomAdapter extends BaseAdapter {
@Override
public int getCount()
{
return 0;
}
@Override
public Object getItem(int i)
{
return null;
}
@Override
public long getItemId(int i)
{
return 0;
}
@Override
public View getView(int i, View view, ViewGroup viewGroup)
{
return null;
}
2. ArrayAdapter
Whenever we have a list of separate elements which is favored by an Array, we can use ArrayAdapter. For instance, list of phone contacts, countries or names etc.
Here is the code of ArrayAdapter in Android:
ArrayAdapter(Context context, int resource, int textViewResourceId, T[] objects)
3. Custom ArrayAdapter
ArrayAdapter is also an application of BaseAdapter so if we want more customization then we construct a custom adapter and extend ArrayAdapter in that. We override all the activity of BaseAdapter in our custom adapter to give more customization to ArrayAdapter.
Below is the code when Custom ArrayAdapter extends ArrayAdapter in that:
 public class MyAdapter extends ArrayAdapter
{
public MyAdapter(Context context, int resource, int textViewResourceId, List objects) {
 super(context, resource, textViewResourceId, objects); }
@Override
public int getCount() {
return super.getCount();
}
@Override
public View getView(int position, View convertView, ViewGroup parent) {
return super.getView(position, convertView, parent);
}
}
4. SimpleAdapter In Android
In Android, SimpleAdapter is an easy Adapter to map static info to views describe in an XML file(layout). One can specify the data backing to a list as an ArrayList of Maps(i.e. hashmap or other) in Android. Each entry in an ArrayList is corresponding to one row of a list.
SimpleAdapter code in Android:
SimpleAdapter(Context context,List<?extends Map<String,?>> data, int resource,String[]from, int[] to)
 {
super(context, data, resource, from, to);
}
5. Custom SimpleAdapter In Android
Whenever we have to start a custom list we need to implement custom adapter. As we know ArrayAdapter is used when we have a list of single item’s favored by an Array.
So if we require customization in a ListView or a GridView we need to implement simple Adapter but when we need more customization in the list or grid items where we have many views’s in a list item and then we have to operate any event like a click or any other act to a particular view then we need to implement a custom adapter who fills our requirement’s and quite easy to be implemented.
Custom Adapter extends SimpleAdapter in that:
public class CustomAdapter extends SimpleAdapter
 {
public CustomAdapter(Context context, List<? extends Map<String, ?>> data, int resource, String[] from, int[] to)
 {
super(context, data, resource, from, to);
 }
@Override
public View getView(int position, View convertView, ViewGroup parent) {
return super.getView(position, convertView, parent);
 }
@Override
public int getCount()
 {
return super.getCount();
}
}
BaseAdapter Example in Android Studio
1. Custom.xml
<?xml version="1.0" encoding="utf-8"?>
<RelativeLayout xmlns:android="http://schemas.android.com/apk/res/android" xmlns:app="http://schemas.android.com/apk/res-auto"
android:layout_width="match_parent"
android:layout_height="match_parent"
android:orientation="horizontal"
android:weightSum="1">
<ImageView
android:id="@+id/image"
android:layout_width="150dp"
android:layout_height="150dp"
app:srcCompat="@mipmap/ic_launcher"
android:layout_alignParentStart="true" />
<TextView android:id="@+id/t2"
 android:layout_width="200dp"
 android:layout_height="wrap_content"
android:layout_marginTop="42dp"
android:ems="10"
 android:layout_marginStart="250dp"
 android:text="Name"
 android:textSize="20dp"
android:textColor="@color/colorPrimary"/>
</RelativeLayout>
2. activity_main.xml
<?xml version="1.0" encoding="utf-8"?>
<LinearLayout
xmlns:android="http://schemas.android.com/apk/res/android"
android:orientation="vertical"
 android:layout_width="match_parent"
 android:layout_height="wrap_content"
 android:padding="24dp" >
<ListView
 android:layout_width="wrap_content"
 android:layout_height="300dp"
 android:id="@+id/l1">
 </ListView>
 </LinearLayout>
3. List.java
package com.loginworks.customlist;
import android.content.Context;
import android.view.LayoutInflater;
import android.view.Menu;
import android.view.MenuItem;
import android.view.View;
import android.view.ViewGroup;
import android.widget.BaseAdapter;
import android.widget.ImageView;
import android.widget.TextView;
class CustomAdapter extends BaseAdapter {
    Context context;
    String Names[];
    LayoutInflater inflter;
    int IMAGES[];
    public CustomAdapter(Context applicationContext, String[] Names, int[] IMAGES) {
        this.context = context;
        this.IMAGES = IMAGES;
        this.Names = Names;
        inflter = (LayoutInflater.from(applicationContext));
    }
    @Override
    public int getCount() {
        return Names.length;
    }
    @Override
    public Object getItem(int position) {
        return null;
    }
    @Override
    public long getItemId(int position) {
        return 0;
    }
    @Override
    public View getView(int position, View convertView, ViewGroup parent) {
        convertView = inflter.inflate(R.layout.custom, null,false);
        TextView country = (TextView)convertView.findViewById(R.id.t2);
        ImageView icon = (ImageView)convertView.findViewById(R.id.image);
        country.setText(Names[position]);
        icon.setImageResource(IMAGES [position]);
        return convertView;
    }
}
4. MainActivity.java
package com.first.rp.firstapplication;
import android.content.Intent;
import android.support.v7.app.AppCompatActivity;
import android.os.Bundle;
import android.view.View;
import android.widget.AdapterView;
import android.widget.ArrayAdapter;
import android.widget.ListView;
import android.widget.TextView;
import java.util.ArrayList;
import java.util.List;
public class CustomList extends AppCompatActivity {
    ListView listView;
    int[]IMAGES={R.drawable.dravid,R.drawable.sachin,R.drawable.sehwag,R.drawable.yuvi};
    String[] Names=new String[]{"Dravid","Sachin","Sehwag","Yuvi"};
    @Override
    protected void onCreate(Bundle savedInstanceState) {
        super.onCreate(savedInstanceState);
        setContentView(R.layout.custom);
        listView=(ListView) findViewById(R.id.l1);
        CustomAdapter customAdapter = new CustomAdapter(getApplicationContext(), Names,IMAGES);
        listView.setAdapter(customAdapter);
        listView.setOnItemClickListener(new AdapterView.OnItemClickListener() {
            @Override
            public void onItemClick(AdapterView<?> parent, View view, int position, long id) {
                if (position == 0) {
                    Intent intent = new Intent(view.getContext(),Dravid.class);
                    startActivityForResult(intent, 0);
                }
                if (position == 1) {
                    Intent intent = new Intent(view.getContext(),Sachin.class);
                    startActivityForResult(intent, 0);
                }
                if (position == 2) {
                    Intent intent = new Intent(view.getContext(),Sehwag.class);
                    startActivityForResult(intent, 0);
                }
            }
        });
    }
}
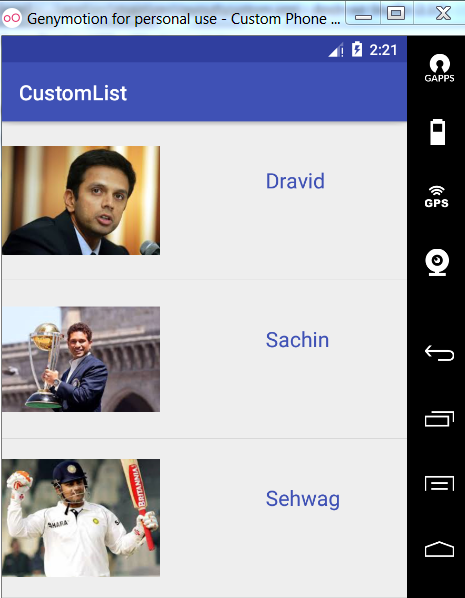
Output
Now run the App in Emulator and you will see Images listed along with their Text. So, this is one implementation of Adapter that uses the BaseAdapter.
From here, you have the cursory knowledge of Adapter and I am sure this step-by-step approach will knock down all your queries on Adapter.
- LinkedIn Scraper | LinkedIn Data Extractor Software Tool - February 22, 2021
- Is Web Scraping Legal? - February 15, 2021
- What Is Data Scraping? - February 10, 2021
Very Informative!!