
In this blog, I am going to give you a detailed tutorial about Apache Maven. I am writing this blog, especially for the beginners so that they can have a basic understanding of the Maven tool.
Once you have gone through this blog, you will definitely find yourself to a next level in using Apache Maven.
Jump to Section
What is Maven?
Maven is a build tool which uses project object model concept (POM), and it is primarily used for Java projects. It is also a project management tool because it provides a complete build lifecycle framework.

Maven Usage in Automation
- It provides folder structure.
- It can download the dependencies from a global repository.
- Maven can compile .java files.
- It can execute java class files and TestNg suite file.
- Maven can compile and execute automation framework from the command prompt.
How to configure Maven in your system?
Step 1
- Download Apache Maven 3.3.9 from the central repository.
Step 2
- There you will find apache-maven 3.3.9-bin.zip click on it and download.
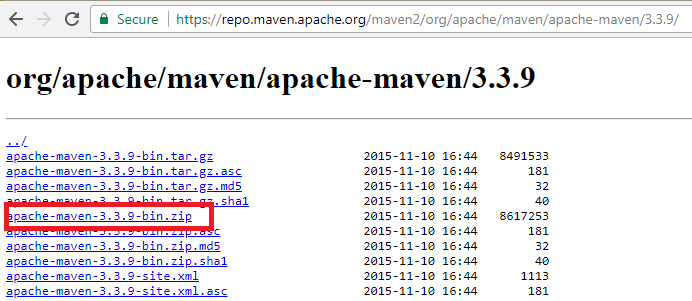
- Go to the location where you downloaded it and extract the zip file.
Step 3
- Copy the extracted folder and paste it in C: drive.
Now, you need to configure Maven in environment variables. For that follow the steps mentioned below.
Step 4
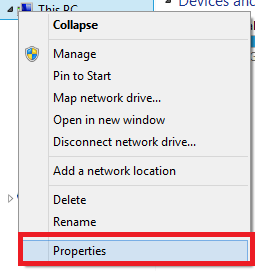
- Right click on This PC or My Computer and click on properties.
- Go to Advanced System settings.

- A new window will open, in that window you need to click on environment variables.
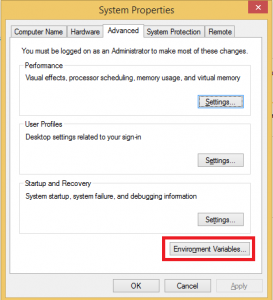
- When you click on it you system variable get displayed. In order to set the desired variables, click on the new button.
Step 5
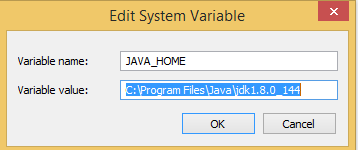
- First of all, you need to create the variable for jdk. For that give the name as JAVA_HOME and in value field enter the path of you jdk installed in your system. Finally, click on ok button.
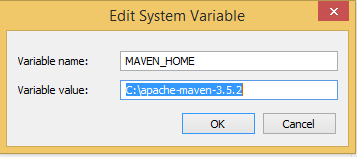
Step 6
- In the next step again click on the new button and create the variable for Maven. In variable name give the name as MAVEN_HOME and in the variable value enter the path of your maven folder and click on ok.
Step 7
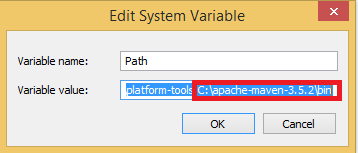
- Now you can see that these two variable has been added to your system variable. Now, search for Path in your system variable, select Path by click on it and then click on Edit button.
- Go to the location where you saved your Maven folder, open it there you will find bin folder, open it and copy the location. Add this location to the Path variable. Before adding please don’t remove anything from the path variable just add a semicolon at last and paste the location URL.
That’s all you need to do to configure the system variables for Maven. If you want to verify that your system variables are configured successfully or not, open the command prompt and type mvn -version. You will get the following results.

If the above result gets displayed containing all the information about your maven and jdk version, it means you have successfully configured the environment variables for Maven.
Maven Installation in Eclipse
Now, if you want to install Maven in your Eclipse IDE then you can also do that. You just need to follow the steps mentioned below.
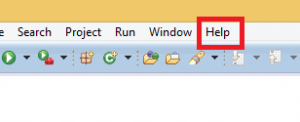
- First of all, launch Eclipse IDE and click on help.
- Now click on Install New Software.
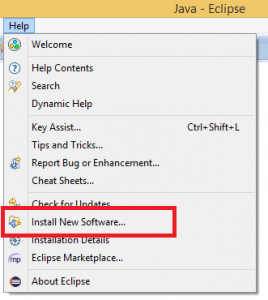
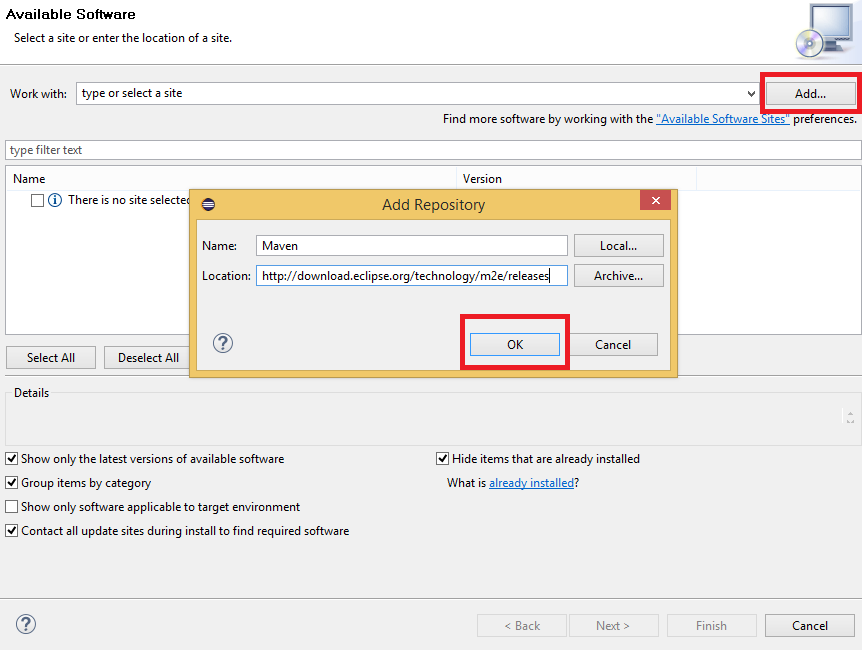
- A new window will appear, in that click on add button. You need to enter Name and Location URL for the repository in the popup window. In the Name field enter the plugin’s name as Maven which you want to install and in Location enter the repository URL which is http://download.eclipse.org/technology/m2e/releases and click on OK button.
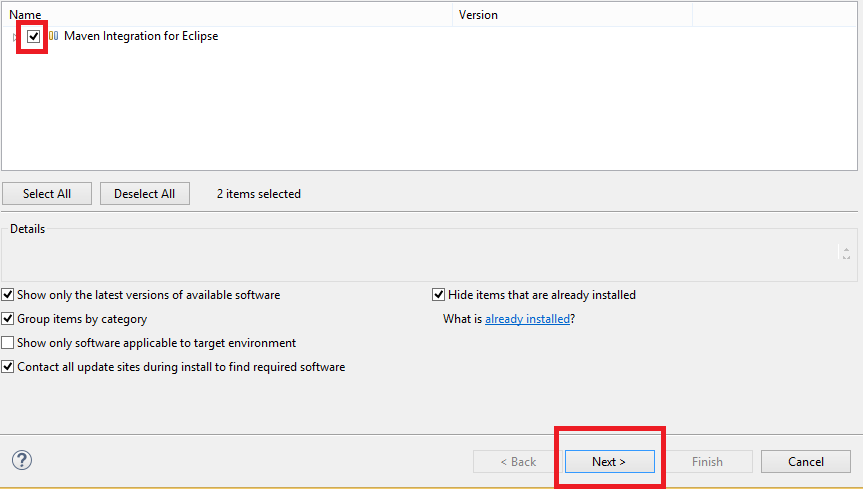
- It will take few seconds to fetch the required plugin’s detail from the repository URL. Wait for some time, when the plugin details displayed on the screen, put a check in the checkbox and click on Next button.
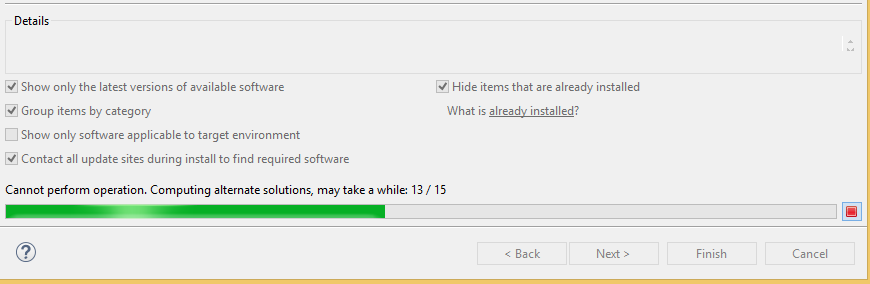
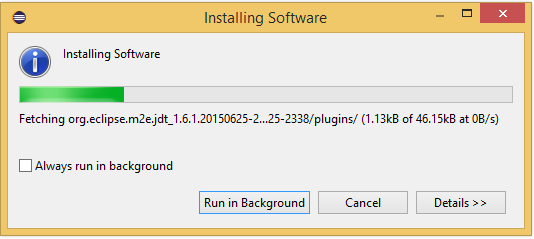
- This process is going to take some time. You can analyze the progress in progress bar displayed at the bottom of the screen.
- After completion of this process, a window will appear, you just need to click on Next button in that window.
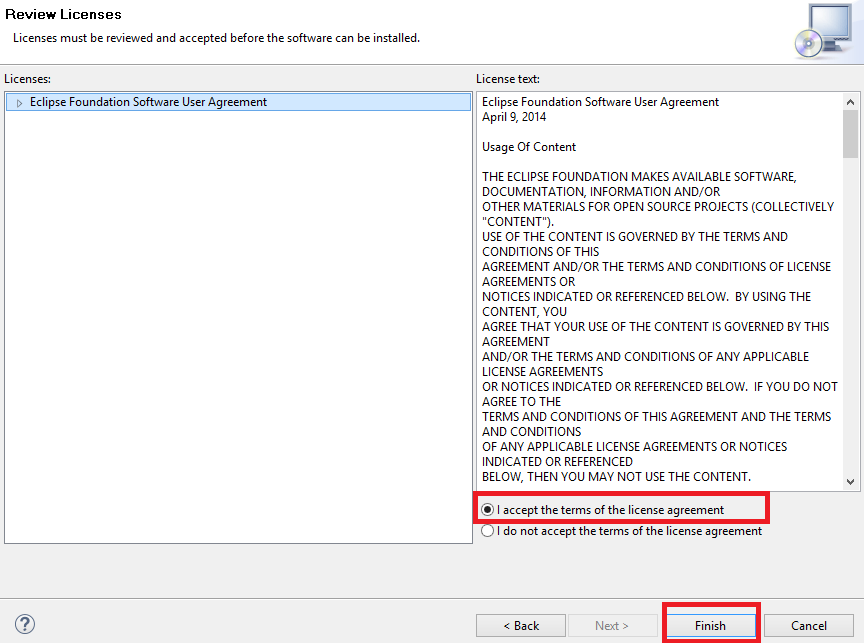
- Once you click on next, it will calculate the required dependencies. Let the process finished and again click on next. It will give you a license agreement to accept, you need to accept it and click on finish. Once you clicked on finish, it will start your final installation process.
- Let it be installed as it will take some time and after installation, you need to restart your Eclipse IDE. It will ask you to restart Eclipse so that the installation and the changes will take effect.
Maven Installation from Eclipse Marketplace
There is one more way to install Maven in Eclipse IDE and that is from Eclipse Marketplace.
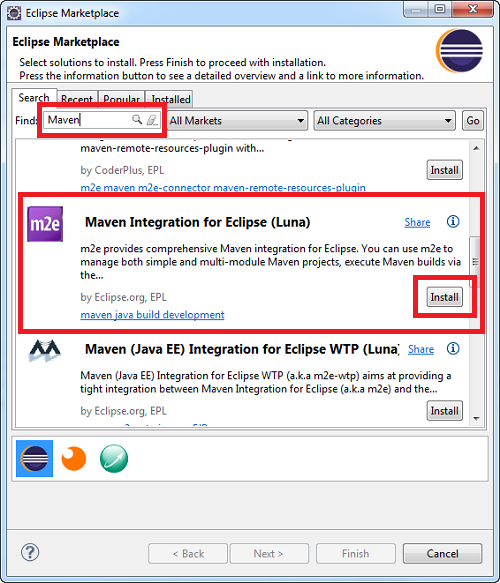
- Open Eclipse IDE and click on help, there you will find an option for Eclipse Marketplace, click on it.

- Once you click on it, Eclipse Marketplace will open there in search box enter maven and press enter. It will search for all the results, then click on install button for Maven Integration for Eclipse.
- Then you just need to follow the step by step instruction to install Maven. Once it is installed you need to restart Eclipse IDE so that the changes will take effect.
You can install Maven in your Eclipse IDE in any way mentioned above. Now, if you want to verify that Maven is successfully installed in your Eclipse IDE, for that you just need to follow these simple steps.
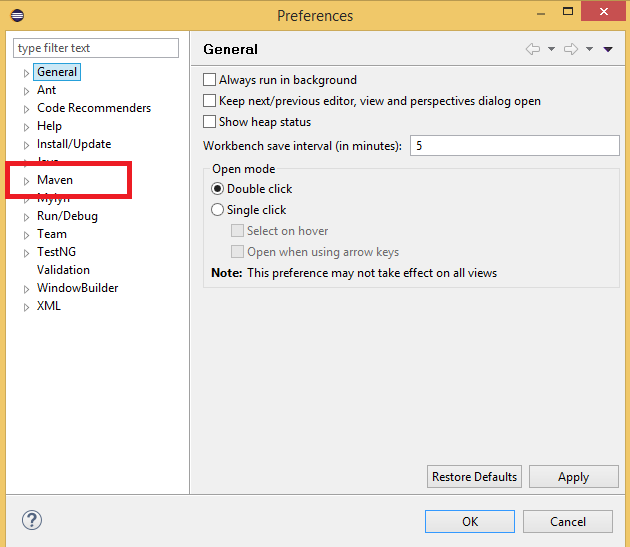
- First of all, you need to go to windows tab in Eclipse IDE and click on preferences.
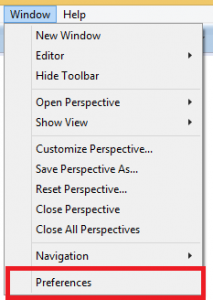
- On click of preferences, a window will appear. You need to observe in that Maven is listed on the left-hand side of that window. If Maven is there that means you have successfully installed Maven in your Eclipse IDE.
Finally, installation part of Maven has been completed. Now you know how to install Maven on windows as well as on Eclipse IDE.
Now, let’s get started with a discussion about how you can create a Maven project and how you can convert an existing project into Maven project.
Steps to Create a Maven Project in Eclipse IDE
Step 1
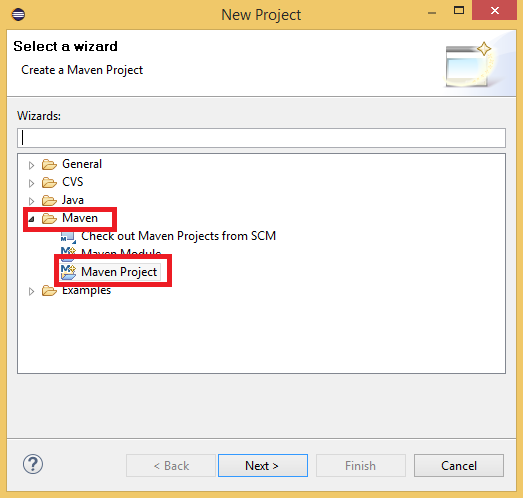
- Open your Eclipse IDE, click on file and then click on new.

- Here you can see the last option on the list Other, click on it. It will open a new window.
Step 2
- In the new wizard, window select the Maven folder and click on Maven project. After that click on next button.
Step 3
- Now, a window will appear asking for the location of your project. You can select the default workspace or if you want to save it to another location you can also do that by clicking on the browse button. You can choose any option here depending on your need to save your project.
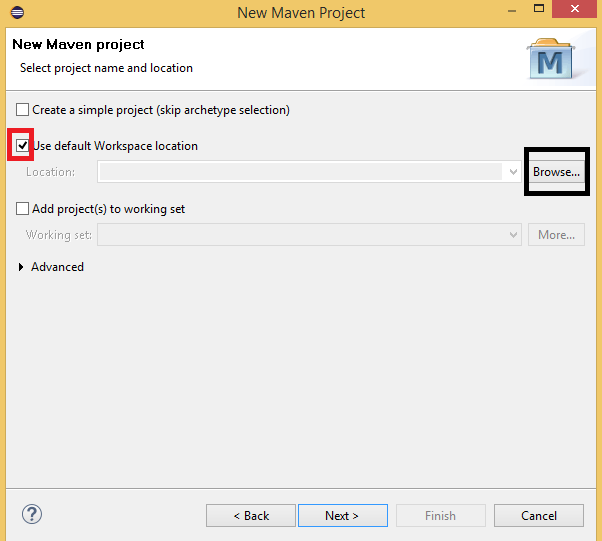
- I have selected the default workspace location. As you can see the check mark before the text Use default Workspace location, by default it will always be checked. It will save your project to the default workspace which you have created at the time of installation of Eclipse IDE. Finally, click on the next button.
Step 4
- It will take you to a window where you need to select the Archetype for your Maven project. Archetype is used to provide the original pattern to your Maven project.
- Here, you can see multiple Archetypes choose the selected one or the latest release.
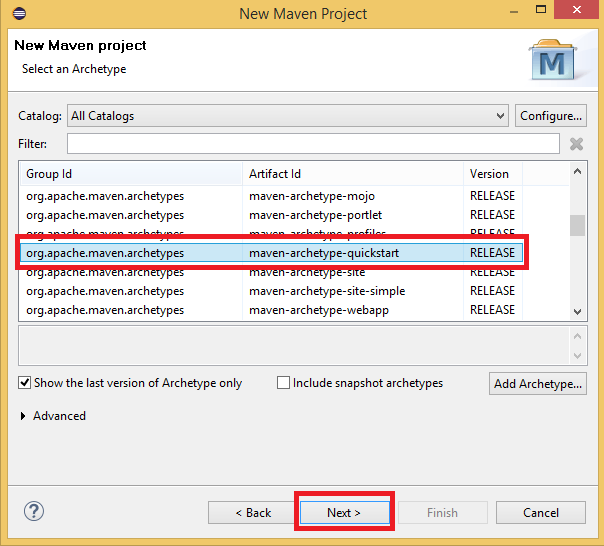
- After selection of Archetype click on the next button.
Step 5
- Now, you need to enter two things for your Maven project, first one is Group ID and the second one is Artifact ID. Group ID will uniquely identify your Maven project among all the projects and Artifact ID is nothing but the resource generated by your Maven project.
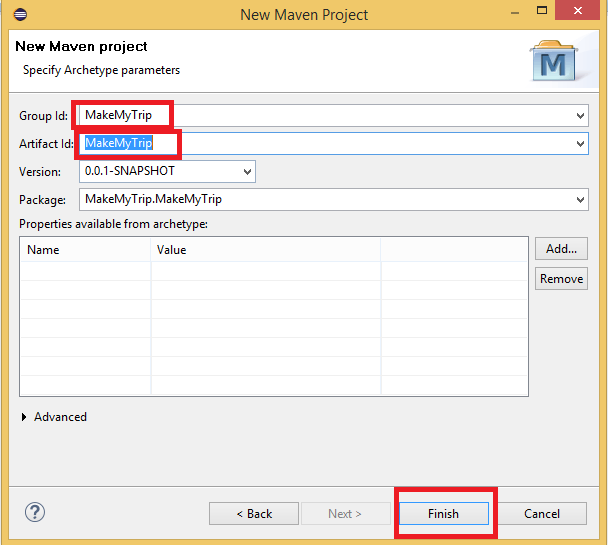
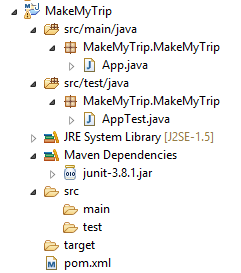
- It is a good practice to give the same name for Group ID and Artifact ID. Once, you enter the name for these two fields click on the Finish button and then your maven project will get created. A basic structure of your Maven project will be like this.
That’s all you need to do to create a new Maven project in your Eclipse IDE.
Now, let’s talk about how you can convert an existing Java project into Maven project.
Steps to Convert an existing project into Maven project
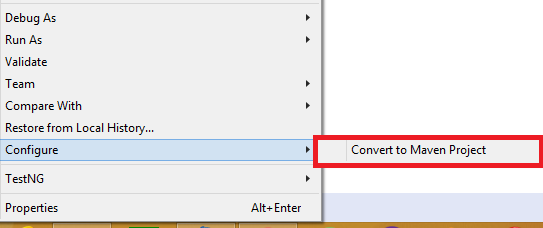
- Right-click on the existing project which you want to convert into Maven project. Go to configure and click on convert to Maven project.
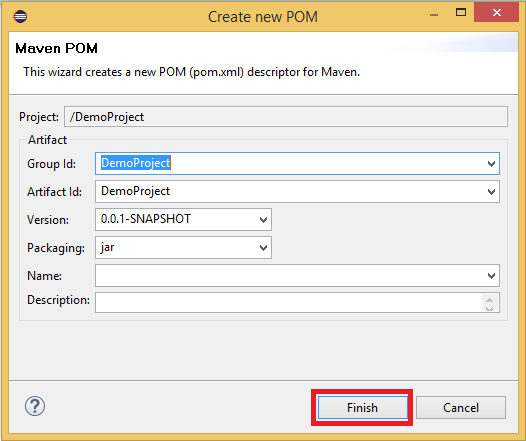
- A new window will appear having details for the project containing Group ID and Artifact ID. You just need to click on the finish button. The process will take a while in the conversion and then your simple java project will be converted into Maven project.
You just need to follow the simple process in order to convert your project into Maven project.
Now, let’s get started with the execution part that how you can execute your Maven project.
Steps to Execute Maven project in Eclipse IDE
As you can see inside the structure of Maven project, there is a file named as pom.xml. This pom.xml file is used to add the dependencies for your project, you can add any dependency in this file. All the dependencies are available on Maven global repository.
In order to update these dependencies in your Maven project, you just need to update your project.
- Goto your Maven project in Eclipse IDE and right click on it. Then goto Maven and click on update project.
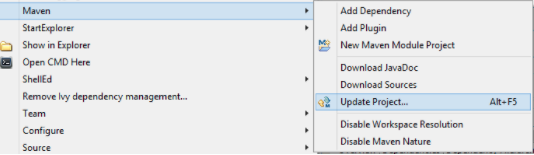
This process will take some time to update your project, you can check the status on the right-hand side corner of your Eclipse IDE. Please wait until the process has finished. Once the process is finished you can execute your Maven project. This update is mandatory sometimes because in some circumstances your Maven project might throw some exceptions. You need to handle those by updating your Maven project.
Now, let’s see how you can execute your Maven project and how you can get the test result.
- Goto your Maven project and right click on your Maven project. There you will find an option Run as move your mouse pointer on it and options to execute your project will get displayed.
- Click on Maven test, it will first compile all your classes with Maven compiler plugin. After compiling all the classes it will execute your Maven project.
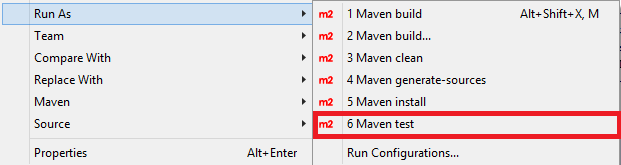
- You can check all the status of compiling the classes and execution of classes on the Eclipse IDE console. After finishing all the process it will give you the status of your execution.
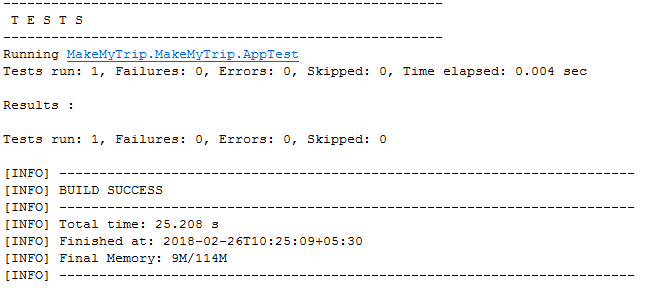
I have created a demo project for MakeMyTrip, after execution it is showing you the status of that project.
You can also execute your Maven project by performing the same operation on pom.xml file.
- Right click on pom.xml file, Goto Run as and click on Maven Test.
That’s how you can create and execute your maven project and analyze all the results on the console!
- COVID-19: How We Are Dealing With It as a Company - March 23, 2020
- Agile Testing – The Only Way to Develop Quality Software - February 8, 2019
- How to Perform System Testing Using Various Types Techniques - May 16, 2018