The skeleton of a project, wireframing is the most effective practice to date. A wireframe is a visual representation of elements in any application using simple shapes. It allows the team to deal with crucial questions on navigation, layout, and content priority.
This blog explains everything that improves your wireframing quality.
Jump to Section
Why should you do Wireframing?
Saves Time: Wireframes lets you spot any potential issues in the structure and flow of the application before spending hours developing it. It is much easier to change a wireframe than to change a final mockup.
Helps to define the priorities of the application: It encourages you to think about the content which you need to place on a particular page.
Helps to get the best outcome: You can experiment with the wireframe layout structure and flow to come up with the best solution for designing and development.
Elements Of Wireframing
Some general elements when you plan every webpage are header, footer, sidebar, and content areas. Then, think of what other additional elements can be placed in a wireframe such as navigation bars, widgets, and buttons. Once you figure out the complete idea of the elements, you can now start creating your wireframe.
All elements in the wireframe are usually displayed, organized, and sketched out keeping the following points in consideration.
1. Content
What exact content do you need to display on this page?
2. Structure
How will you put the elements of this page together?
3. Hierarchy
What will be the positioning, labeling, and size of each element?
4. Functionality
How will these elements work?
5. Navigate
Where does the user navigate on choosing a particular element?
What not to include while wireframing
Below is what not to include while wireframing:
1. Graphic elements
Wireframes should not include any designed element, as this distracts the purpose of a wireframe. Instead, it should be created without the use of color, graphs, or typography.
2. Lorem ipsum text
Wireframes should not have any Dummy text rather real text should be used for clarity.
3. Actual design
The final look of the page should not be defined in Wireframes. It should show the navigation and functionality of the website i.e. how the site will work, not how the site will look like.
5-Step wireframing Process
Below is the list of 5 simple steps that can be followed for the wireframing process. These steps are very useful to create a wireframe.
1. Content Inventory,
2. Visual Hierarchy,
3. Content Wireframe,
4. Sculpted Wireframe,
5. Lo-fi Prototype.
Let’s go through the steps one by one.
Step 1. Content Inventory
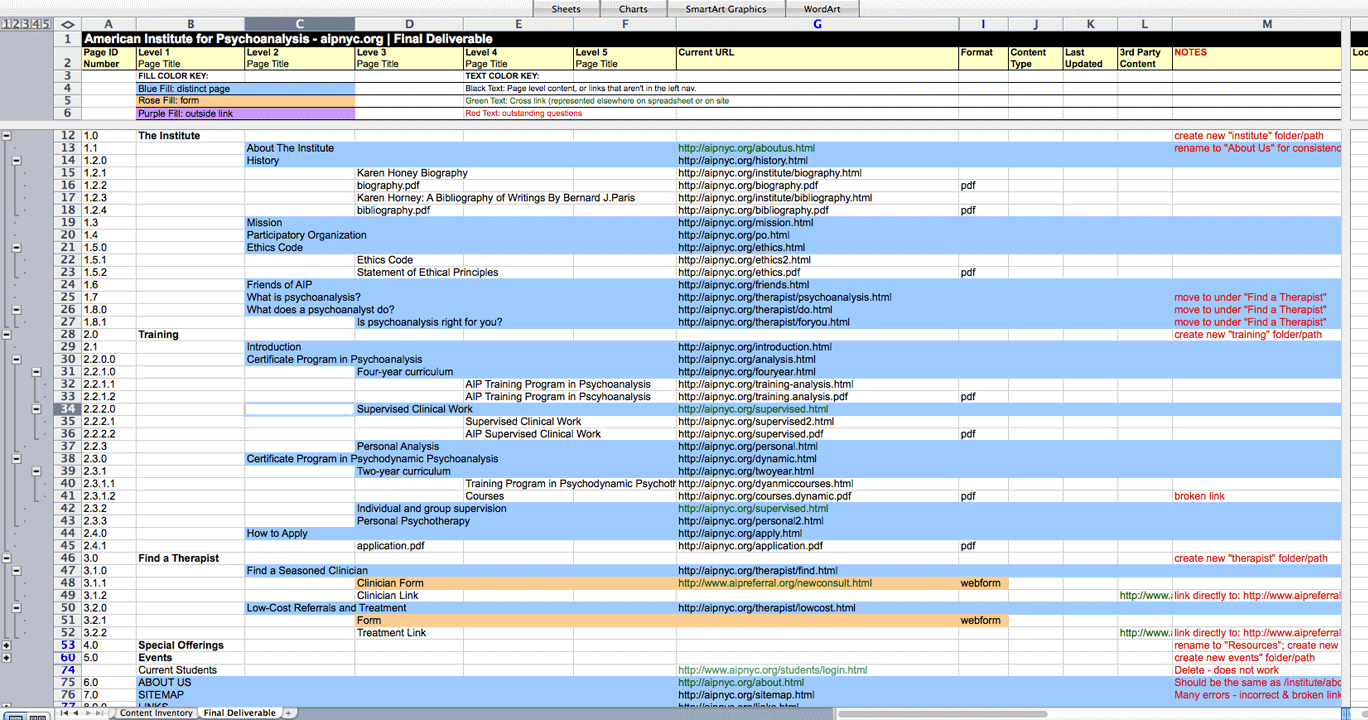
A content inventory needs to be created at first, which is like collecting all your materials and organizing them before building.
Content inventories are spreadsheets or graphs where you can list out all the contents on the basis of pages that you want to include. The content inventory helps in maintaining the content that requires being there in the design and encourages thinking about the most important elements that need to be present on a page.
- The best way to make a good content inventory is to follow a short process,
- Listing out all contents with short description and URLs (If any),
- Content organization on the basis of the topic,
- Putting the content element on its respective pages to avoid duplicates on multiple pages,
- Do not require any redundancies scanning or removal of content.
All the pages and categories can be divided into small sections and each section can be assigned to a team of people.
Now the next step is “Visual Hierarchy”.
Step 2. Visual Hierarchy
After having a content inventory listing with all the elements, it becomes easier to determine which is the most important element on a page. You need to label each item in your spreadsheet as a primary, secondary, or tertiary element.
Step 3. Content Wireframe
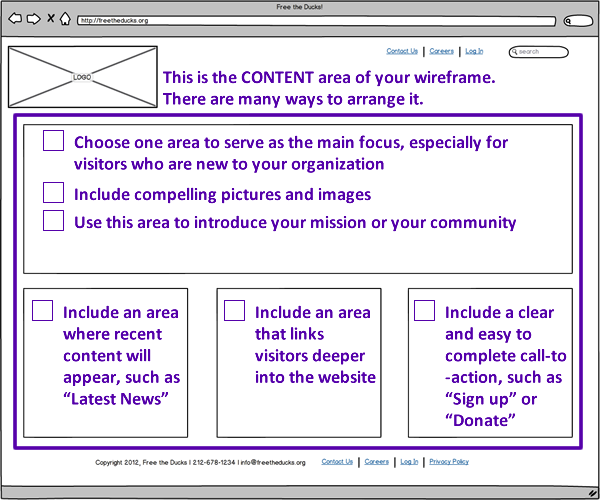
It defines the first version of your wireframe with blocks of content. In “Content wireframe” you only need to care about where content goes, not how it’s presented.
Wireframes and designs work best with the mobile-first approach. When the wireframe is done for the smallest device screen first, you can prioritize only the essentials, and then add more elements as you continue further. The alternative way is to design all elements at once, and then subtracting, which can be a waste of time.
Once a general layout is created, you can keep adding more details to it.
Step 4. Sculpted Wireframe
Content blocks are like chunks of marble. In this step i.e. Sculpted Wireframe, you need to sculpt them into recognizable pieces. This means showing the navigation or designating where individual links and icons go, setting space for images, and deciding their sizes.
Placeholders, boxes, and buttons are the major elements in any detailed wireframe.
Also, you need to have user flows, as they help you optimize the placement of elements. And you can start incorporating scanning patterns and more accurately defining your visual hierarchy.
Step 5. Lo-fi Prototype
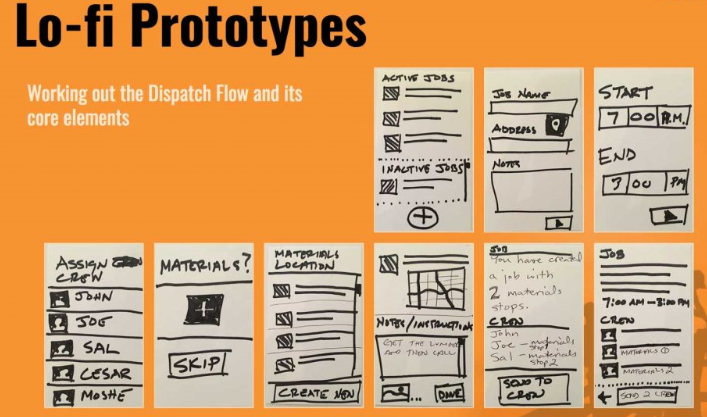
Turning your wireframe into a lo-fi prototype is highly essential so that you can have a complete review and add features if any of them are missing. You can easily add interactivity, sometimes even just dragging and dropping to create a perfect wireframe. You need to use the lo-fi prototype to refine the foundation of your project. And, when a basic prototype is created, then you can move to the visual design phase.
Some wireframing tools to help you create the useful wireframe
Below you can find some of the best wireframing tools that can help you in creating a great wireframe.
- Pencil Project,
- Axure,
- Invision,
- Moqups,
- Balsamiq,
- Fluid UI,
- Mockplus,
- Wireframe.cc.
Pencil Project
Pencil Project, a quick wireframing tool that focuses mainly on GUI prototype and diagram. It is a free tool available for Windows, Linux as well as Mac OS. It supports sketching just like Balsamiq. You can create your own connection by editing existing wireframing or creating a new one. Also, you can create links for each graphic element in your diagram. It is more than just creating diagrams, it can be a good help to confirm UI at a later stage for building operation program and website model.
In short, the tool is highly intuitive and free of charge. It is an open-source tool for wireframe and a great help for basic users. Hence, it is quite user-friendly and has all the basic GUI tools in it.
Axure
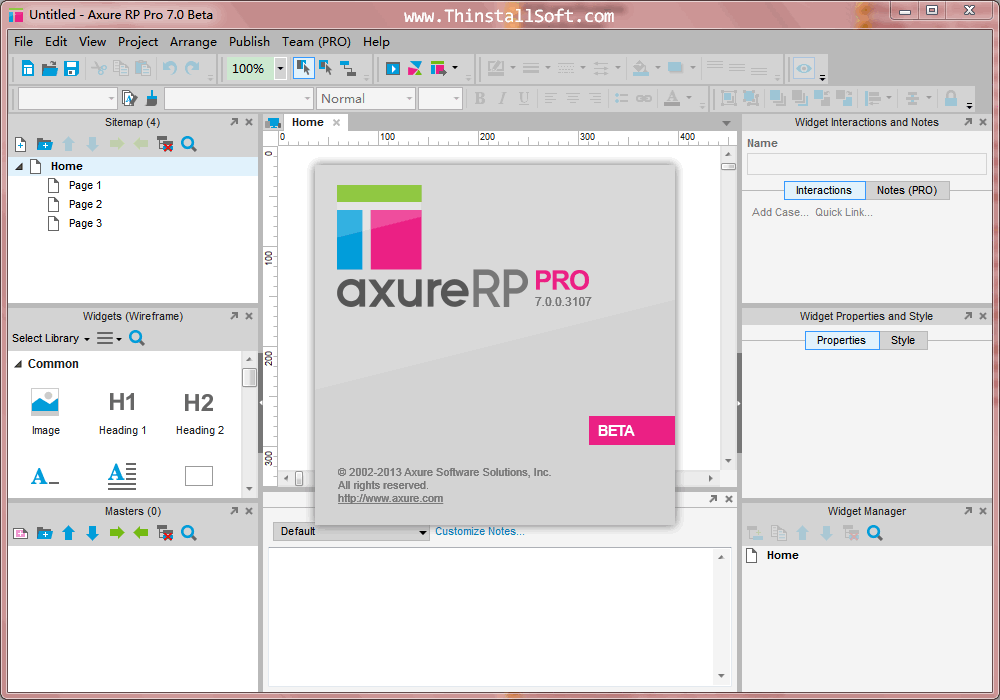
Axure, a wireframing tool with a robust feature. It is one of the best tools to create a perfect wireframe as it has all level solution starting from intermediate to advanced level. It has features like sitemaps and widgets. You can include conditional flows, animation, dynamic content, and more in your wireframe. Axure is available both on Mac OS and Windows.
You can create HTML mockups for both website and mobile application and the built-in share functionality helps you to view the application design on your phone.
Invision
Invision is an easy to learn tool for wireframe creation. You can convert static mobile and web application designs into interactive and clickable wireframes. Also, you can create a clickable link that can be shared with different users. You can upload the image from local, Dropbox, Google Drive, or Box.
Moqups
Moqups is a tool to create sitemaps, flowcharts, storyboards and building a functional prototype. It has cloud-based storage, real-time feedback features, and unlimited users under a single monthly subscription. Therefore, it makes it easy for smaller agencies to formalize their wireframing process. You can have a trial version for 7 days before subscribing to the application. The tool is the best suit for website mockups.
Balsamiq
Balsamiq, the best tool for creating a low-fidelity wireframe. It is available both as a web application and desktop software for Windows and Mac OS. The application has a great solution for agencies and freelancers to create stories with their mockups instead of focusing in detail on the complete functionality of the application.
You have the ability to collaborate with team members to share the final thoughts for feedback. This application is more focused on website mockup and you can export the files in PDF, PNG, or clipboard elements. You can take a trial of 7 days before subscribing to the tool.
Fluid UI
Fluid UI is a tool that provides a great way to visually map out the project. It creates a link to the screens forming a diagram showing how everything works. This application has the real-time collaboration of a team. Also, you have the feature to export the entire view and can be used as a flow document. It has Material Design,16 built-in iOS, and Wireframe libraries that contain over 2000 customized widgets and icons. You can get a free plan that has many of the important features which you can use to create wireframes. In short, it is a good tool to work on projects from scratch as it helps in creating high-quality prototypes
Mockplus
Mockplus, a simple and clean application. This is also a great application for beginners. This tool focuses mainly on designing so the users can sketch out their thoughts in simple designs instead of spending their time learning about how to handle the application.
It’s a quick application tool that helps in creating an interactive wireframe and prototype in less time. The tool has more than 200 components, templates, and samples and provides massive resource accessibility. It supports the export of the sketches directly in the MP file. No coding, no training, and no parameters required, just with a simple drag and drop one can create a complete user-friendly wireframe. This tool also has features like page linking and component interaction. Also, has an auto-recovery feature. You can use this tool on any platform, be in mobile, web, or desktop version.
Wireframe.cc
Wireframe.cc is an online wireframe tool having a simple interface to quickly sketch out the wireframe. It is the best wireframe tool for beginners and has minimal tools and resembles a typical drawing application. It has the most basic feature with 3 designing patterns i.e. web, mobile landscape, and portrait mode. The best thing is you can start working on it even without creating an account.
The above are a few of the tools that can help you create perfect and quick wireframes. Each of these tools has its own unique features and icons and are all in demand.
Final Words
Above, I have shared the tools that I experienced as suitable and the best ones to work upon but there are still many more tools available in which you can work apart from these tools. Overall, we need a tool where we can sketch out our thought for an application so as to make it easy for further steps of a project. We just need to pick the tool that best suits your need to create a perfect wireframe.
In conclusion, just pick a tool and start presenting your thought. The more you apply wireframe the more you get an expert in it. I hope this post will help and encourage you to create a perfect wireframe. Keep wireframing, Keep innovating ideas and yes don’t forget to comment, like, and share it.
I will connect again with more ideas and blogs. thank you!
- What Products Should You Sell on Amazon? - November 18, 2020
- 10 Reasons Why You Should Start Selling on Amazon - October 22, 2020
- Comparative Study of Top 6 Web Scraping Tools - September 3, 2020


