Introduction
Laravel is a very powerful PHP web framework. It makes the app development process very easy for developers. In the first place before creating a project, we should know basic understanding of Laravel. Laravel is a free open source web framework created by Taylor Otwell. Not only Working with Laravel is very easy but also easy to maintain. If you know the MVC(model view and controller) then it will be easy for you to work with Laravel. Let’s discuss ‘Model View Controller’ in brief.
Model: Model represents data, basically it holds your database related logic.
View: It displays the model data. Basically, it holds your HTML code.
Controller: Controller provides model data to the view. In the controller, you write your logic like clicking a button or any event you want to create. This is the basic understanding of Laravel. Now Let’s create a very simple project by following some steps.
Jump to Section
Step 1
In the first place, to create a Laravel project, you can follow the below command. For that, just open your command line terminal and then type the command.
In addition, to run this command, you need to install composer.
 Now you can see a word composer. It is a tool used for dependency management in PHP.
Basically, it helps you to create your project or update your project. It will manage your libraries as well. I name my project user-management, you can name it anything you like. Now, after creating the project open your project in any editor.
If you want to install any specific version of Laravel, you can just type the below command.

Open your project in any editor then visit database\migrations and the user’s table file.
Below is my code for user’s table. I just added a new admin field in my user’s table as you can see.
 <?php
use Illuminate\Support\Facades\Schema;
use Illuminate\Database\Schema\Blueprint;
use Illuminate\Database\Migrations\Migration;
class CreateUsersTable extends Migration
{
public function up()
{
Schema::create('users', function (Blueprint $table) {
             $table->increments('id');
             $table->string('name');
             $table->string('email')->unique();
             $table->boolean('admin')->default(0);
             $table->string('password');
             $table->rememberToken();
             $table->timestamps();
     });
   }
   public function down(){
     Schema::dropIfExists('users');
  }
}
Step 2
Let’s create a database now. For this, open the .env file where you store your database information. Below is the code for the .env file.
APP_ENV=local
APP_KEY=base64:anbh5Fno1rhAvnyL35WcBilvGkxO9RQgwN3LlC29cGI=
APP_DEBUG=true
APP_LOG_LEVEL=debug
APP_URL=http://localhost

DB_CONNECTION=mysql
DB_HOST=127.0.0.1
DB_PORT=3306
DB_DATABASE=manage_user
DB_USERNAME=root
DB_PASSWORD=

BROADCAST_DRIVER=log
CACHE_DRIVER=file
SESSION_DRIVER=file
QUEUE_DRIVER=sync

REDIS_HOST=127.0.0.1
REDIS_PASSWORD=null
REDIS_PORT=6379

MAIL_DRIVER=smtp
MAIL_HOST=mailtrap.io
MAIL_PORT=2525
MAIL_USERNAME=null
MAIL_PASSWORD=null
MAIL_ENCRYPTION=null

PUSHER_APP_ID=
PUSHER_APP_KEY=
PUSHER_APP_SECRET=
Step 3
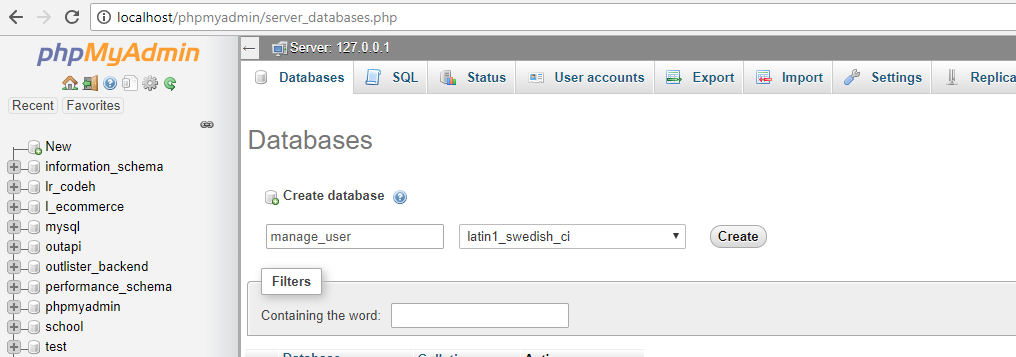
After configuring the database, just create a database in PHPMYADMIN. In order to create the database, install XAMPP and start your Apache and MySQL server. Then, visit localhost/phpmyadmin, and create your database. Below is the image, just take a look.
Let’s do some coding. Laravel provides login, signup, forget password functionality by hitting just one command.

This command will give the login, signup functionality. Now let’s migrate our table. Below command will create the tables in the database.

If you are unable to migrate the table or having an issue with users table which already exists, then do this.
open app/providers/AppServiceProvider.php.
Add this line above.
use Illuminate\Support\Facades\Schema;
Add below code in boot function.
Schema::defaultStringLength(191);
Just delete your database tables, then migrate.
Step 4
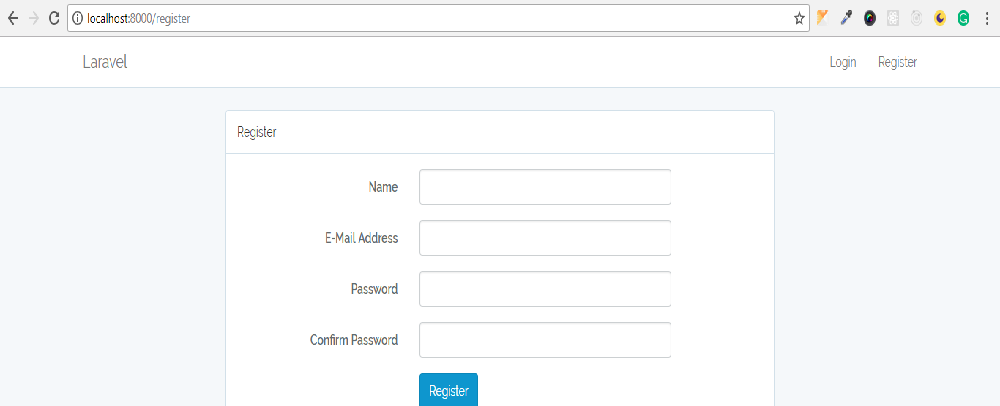
Type the below URL in chrome or any browser you like. http://localhost/user-management/public, and you will see your project running.
Another way to see your project, just hit the below command and visit the URL provided by the Laravel.

If you register from the front page anybody can be an admin, let’s create a default admin. In order to create a default admin lets create a seeder for default admin.

After generating the seeder just visit the UsersTableSeeder.
app/database/seeds/UsersTableSeeder. Copy the below code into your file.
<?php
use Illuminate\Database\Seeder;
class UsersTableSeeder extends Seeder{
public function run(){
              $user = App\User::create([
               'name' => 'Your full name goes here',
               'email' => 'your email',
               'password' => bcrypt(123456),// you can choose your password here
               'admin' => 1 // admin should have a value dont change it
         ]);
      }
 }
After updating this file. Go to this file app/database/seeds/DatabaseSeeder, and uncomment the code.
//$this->call(UsersTableSeeder::class);

 <?php
use Illuminate\Database\Seeder;
       class DatabaseSeeder extends Seeder{
                       public function run(){
                                $this->call(UsersTableSeeder::class);
                  }
}
Run this command in your terminal:
 This command will create a default admin for you. Now login with your credentials.
Step 5
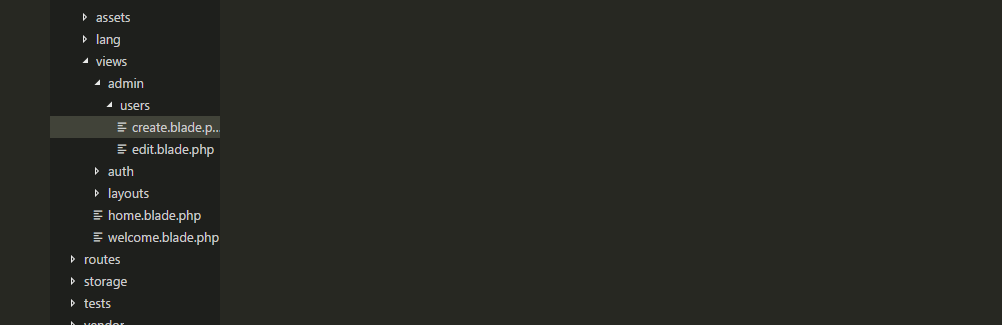
Let’s create some directory for our admin area where we can show some data. Go to the resources/views and create an admin folder in views directory. In admin, folder creates another folder called users. In users, folder creates two files create or edit.
Now creates a controller. The command for creating a controller is as follows:

Resource:- The resource will create a CRUD method for us, we do not need to create manually. Below is the code for UsersController.
<?php
namespace App\Http\Controllers;
use Illuminate\Http\Request;
use App\User;
use Session;
class UsersController extends Controller{
       public function __construct(){
          $this->middleware('admin');
       }
       public function index(){
         return view('admin.users.index')->with('users', User::all());
       }
       public function create(){
         return view('admin.users.create');
       }
      public function store(Request $request){
         $this->validate($request, [
              'name' => 'required',
              'email' => 'required'
         ]);

         $user = User::create([
        'name' => $request->name,
        'email' => $request->email,
        'password' => bcrypt('password')
        ]);
      Session::flash('success', 'User Added Successfully');
      return redirect()->route('users');


    }

    public function destroy($id){
          $user = User::find($id);
          $user->delete();
          Session::flash('success', 'User Deleted');
          return redirect()->back();
    }

   public function admin($id){
        $user = User::find($id);
        $user->admin = 1;
        $user->save();
        Session::flash('success', 'SuccessFully changed user permission');
        return redirect()->back();
    }
       public function not_admin($id){
           $user = User::find($id);
           $user->admin = 0;
           $user->save();
           Session::flash('success', 'SuccessFully Changed User Permission');
           return redirect()->back();
      }
 }
In resource/views/admin/users/create.blade.php. Paste the below code.
@extends('layouts.app')
@section('content')
 @if(count($errors) > 0)
 <ul class="list-group">
  @foreach($errors->all() as $error)
  <li class="list-group-item text-danger">
  {{ $error }}
   </li>
  @endforeach
  </ul>
  @endif
  <div class="panel panel-default">
    <div class="panel-heading">Create New User</div>
      <div class="panel-body">
      <form action="{{ route('user.store') }}" method="POST">
       {{ csrf_field() }}
      <div class="form-group">
       <label for="name">Name</label>
          <input type="text" name="name" class="form-control">
       </div>
       <div class="form-group">
          <label for="email">Email</label>
          <input type="email" class="form-control" name="email">
       </div>
       <div class="form-group">
         <div class="text-center">
          <button class="btn btn-success" type="submit">
            Add User
          </button>
          </div>
        </div>
      </form>
    </div>
</div>
@endsection
Replace the code in your home.blade.php
@extends('layouts.app')
   @section('content')
     <div class="panel-default">
     <div class="panel-heading">Dashboard</div>
    <div class="panel-body">
     Welcome!
    </div>
</div>
@endsection
Replace the code in your app.blade.php.
<!DOCTYPE html>
<html lang="{{ app()->getLocale() }}">
<head>
<meta charset="utf-8">
<meta http-equiv="X-UA-Compatible" content="IE=edge">
<meta name="viewport" content="width=device-width, initial-scale=1">
<!-- CSRF Token -->
<meta name="csrf-token" content="{{ csrf_token() }}">
<title>{{ config('app.name', 'Laravel') }}</title>
<!-- Styles -->
<link href="{{ asset('css/app.css') }}" rel="stylesheet">
</head>
<body>
<div id="app">
<nav class="navbar navbar-default navbar-static-top">
<div class="container">
<div class="navbar-header">
<!-- Collapsed Hamburger -->
<button type="button" class="navbar-toggle collapsed" data-toggle="collapse" data-target="#app-navbar-collapse">
<span class="sr-only">Toggle Navigation</span>
<span class="icon-bar"></span>
<span class="icon-bar"></span>
<span class="icon-bar"></span>
</button>
<!-- Branding Image -->
<a class="navbar-brand" href="{{ url('/') }}">
{{ config('app.name', 'Laravel') }}
</a>
</div>
<div class="collapse navbar-collapse" id="app-navbar-collapse">
<!-- Left Side Of Navbar -->
<ul class="nav navbar-nav">
</ul>
<!-- Right Side Of Navbar -->
<ul class="nav navbar-nav navbar-right">
<!-- Authentication Links -->
@if (Auth::guest())
<li><a href="{{ route('login') }}">Login</a></li>
<li><a href="{{ route('register') }}">Register</a></li>
@else
<li class="dropdown">
<a href="#" class="dropdown-toggle" data-toggle="dropdown" role="button" aria-expanded="false">
{{ Auth::user()->name }} <span class="caret"></span>
</a>
<ul class="dropdown-menu" role="menu">
<li>
<a href="{{ route('logout') }}"
onclick="event.preventDefault();
document.getElementById('logout-form').submit();">
Logout
</a>
<form id="logout-form" action="{{ route('logout') }}" method="POST" style="display: none;">
{{ csrf_field() }}
</form>
</li>
</ul>
</li>
@endif
</ul>
</div>
</div>
</nav>
<!-- -->
<div class="container">
<div class="row">
@if(Auth::check())
<div class="col-lg-4">
<ul class="list-group">
@if(Auth::user()->admin)
<li class="list-group-item">
<a href="{{ route('users') }}">Manage Users</a>
</li>
<li class="list-group-item">
<a href="{{ route('create.user') }}">Create New User</a>
</li>
@endif
<li class="list-group-item">
<a href="">My Profile</a>
</li>
<li class="list-group-item">
<a href="">Posts</a>
</li>
<li class="list-group-item">
<a href="">Create Post</a>
</li>
<li class="list-group-item">
<a href="">Products</a>
</li>
<li class="list-group-item">
<a href="">Add Products</a>
</li>
<li class="list-group-item">
<a href="">Packages</a>
</li>
<li class="list-group-item">
<a href="">Add Packages</a>
</li>
<li class="list-group-item">
<a href="">Categories</a>
</li>
<li class="list-group-item">
<a href="">Hotels</a>
</li>
<li class="list-group-item">
<a href="">Add Hotels</a>
</li>
<li class="list-group-item">
<a href="">Add City</a>
</li>
<li class="list-group-item">
<a href="">Add State</a>
</li>
@if(Auth::user()->admin)
<li class="list-group-item">
<a href="">Add Plugins</a>
</li>
<li class="list-group-item">
<a href="">Themes</a>
</li>
<li class="list-group-item">
<a href="">Settings</a>
</li>
<li class="list-group-item">
<a href="">Permissions</a>
</li>
<li class="list-group-item">
<a href=""> Departments</a>
</li>
@endif
</ul>
</div>
@endif
<div class="col-lg-8">
@yield('content')
</div>
</div>
</div>
<!-- -->
</div>
<!-- Scripts -->
<script src="{{ asset('js/app.js') }}"></script>
</body>
</html>
Now create middleware for admin for our admin security.

app/HTTP/Middleware/Admin, Paste the below code.
<?php
namespace App\Http\Middleware;
use Auth;
use Session;
use Closure;
class Admin{
    public function handle($request, Closure $next){
                     if(!Auth::user()->admin){
                            Session::flash('info','You do not have permission for this action');
                           return redirect()->back();
               }
                 return $next($request);
    }
}
In addition to this work create the middleware route.
Add the below code in kernel.php in $routeMiddleware.
‘admin’ => \App\Http\Middleware\Admin::class
Add the below code in web.php.

Route::group(['prefix' => 'admin', 'middleware' => 'auth'], function(){

Route::get('/users', [
             'uses' => 'UsersController@index',
             'as' => 'users'
]);

Route::get('/user/create', [
            'uses' => 'UsersController@create',
            'as' => 'create.user'
]);

Route::post('/user/store', [
             'uses' => 'UsersController@store',
             'as' => 'user.store'

]);

Route::get('/user/delete/{id}', [
            'uses' => 'UsersController@destroy',
            'as' => 'user.delete'
]);

Route::get('/user/not-admin/{id}', [
            'uses' => 'UsersController@not_admin',
            'as' => 'user.not.admin'
]);

Route::get('/user/admin/{id}', [
            'uses' => 'UsersController@admin',
            'as' => 'user.admin'
   ]);

});
And we are done with our project. Now you can manage users very easily you can make admin or remove admin permissions. You see how easy it was working with Laravel. that’s why we composer so that you can learn about how can you create models, controllers, tables, by command. We did many things in this project like creating a controller, make a default admin, giving permission to admin. We may also use seeder and now you have the basic idea of how to use this particular class. You can write your own logic for better functionality
However, do write your suggestions or query to me in the comment section.
Thank You for reading!!!
- What Is Big Data Visualization? - January 22, 2021
- Five Benefits of Big Data Analytics for E-commerce - July 9, 2020
- Google Data Studio Vs. Tableau: Which One is More Suitable for Your Business? - June 25, 2020