
Hello Everyone, in this blog we will be going to learn the basics of search bar functionality in ios.
As we know that searching feature provides us the flexibility to find something easily in the application if there is so much of data present in the application.
Let’s jump directly into the application now.
Jump to Section
Things We Need
We Need few things like – MacBook or Mac with XCode in it, Some motivation to perform little coding..!
Initial Setup
Go into the Xcode and enter create new application section and then enter into the single view application in it as mentioned.
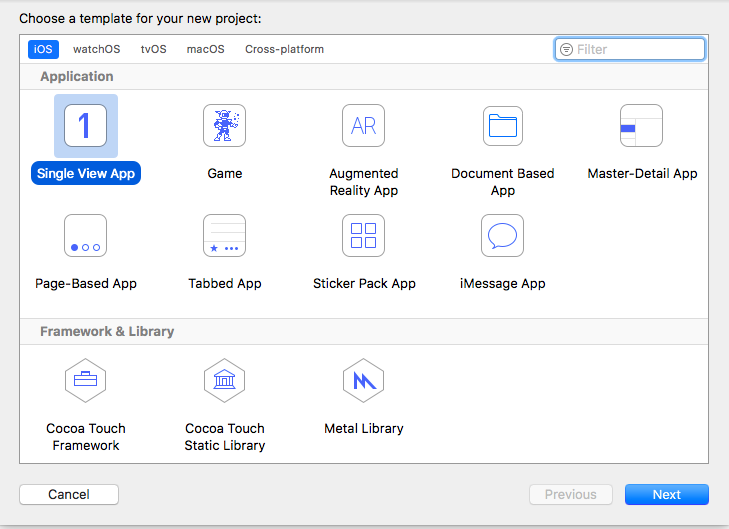
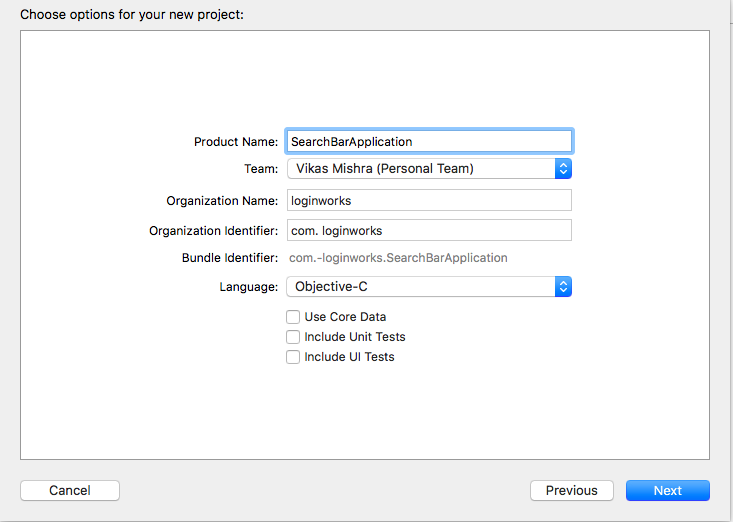
Now after this step give a name to your application as I have done in the snapshot below, You can choose a name of your choice.
Interface Designing
Now we will be going to design the interface of the application which will contain the following things as mentioned:
- A Table View which can be used to show the data contains in the form of the list.
- A Search Bar which will be going to use to search the objects on the basis of there name.
- A UIButton to add some objects to our list to extend it further.
Step 1
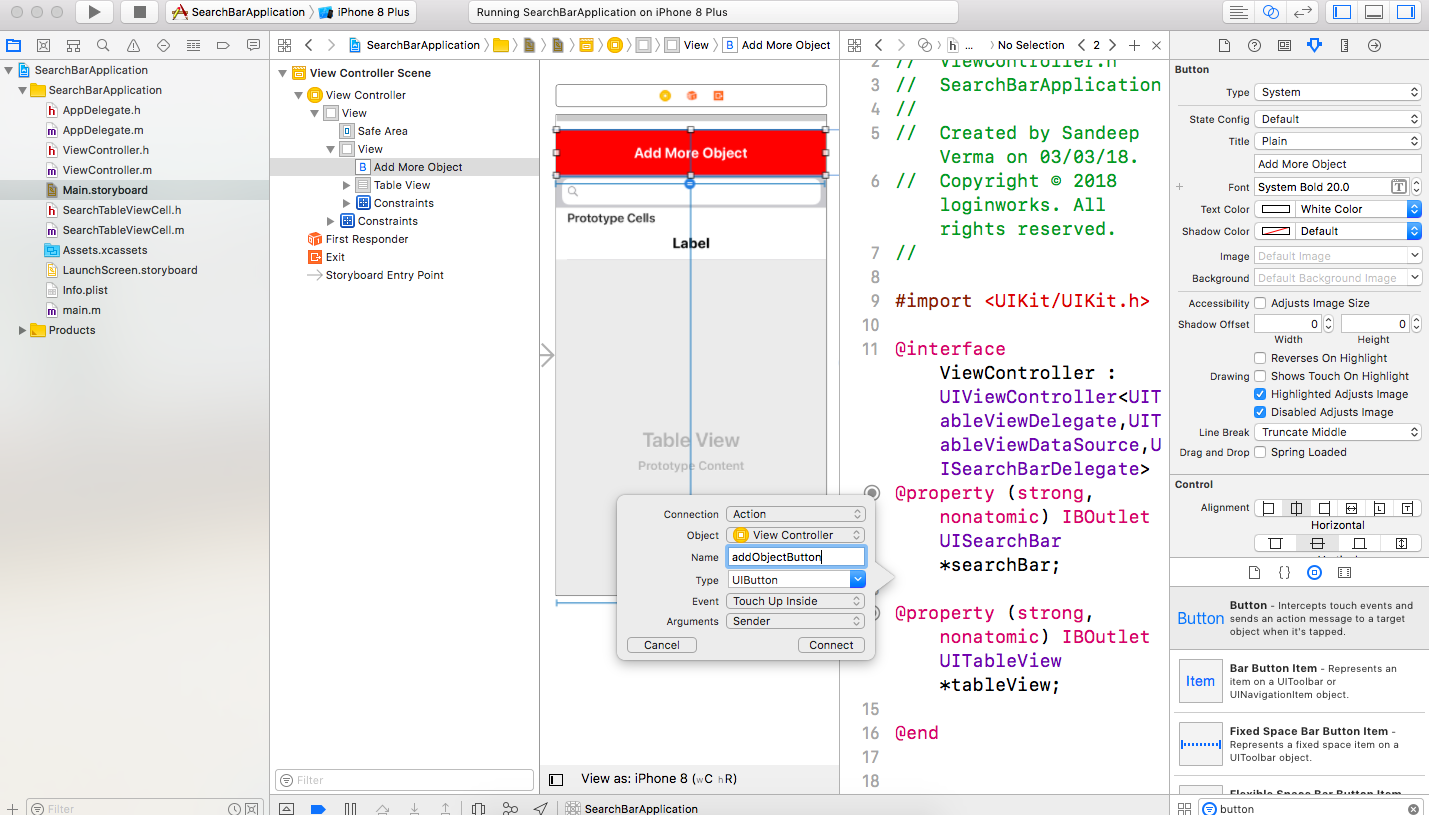
Add a UIButton into your main view so that we can add more objects to it in future as mentioned below. Remember this is a choice whether you want to do it or not. Also, give it a reference to your view controller with a name as addObjectButton.
Step 2
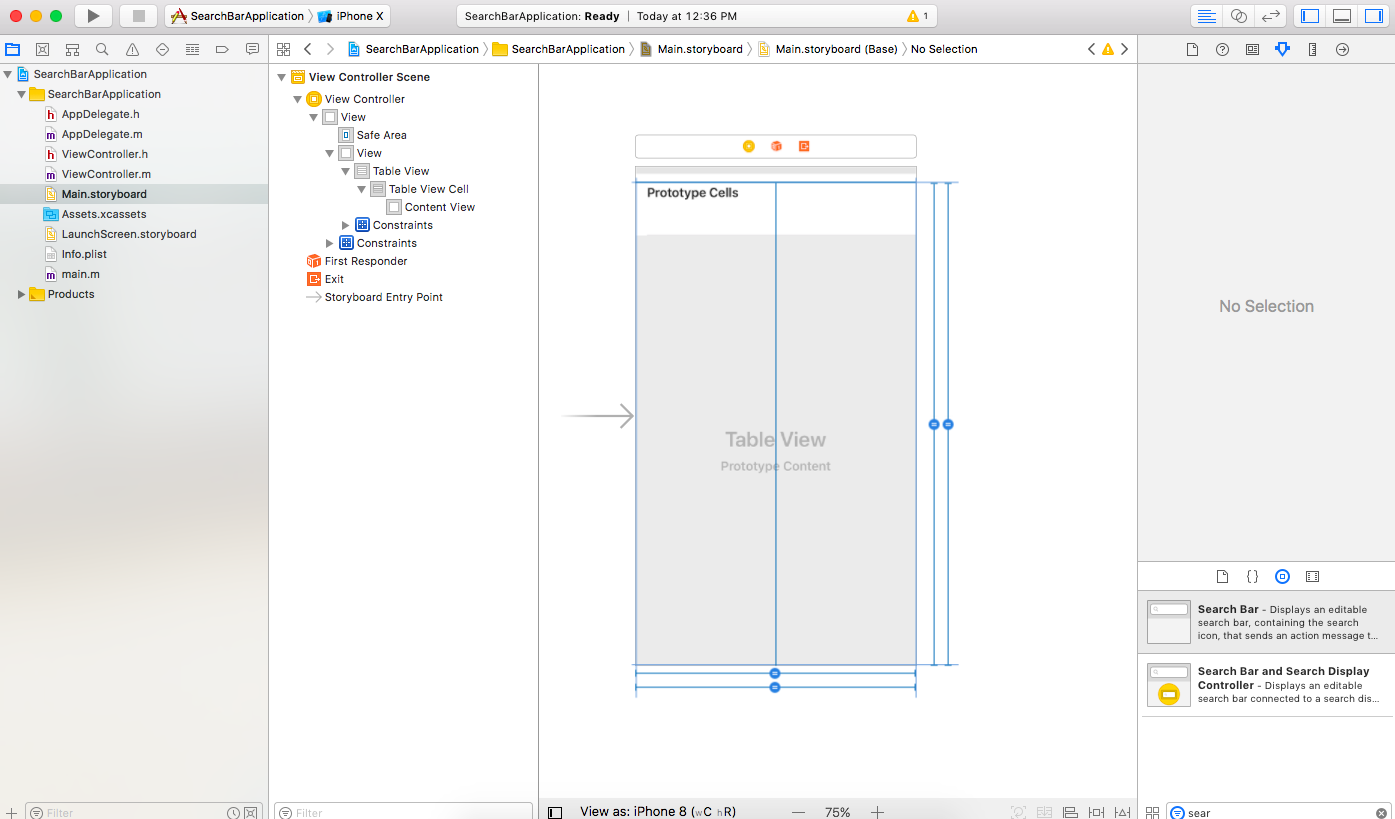
Now add a table View below the button which we have added earlier in our application.
With the help of this table view, we can show the data consist of our app using a table view format.
Step 3
Now inside it first add a search bar from the toolbar present on the right side of the XCode.
Drop it inside your table view so that it can fetch and search the data from the table view easily using its delegate methods.
Now we have the ability to use the search functionality in iOS into our application.
We can now add the coding part which can be used to find and show the relevant result from the list of data available in our app using the search bar delegates.
Step 4
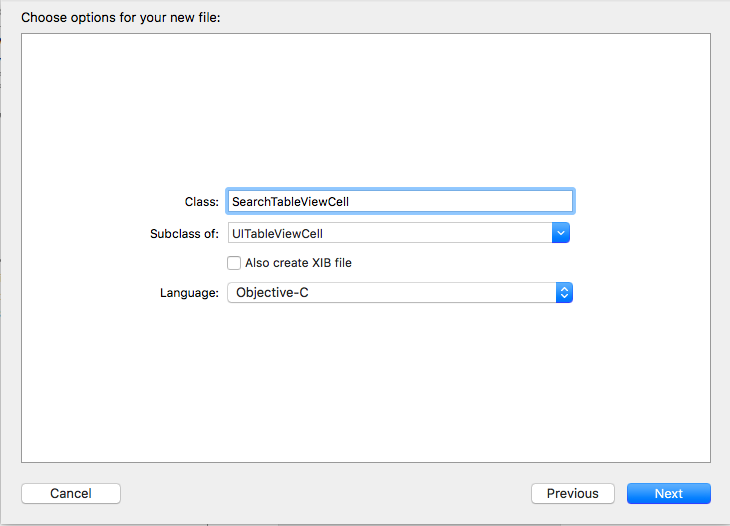
Now we need to add a UITableViewCell class into our app as we will be going to use it in future with our custom table view cell.
To do this just go to file -> new file -> cocoa touch class -> UITableViewCell class and name it according to you.
After this process assigns this file to your custom table view cell class which you have created earlier.
Step 5
At this point, we can now add the coding functionality to our application and to do this head into the viewcontroller.h file of your application.
Add the following code to your file as shown below.
#import <UIKit/UIKit.h>

@interface ViewController : UIViewController<UITableViewDelegate,UITableViewDataSource,UISearchBarDelegate>

@property (strong, nonatomic) IBOutlet UISearchBar *searchBar;

- (IBAction)addObjectButton:(UIButton *)sender;

@property (strong, nonatomic) IBOutlet UITableView *tableView;

@end
Here we are adding the table view delegate and data source objects to it and also the delegate to call the search bar.
I have created a search bar object which is UISearchBar and then later attach it to the search bar object added inside the table view in interface designing tool.
A Button which has already been created earlier and also a table view Outlet so that we can assign it to our custom table view object.
Step 6
Now we will be going to create two mutable arrays into our viewcontroller.m file so that afterwards.
We can use one to add the object for table view inside an array. Another to add the object which can be shown after searching for a particular object using the search bar.
#import "ViewController.h"

#import "SearchTableViewCell.h"

@interface ViewController (){

    NSMutableArray *devices;

    NSMutableArray *filteredDevices;

    }
Step 7
One more thing we are going to use is a boolean object which will tell us that whether the filtered data is searched or not, So do add it to your code as mentioned below.
#import "ViewController.h"

#import "SearchTableViewCell.h"

@interface ViewController (){

    NSMutableArray *devices;

    NSMutableArray *filteredDevices;

    BOOL isFiltered;

}
Delegates and Data Source Methods
Now at this point, we can add the functionality to handle the table view data and methods within our view controller .m file.
Step 1
In your viewdidload method add the code which will be going to add the objects to our array.
Also will initialize the search bar delegate.
- (void)viewDidLoad {

    [super viewDidLoad];

    isFiltered = false;

    self.searchBar.delegate = self;

    devices = [[NSMutableArray alloc]init];

    [devices addObject:@"iPhone"];

}
Inside this array add more objects like – iPhone, iPad, iPod, iMac, iStore, iOS, iTunes etc. Afterward, we can use the search feature of iOS to filter out a particular object.
Step 2
Add the methods to call the data into your table view with the help of custom cell and the method required to do is cellForRowAtIndexPath:
The method to tell the table view that how many rows are required in the table view which can be done using numberOfRowsInSection: method.
 - (NSInteger)tableView:(UITableView *)tableView numberOfRowsInSection:(NSInteger)section {

    if (isFiltered) {

        return filteredDevices.count;

    }

    return devices.count;

}

- (UITableViewCell *)tableView:(UITableView *)tableView cellForRowAtIndexPath:(NSIndexPath *)indexPath {

    SearchTableViewCell *cell = [tableView dequeueReusableCellWithIdentifier:@"Cell" forIndexPath:indexPath];

    if (isFiltered) {

        cell.mainLabel.text = filteredDevices[indexPath.row];

    }

    else {

        // Configure the cell...

        cell.mainLabel.text = devices[indexPath.row];

    }

    return cell;
 }
As you can see that I am using the bool function which is isFiltered into my code. Of course, this will be going to tell whether the search has been done or not.
Step 3
Now, all we need to do is to add the code which will search the object based on the query hit by the user.
We can do this by using the textDidChange: method provided by the search bar.
- (void)searchBar:(UISearchBar *)searchBar textDidChange:(NSString *)searchText{

    if (searchText.length == 0) {

        isFiltered = false;

        [self.searchBar endEditing:YES];

    }

    else {

        isFiltered = true;

        filteredDevices = [[NSMutableArray alloc]init];

     for (NSString *device in devices) {

            NSRange range = [device rangeOfString:searchText options:NSCaseInsensitiveSearch];

            if (range.location != NSNotFound) {

                [filteredDevices addObject:device];

            }

        }

    }

    [self.tableView reloadData];

}
In this code, you can see that I am using an NSRange Object which will be going to search the text on the basis of the rangeOfString object.
Step 4
One more thing we forgot to add is the numberOfSection: method,.
Finally this will be going to show that how many sections are there inside the table view of our application.
- (NSInteger)numberOfSectionsInTableView:(UITableView *)tableView {
    return 1;
}
Here, it will be going to show one section, we can add a number of the section according to our requirement.
Now our application is completed and you can run and check the functionality of the search bar feature.
Hey, we are not done yet just hold on a little bit and take a look at the code below.
Bonus Part
Yes, we are adding one more feature to our application which is adding the object to our table view using a custom alert box.
Step 1
Now, if you remember we have added a button to our application earlier and with the help of that button we are going to add a custom alert message, which will contain a text field to add the more elements in our table view:
- Create an alert controller object through which you can show the title and text into your alert.
- Add the text field to your alert controller so that you can enable it to add object inside the array later.
- Adding the alert action to your custom alert box which will be going to provide us, The feature of performing some action after adding the object to it.
- (IBAction)addObjectButton:(UIButton *)sender {

    UIAlertController * alertController = [UIAlertController alertControllerWithTitle: @"Add Element"

       message: @"Input Data"

        preferredStyle:UIAlertControllerStyleAlert];

    [alertController addTextFieldWithConfigurationHandler:^(UITextField *textField) {

        textField.placeholder = @"name";

        textField.textColor = [UIColor blueColor];

        textField.clearButtonMode = UITextFieldViewModeWhileEditing;

        textField.borderStyle = UITextBorderStyleRoundedRect;

    }];

    UIAlertAction* ok = [UIAlertAction actionWithTitle:@"OK" style:UIAlertActionStyleDefault

                                               handler:^(UIAlertAction * action){

                                                   //Do Some action here

                                                   UITextField *textField = alertController.textFields[0];

                                                   [devices addObject:textField.text];

                                                   [self.tableView reloadData];
 }];

    UIAlertAction* cancel = [UIAlertAction actionWithTitle:@"Cancel" style:UIAlertActionStyleDefault

                                                   handler:^(UIAlertAction * action) {
[alertController dismissViewControllerAnimated:YES completion:nil];

                                                   }];

  [alertController addAction:ok];

    [alertController addAction:cancel];

    [self presentViewController:alertController animated:YES completion:nil];

}
Now this will be going to perform all the functionality to add a new object to our array. Which will show into our table view later on after user finishes adding it and will press the ok button.
Want To Delete An Object
What if you want to delete an object by simply swiping it on the left side just like the feature of iOS provided into the contact of an iPhone. You are thinking right.
In the meantime, we are going to add that feature to our this project as sometimes what happens that we added an object by mistake and then,
Later want to delete it but can’t be able to do it just because of lack of coding or knowledge.
So let’s add it in a quick and easiest way possible.
First, Add this
- (BOOL)tableView:(UITableView *)tableView canEditRowAtIndexPath:(NSIndexPath *)indexPath {
    return YES;
}
Using this method we can enable the swipe to delete feature of iOS to our table view objects.
Now after initializing the feature, we can add the code to delete the object from the array at the particular position.
- (void)tableView:(UITableView *)tableView commitEditingStyle:(UITableViewCellEditingStyle)editingStyle forRowAtIndexPath:(NSIndexPath *)indexPath {

    if (editingStyle == UITableViewCellEditingStyleDelete) {

        //remove the deleted object from your data source.

        //If your data source is an NSMutableArray, do this

        [devices removeObjectAtIndex:indexPath.row];

        [self.tableView reloadData]; // tell table to refresh now

    }
}
Here we can use the swipe to delete feature in it.
Once we are done adding it you can run the project, At this point, you can see the action by swiping the object to the left side.
Action Time
Run the build and start performing all the steps one by one:
- Check if the table view objects are seen in the first launch. If not, add the necessary code to it so that you can avoid the crash.
- Next, check the Button at the top of the screen. Whether you can add the objects to your array using a custom alert box.
- Now check if the swipe left to delete feature is running or not.
Check the snapshot here which have all the feature provided in this tutorial.
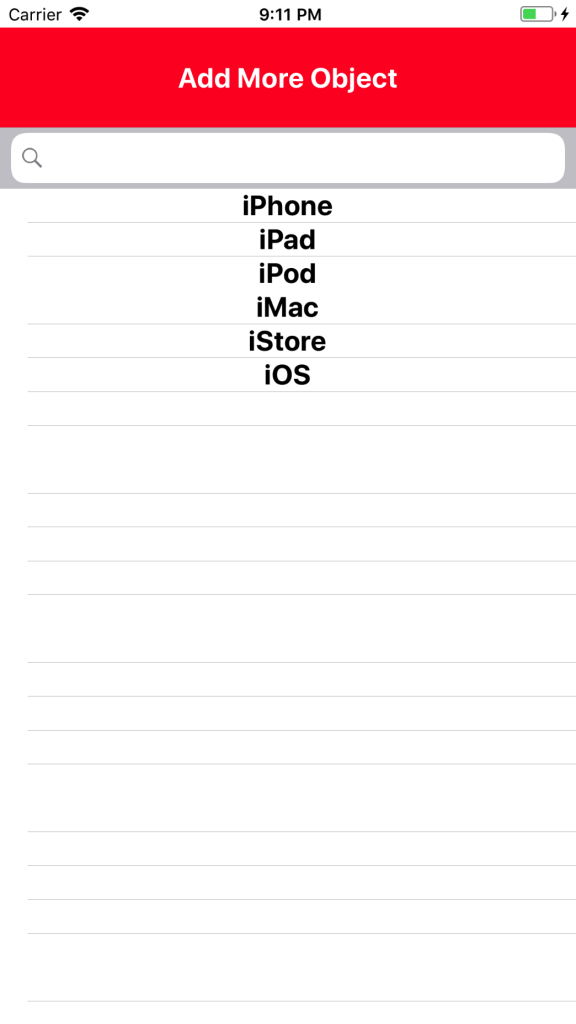
At this point, you can see the table view is loading all the objects in it as we have added earlier.
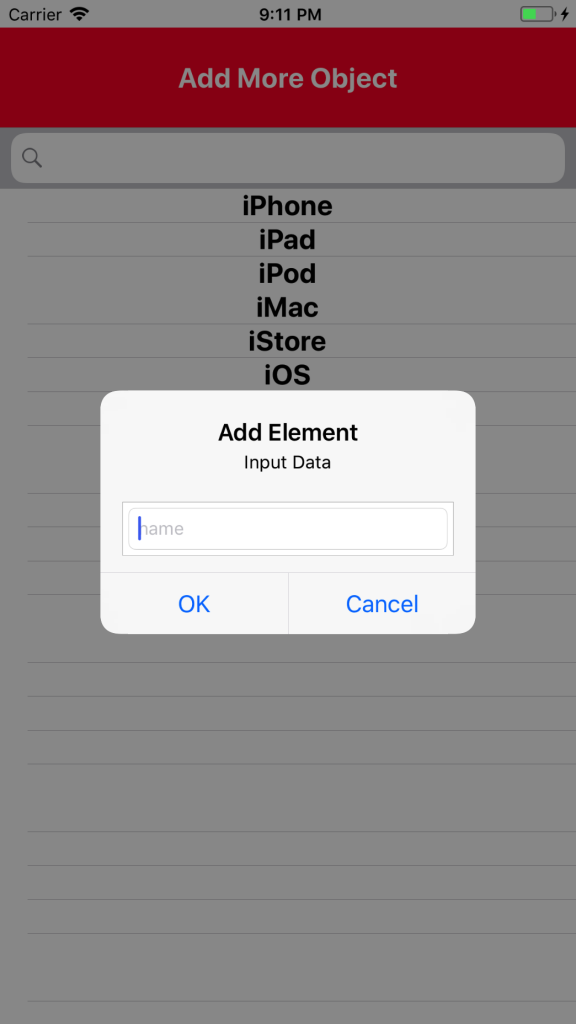
Here you can see that we have added a custom alert to add the new objects to our array.
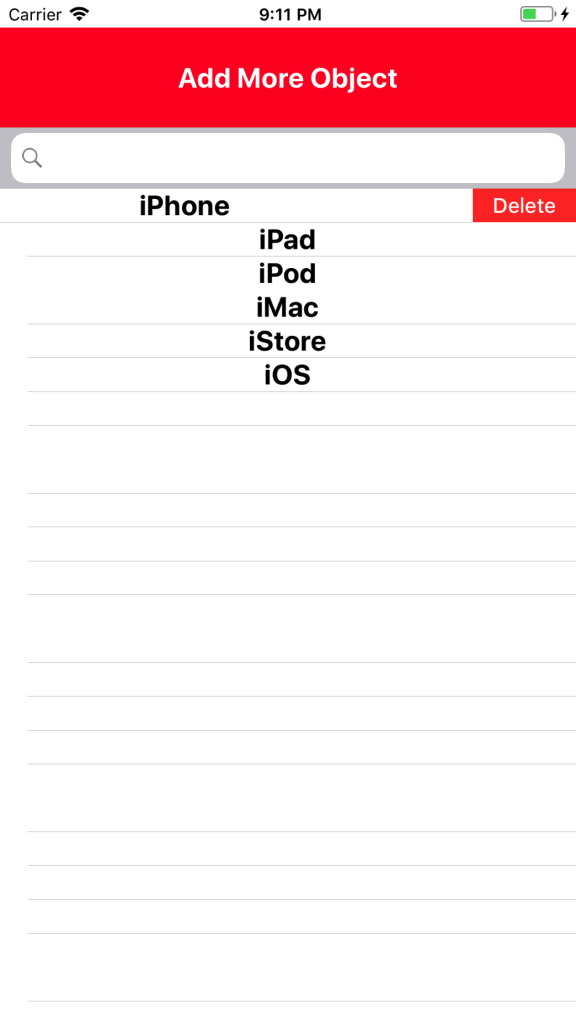
You can see that we have added the swipe to delete feature of iOS to our application.
Summary
I hope you will finally find this blog useful. If your answer is yes, then let me know whether you want more tutorials like this in the near future.
As you can see that we have implemented all the parts of the application successfully using the simple coding skills. So, till then keep working and keep learning..!!
- LinkedIn Scraper | LinkedIn Data Extractor Software Tool - February 22, 2021
- Is Web Scraping Legal? - February 15, 2021
- What Is Data Scraping? - February 10, 2021
Hi this is a very good article. However I’m trying to implement a ViewController to show the details of the item I have selected, and it will only show the details from the original array, not the filtered array. How do I do that?