Before start working on angular 4 we need to understand what is angular 4 and how to install that in our system, So I am starting from scratch
Jump to Section
Introduction
There are three major release of angular till now. Angular 1 which is known as AngularJS was followed by Angular 2 which came with lots of changes as compared with earlier version and now Angular 4 in the year 2017.
Some useful commands
-
{Reach in project folder} -cd FolderName -
{Start the npm services} -ng serve -
{Create a new project} -ng new "Porject Name" -
{Create a new component} -ng generate component "Component Name" -
{Create a service} -ng generate service "Service Name" -
npm install -g typescript (for installing the typescript globally in our system)
-
tsc --version (tsc stand for TYPE-SCRIPT COMPILER for checking the version of typescript)
-
mkdir FolderName (for creating folder)
What is a component?
A component in Angular is a class with the template and a decorator and a component is made up of basically three things which is given below:
- Template {which contains interface like HTML, directives and data binding.}
- Class {which contains methods and variables used in templates to bind data}
- Decorator adds meta data to a class making it an angular component.
@Component({
  selector: 'app-course',
  templateUrl: './course.component.html',
  styleUrls: ['./course.component.css']
})
export class exampleComponent implements OnInit {
firstName:string ="Ram" // variables
}
Template vs TemplateUrl
Angular2 Typescript allows us to write HTML code in multi-line under templates by using ` characters to enquote them and also given right us to write all multi-line HTML code into a separate .html file and its refer as templateUrl in a component.
Now next question come up in our mind is where should we use Template and where should we use TemplateUrl, So according to the expert of angular if HTML code is more then three lines then we have to use TemplateUrl and if HTML code is equal to or less then three lines then use Template.
.TS File (Template)
@Component({
 selector: 'app-student',
 template: `<ul>
               <li *ngFor="let stu of students">{{stu}}</li>
            </ul>`,
 styleUrls: ['./student.component.css']
})
.TS File (TemplateUrl)
@Component({
 selector: 'app-student',
 templateUrl: './student.component.html',
 styleUrls: ['./student.component.css']
})
Nested Component
Nested Component is a component within other components somehow like parent component and its child component. In given below example the bolded blue color app-employee is child component which is written under the app-course component and this is called Nested Component.
.TS File
import { Component, OnInit } from '@angular/core';
import { CoursesService } from '../courses.service';
@Component({
  selector: 'app-course',
  template: `<h2>{{title}}</h2>
              <ul>
                <li *ngFor="let cour of course">
                  {{cour}}
                </li>
              </ul>
              <app-employee></app-employee>`,
  styleUrls: ['./course.component.css']
})
export class CourseComponent implements OnInit {
  title='List of course';
  course;
  constructor(service:CoursesService) {
    this.course = service.getCourse();
  }
  ngOnInit() {  }
}
What is Angular Interpolation?
Interpolation markup with embedded expression is used by angular for data binding to text or attribute value.
There are three types of interpolation:
- One-way binding in which components to view template.
- One-way binding in which view template to components.
- Two-way binding in both component to view template & view template to component
What is Property Binding?
All though property binding and attribute binding do the same thing in most of the case to binding component class properties to the template but property binding is successful with only properties of HTML controls not with the structural part like the example given below in attribute binding.
What is Attribute Binding?
Interpolation and Property binding deal with binding component class properties to HTML elements properties but not Attribute, but not all HTML elements have corresponding properties. For example,
Colspan attribute does not have corresponding attribute property.
How to do Class Binding?
For Class Binding like in given screenshot below we have lots of classes to binding in control and also apply a single class separately, in these given SS two or more class are wrapped in a single variable called “classesToApply” in TS file along with on more variable called “isApply” where we store a Boolean type value (true/False), For applying other class separately. Here you can see “colorClass” is applied single alone and all other classes are applied in a single variable “classesToApply”.
.CSS File
.italicClass{
    font-style: italic;
}
.boldClass {
    font-weight: bold;
}
.colorClass{
    color: red;
}
.TS File
export class classesComponent implements OnInit {
  classesToApply: string="italicClass boldClass btn btn-danger btn-sm";
  isApply: boolean=true;
}
.HTML File
<button [class]='classesToApply' [class.colorClass]="isApply" [disabled]="isApply" >Click Me</button>
OR
There’s another way to achieve the same result.
.TS File
export class AttributeBindingComponent implements OnInit {
  applyBoldClass:boolean=true;
  applyItalicClass:boolean=true;

  addClasses(){
    let classes ={
      boldClass : this.applyBoldClass,
      italicClass : this.applyItalicClass,
      btn:true
    }
    return classes
.HTML File
<button class="btn btn-danger btn-xs pull-right" [ngClass]='addClasses()'>View More >></button>
What is Event Binding?
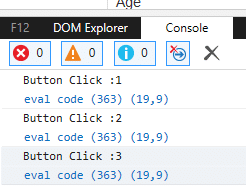
All topic described above is one-way data flow which is component to HTML but event binding is opposite of that where we notify or send we can send our data from HTML to the component. A small example is given below.
.TS File
export class EventBindingComponent implements OnInit {
  count:number = 0;
  OnClick()
  {
    this.count++;
    console.log("Button Click :"+this.count);
  }
}
.HTML File
<button (click)='OnClick()'>>>Click Me<<</button>
OR
.TS File
export class AttributeBindingComponent implements OnInit {
  tableHeader : string ="Student Detail";
  fristName : string = "Tom";
  lastName : string = "Hokins";
  gender : string = "Male";
  age : number = 23;
  isColspan: number =2;
  isShowDetail:boolean=true;
  onShowDetail(){
    this.isShowDetail= !this.isShowDetail;
  }
}
.HTML File
<table class="table table-responsive table-hover table-bordered table-striped">
  <thead>
    <th [attr.colspan]='isColspan'>
      {{tableHeader?tableHeader:"No Header"}}
    </th>
  </thead>
  <tbody>
    <tr>
      <td>FristName</td>
      <td>{{fristName}}</td>
    </tr>
    <tr>
        <td>LastName</td>
        <td>{{lastName}}</td>
    </tr>
    <tr *ngIf="isShowDetail">
        <td>Gender</td>
        <td>{{gender}}</td>
    </tr>
    <tr *ngIf="isShowDetail">
        <td>Age</td>
        <td>{{age}}</td>
     </tr>
     <tr>
      <td [attr.colspan]='isColspan'>
        <button class="btn btn-danger btn-xs pull-right" [ngClass]='addClasses()' (click)="onShowDetail()">{{isShowDetail? "Show": "Hide"}} Detail >></button>
      </td>
   </tr>
  </tbody>
</table>
Output Screen


Two-Way Binding
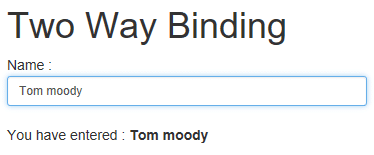
Till now we are binding our data in a kind of on way only in which we are binding component variables to our .HTML page but now we are going to do both side binding of data means component to template and vise versa template to component variables. Given below is a super simple example of two-way binding.
.TS File with HTML Code
import { Component, OnInit } from '@angular/core';
@Component({
  selector: 'app-two-way-binding',
  template: `<h1>Two Way Binding</h1>
              <p>Name : <input type="text" [(ngModel)]='name' /><br/>
              You have entered : {{name}}</p>`,
  styleUrls: ['./two-way-binding.component.css']
})
export class TwoWayBindingComponent implements OnInit {
  name:string="Tom";
  constructor() { }
  ngOnInit() { }
}
Output Screen

*ngFor Loop and *ngIf
This is structural directive of Angular, its generally used for iterating a list or an array. Following example we have taken a list of employee, also handle condition where the employee is empty or doesn’t exist with other directive ngIf.
.TS File
import { Component, OnInit } from '@angular/core';
@Component({
  selector: 'app-for-loop',
  templateUrl: './for-loop.component.html',
  styleUrls: ['./for-loop.component.css']
})
export class ForLoopComponent implements OnInit {
  employees:any[] =[
        {"name":"Shyam", "email":"[email protected]"},
        {"name":"Bob", "email":"[email protected]"},
        {"name":"Jai", "email":"[email protected]"}
    ] ;
  constructor() { }
  ngOnInit() {  }
}
.HMTL File
<h1>*ngFor Loop</h1>
<table class="table table-responsive table-hover table-bordered table-striped">
  <thead>
    <th>Name</th>
    <th>Email</th>
  </thead>
  <tbody>
    <tr *ngFor="let emp of employees">
      <td>{{emp.name}}</td>
      <td>{{emp.email}}</td>
    </tr>
    <tr *ngIf="!employees || employees.length == 0">
      <td colspan="2">No Employee Found</td>
    </tr>
  </tbody>
</table>
This Blog covered around 10-15 topics. Please feel free to comment your questions or queries below.
In my next blog, I’ll explain topics like ‘binding component class properties’, ‘observer’, ‘map’, and ‘subscribe’.
- What Is Big Data Visualization? - January 22, 2021
- Five Benefits of Big Data Analytics for E-commerce - July 9, 2020
- Google Data Studio Vs. Tableau: Which One is More Suitable for Your Business? - June 25, 2020

